

| Attention Before you read this post, I highly recommend you check out my resources page for access to the tools and services I use to not only maintain my system but also fix all my computer errors, by clicking here! |
Let me paint this scenario for you: Turning on your computer, you go to Windows Update Center and realise that all your updates have fail consistently, with the error code 0x80070652. While using your Windows based operating system, you receive a notification referring to the installation of a specific update; it starts but fails due to whatever random reason. You shut your computer down for the night, then turn it on in the morning and receive another notification stating that it’s “Restoring the previous version of Windows”. So you take it upon yourself to check out which specific update(s) are failing to install, and visit the official Microsoft website and download the update manually. You run the setup; it runs through the installation process only for it to fail towards the end.
If you find yourself in this particular situation, then you’re not alone. Error 0x80070652 essentially means that another installation is already in progress. The computer will thus request you complete that initial installation before commencing your current one.
Having many different Windows Installer processes running at the same time, can cause confusion for the operating system. Windows was not designed to run multiple Windows Installer procedures at the same time. Receiving error 0x80070652 initially means you are required to close any additional installations that you have running. This could be a setup file running in the background via Windows Task Manager, unbeknownst to you. Looking out for any Windows Processes with the name setup.msi or setup.exe is a good place to start when attempting to alleviate this conflict.
What Causes Error 80070652?
Now that I have written briefly on what error 0x80070652 is the next question you’ll probably want answered is the reason why this particular error occurs, what causes it to happen. Well there are several different things, the most common being the following:
- Slow internet connectivity.
- Location where temporary internet files are saved contains a malicious file.
- Missing or damaged DLL files.
- Hardware drivers are outdated.
- Corrupted Windows registry.
Common Error Messages
For the end users that encounter this error, it can typically manifest itself in a number of different ways, depending on the scenario that you encounter it in. Anyway, below is a rundown of all the various associated error messages:
Error 0x80070652
ERROR_INSTALL_ALREADY_RUNNING
Windows was unable to search for new updates. An error occurred while checking for new update for your computer.
Some updates were not installed. Failed: XX updates.
Error Code: 80070652 during update on Windows 8 Professional – Version X.X (Build XXXX).
The module Error_install_already_running was loaded but entry-point DllRegisterServer was not found. Make sure Error_install_already_running is a valid OCX or DLL file then try again.
A problem has been detected and Windows will be shut down to prevent damage to your computer.
How to Fix 0x80070652 Errors
Error 0x80070652 means a previous installation was carried out unsuccessfully. In many cases, this can be fixed by a simple system restart. However, if this fails to fix the problem, then there are several things that you can do to effectively tackle, this fairly common occurrence, even for the latest Windows operating systems.
So continue reading for those solutions.
Run a Registry Scan
The main reason why this error may be occurring is because of corruption within the registry. A virus or malicious file is capable of corrupting this very important area of the computer. Unfortunately, virus scanners are not designed to repair this area of your computer; this is where registry cleaners come into the equation.
If you don’t know what the registry is, it’s basically the central database of the computer, used to store important hardware and software configuration settings. To fix any damaged caused within this location of your computer, I recommend you run a full scan of Advanced System Repair Pro, which is one of the very best registry cleaner tools, designed specifically for this task.
Anyway, you can download Advanced System Repair Pro from the following link:
CLICK HERE TO CHECK OUT ADVANCED SYSTEM REPAIR PRO
Run a Virus Scan
Once a malicious file gets onto your computer, it is capable of corrupting important system files, rendering Windows components inoperable. In the event that a virus is to blame for this problem, I recommend you run a full scan of SpyHunter.
The reason why I recommend you use SpyHunter is because it’s a highly proficient tool, capable of removing, adware, spyware, malware and various other system infractions. It’s also capable of repairing previously damaged components (writing from personal experience).
You can download this powerful tool from the following link:
CLICK HERE TO CHECK OUT SPYHUNTER
 The solution(s) below are for ADVANCED level computer users. If you are a beginner to intermediate computer user, I highly recommend you use the automated tool(s) above! The solution(s) below are for ADVANCED level computer users. If you are a beginner to intermediate computer user, I highly recommend you use the automated tool(s) above! |
Install Update Manually
Although something I previously touched on, for many individuals, manually installing an update is something that escapes them or at the very most, is beyond their knowledge base. It’s not a foregone conclusion, in many instances a manual install is all that is required to get that important update on your system. Anyway, to do that, simply do the following:
1. First, boot into your computer with full administrative rights.
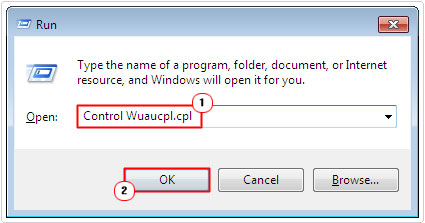
2. Then press  + R, type Control Wuaucpl.cpl and click on OK.
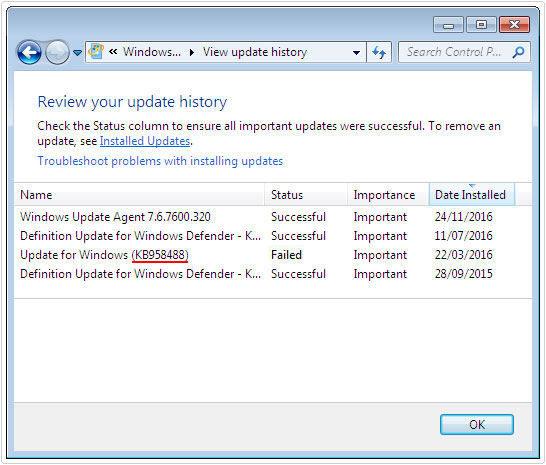
3. When Windows Update loads up, click on View update history.

4. This will take you to the View update history screen; from here you will be given a list of updates that were successfully or unsuccessfully installed on your computer. By double clicking on the updates that failed to install, you will be given additional information on that update; simply jot down the name(s) of the updates that failed.
5. Then load up your web browser and run a search for that particular update. You’ll want to run the search on the KB article number; this will ensure you download the correct update.

6. Once you have located the update, you’ll need to download it to your computer before installing it on your computer.
Note: Make sure you download the update from the official Microsoft website.
Use Windows Installer Cleanup Utility
For Windows XP users, you can fix this error by using the cleanup utility, a tool that has since been discontinued.
1. Simply download Windows Installer Cleanup Utility.
Note: Windows Installer Cleanup Utility is no longer available to download from Microsoft’s official website, which means you will need to download it from a third-party download site. Make sure the site you do choose to download the utility from, is reputable.
2. Once you’ve installed the utility and have it up and running, simply use it to successfully remove any remnants of the failed update from your computer.
3. Then, use steps 6 – 7 of Install Update Manually.
Run System File Checker
If the operating system fails to install the update after you manually downloaded and ran the setup on your computer, then you may want to try running system file checker. This tool is designed to scan, detect and repair or replace previously damaged or deleted system files. In your particular situation, there is a good chance that a system file may have been corrupted, thus the only way to fix it will be to either, reinstall Windows or use this tool. Fortunately, using this tool is fairly simple, just do the following:
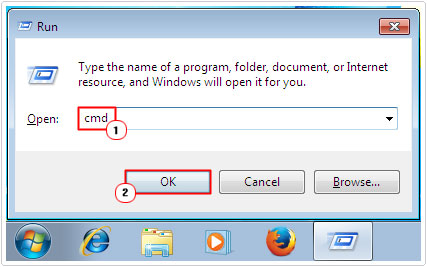
1. First, boot into your computer with full administrative rights.
2. Then press + R, type cmd and click on OK.
3. Once Command Prompt loads up, type sfc /scannow and press Enter.
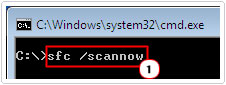
Note: System file checker will start scanning your system files, during this process; you may be required to insert your Windows CD into your CD ROM drive; however this depends on whether or not Windows cache files are present on your computer.
Run System Restore
If all the methods leading up to this one were unable to repair error 0x80070652, then you may want to try using Windows System Restore.
System Restore is a tool designed to set your system back to a previous state. The idea is that you set your system back to a period before you were having problems with Windows Update. Whether or not you’ll be able to do this, will depend greatly on the number of restore points you have on your computer and just how far they go back.
That said, for step by step instructions on how to use this tool, I suggest you check out my post on fixing error code 800b0100.
Are you looking for a way to repair all the errors on your computer?

If the answer is Yes, then I highly recommend you check out Advanced System Repair Pro.
Which is the leading registry cleaner program online that is able to cure your system from a number of different ailments such as Windows Installer Errors, Runtime Errors, Malicious Software, Spyware, System Freezing, Active Malware, Blue Screen of Death Errors, Rundll Errors, Slow Erratic Computer Performance, ActiveX Errors and much more. Click here to check it out NOW!