

| Attention Before you read this post, I highly recommend you check out my resources page for access to the tools and services I use to not only maintain my system but also fix all my computer errors, by clicking here! |
Updating your operating system is extremely important as it provides much needed security enhancements which are vital for safeguarding ones system from potential hackers and viruses. The STOP 0x8024402c error is just one of many Windows Update related issues.
This particular error occurs when attempting to use Windows Update, and is typically caused by the systems inability to determine the appropriate internet connection settings to use to connect to the Microsoft Update server. Although such an error may appear somewhat menial, it can in many instances trigger a BSOD (Blue Screen of Death) reaction. However, despite all of that, there are ways that you can combat it, all of which I will discuss in this post.
What Causes STOP 0x8024402c Error?
When attempting to use Windows Update to update your system, you receive the following error message:
STOP: 0x8024402c
The systems inability to connect to the Windows Update server may be triggered by one or more of the following reasons:
- Proxy override settings have an incorrect character in it.
- The Windows registry is corrupted.
- The Automatic Update feature is functioning incorrectly due to attempts to connect to the Update server via VPN.
- An incorrectly configured Firewall program is blocking access to the Update server.
One of the quickest ways of solving this 0x8024402c error is to enable the automatically detect settings option, which in many instances has proven sufficient in allowing the computer to establish a successful connection with the Update server.
With that said, there are many more methods that one can adopt to sufficiently rectify this error, all of which I have outlined below.
How to Fix It
When it comes to resolving the STOP 0x8024402c error, there are several things that you can do. Certain solutions tend to be more successful than others, but ultimately, this error could be caused by a multitude of things. Fortunately, I have provided you with a number of potentially working solutions.
Run a Registry Scan
The registry is basically the main database for the operating system, it is used to store the most important settings and files that the operating system requires for smooth functionality. Despite the registry being the most vital area of the computer, it is still highly susceptible to errors, including the 0x8024402c error
The main issue is that because the registry is constantly being used by the operating system to carry out specific functions, whether it is to execute a program or to store a password, it’s not uncommon for certain entries to become corrupted. A corrupted registry does not only slow the system down but also causes a plethora of computer errors to manifest. To ensure that the 0x8024402c error is not being caused by a corrupted registry, you will need to use a registry cleaner tool like Advanced System Repair Pro to scan, detect and remove any corrupt or invalid entries from your registry.
Advanced System Repair Pro is a multifaceted tool, designed to not only clean your registry but also optimise your system. It’s recommended that you download, install and scheduled this tool to run regularly on your system, as it will ensure your computer does not develop any additional registry related problems in the future. Anyway, you can acquire this powerful tool from the following link:
CLICK HERE TO CHECK OUT ADVANCED SYSTEM REPAIR PRO
 The solution(s) below are for ADVANCED level computer users. If you are a beginner to intermediate computer user, I highly recommend you use the automated tool(s) above! The solution(s) below are for ADVANCED level computer users. If you are a beginner to intermediate computer user, I highly recommend you use the automated tool(s) above! |
Enable Automatically Detect Settings
In many cases, the STOP 0x8024402c error is typically the result of the operating system being confused as to what method it should use to connect to the internet. In order to ensure that this isn’t the cause of the 0x8024402c error on your system, you will need to enable the automatically detect settings option in Internet Explorer. To do this, simply do the following:
1. First, boot into your computer with full administrative rights.
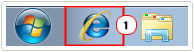
2. Once in, open up Internet Explorer, by clicking on its desktop Icon.
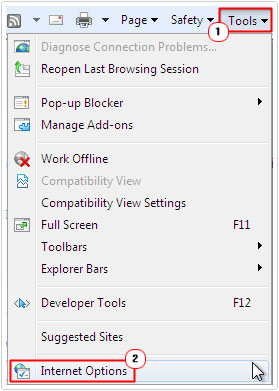
3. Once Internet Explorer has loaded up, click on Tools -> Internet Options.
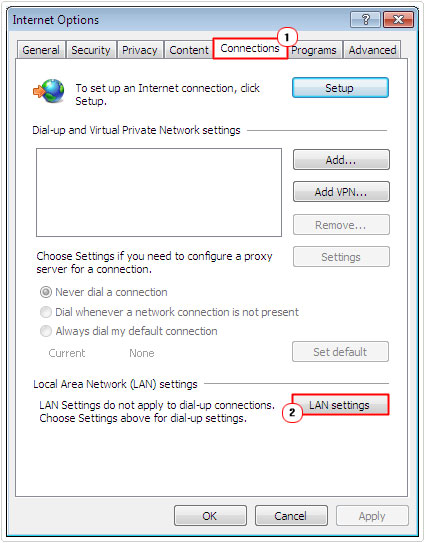
4. An Internet Options applet should appear, click on the Connections Tab, and then click on the LAN Settings button.
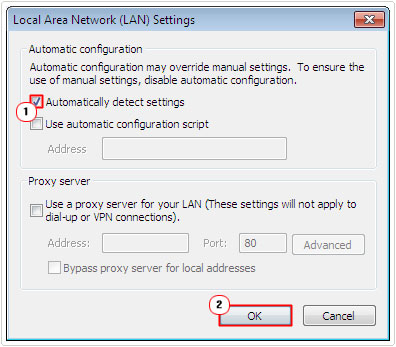
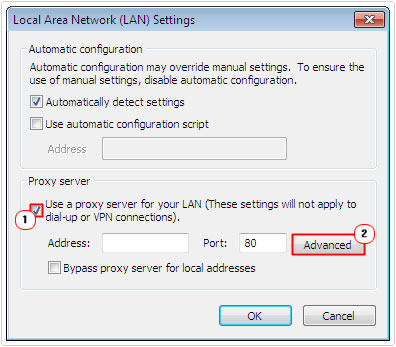
5. The Local Area Network (LAN) Settings applet should load up, from here check the box next to automatically detect settings and click on OK.
By enabling this feature this will allow Internet Explorer to automatically detect your internet settings, which should eliminated any connection mishaps that is causing the Windows Update service to fail.
Check the Proxy Exception List
The proxy server is basically a server which acts as a middleman between two communicating systems, in this particular situation, your computer and the World Wide Web. If your proxy exception list has too many characters in it, it can confuse the system, causing it to fluctuate between the various servers. Thus, it’s very important that the proxy settings are in order. To remove any unnecessary characters from your proxy, simply do the following:
1. First, load up Internet Options by following steps 1 – 4 of Enable Automatically Detect Settings.
2. From the Local Area Network (LAN) Settings applet, click on Use a proxy server for your LAN, then click on the advanced button.
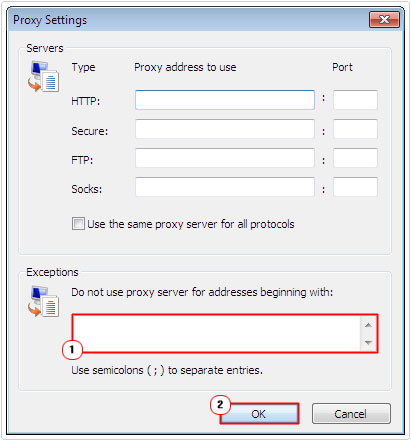
3. This will take you to the Proxy Settings applet, from here, delete any entries you find in the Exceptions section, and then click on OK and close Internet Explorer.
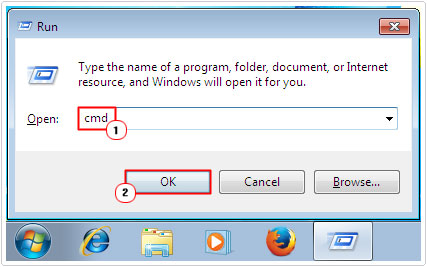
4. Once you’ve done that, open Command Prompt by clicking on Start -> Type cmd (into the Search programs and files box) and Press CTRL + Shift + Enter, then click on Yes [Windows 8/8.1/10: right click on Start and click on Command Prompt (Admin)].
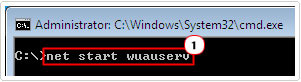
5. Once Command Prompt loads up, type net stop wuauserv then press Enter.
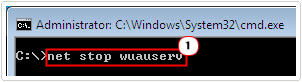
6. Once the Service has been stopped, type net start wuauserv and press Enter.
Note: Alternatively, you can restart the Windows Update services by following the instructions on my post on Windows error 0x80190194.
If you follow this method correctly, it should clean your proxy settings allowing your system to establish a successful connection with the Windows Update server.
Additionally, if you feel you lack the required expertise to carry out the above instructions, then you can use Microsoft automated fix it program. It will basically do everything that has been described above for you.
Anyway, you can download and install this tool from the following link: http://www.mediafire.com/download/xeuh4jx1pi39w8o/MicrosoftEasyFix50573.msi
Update Your Firewall
If you have a firewall program running on your computer, then you may want to update or reconfigure it to allow your system access to Microsoft’s Update server.
The instructions on how to do this will vary from firewall program to firewall program. However, ultimately, what you’ll want to do is add the following URLs to your exception list:
http://*.windowsupdate.microsoft.com
https://*.windowsupdate.microsoft.com
http://download.windowsupdate.com
For help on how to do this, I recommend you refer to your applications documentation or contact the developer.
Add to Trusted Sites
Another method that has proven quite effective at fixing STOP 0x8024402c error involves adding the Microsoft Update server URLs to your trusted sites security settings. In order to do this, simply do the following:
1. First, boot into your computer and access Internet Options by following steps 1 – 3 of Enable Automatically Detect Settings.
2. Once Internet Options loads up, click on the Security Tab, then click on the Trusted sites Icon, then click on Sites.

3. A Trusted sites applet should appear, simply add the following URLs one by one, by clicking on the Add button:
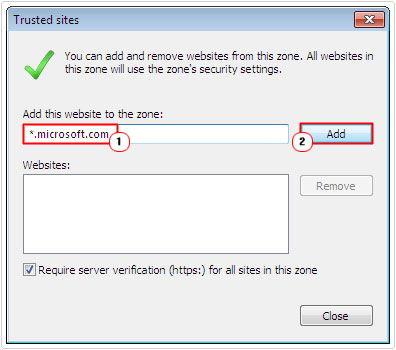
*.microsoft.com
*.download.microsoft.com
*.windowsupdate.com
*.windowsupdate.microsoft.com
v5.windowsupdate.microsoft.com
windowsupdate.microsoft.com
4. Once you’ve done that, try updating your system again.
Restart Your Router
Your systems inability to establish a successful connection with the Windows Update server could be the result of a faulty connection with your ISP. Thus, you may want to consider restarting your router so that it can re-establish a connection with your ISP.
To do this, simply unplug the router for 10 seconds, then plug it back in and wait for it to reconnect. The colours on the front of the device should tell you when it has successfully established a connection.
Lastly, try and use Windows Update again.
Are you looking for a way to repair all the errors on your computer?

If the answer is Yes, then I highly recommend you check out Advanced System Repair Pro.
Which is the leading registry cleaner program online that is able to cure your system from a number of different ailments such as Windows Installer Errors, Runtime Errors, Malicious Software, Spyware, System Freezing, Active Malware, Blue Screen of Death Errors, Rundll Errors, Slow Erratic Computer Performance, ActiveX Errors and much more. Click here to check it out NOW!