| Attention Before you read this post, I highly recommend you check out my resources page for access to the tools and services I use to not only maintain my system but also fix all my computer errors, by clicking here! |
Though you may be oblivious to it, shortcuts have established themselves as an essential aspect of our computer experience. Program shortcuts appear in your start menu and on your desktop and are usually accompanied by small graphical icons. The purpose of these shortcuts is to enhance your overall experience of using the computer, by making those applications and files you use most frequently, far more accessible. Shortcuts to programs and folders, should be regularly checked to ensure they work and also for optimisation purposes. This especially reigns true when it comes to conserving system memory, as traces of an application can be left behind after being uninstalled, making it your prerogative to find and remove those files that are no longer of use to you. If you’re having trouble with broken shortcuts, then you’ve come to the right post, where I will teach you how to locate and repair them.
Broken shortcuts are a fairly common occurrence. If you’re on this page, then it’s something that you’re currently faced with, you probably discovered it when you were trying to open a folder or an application through a shortcut that you frequently use; a very annoying and forgettable issue for all Windows users. The purpose of a shortcut is to simplify your Windows experience and a broken shortcut only adds to create complications. As an alternative, you could manually go to the directory of that specific folder or application to access it, but eventually you going to want to repair the shortcut. Despite their non-functioning nature, broken shortcuts still consume system memory, in addition to that odd situation where the broken shortcut prohibits you from deleting and/or moving it.
A broken shortcut is typically the result of a shortcut no longer pointing to the correct folder or application file. This may be the result of an application file or folder being moved or deleted. A considerable amount of conflicts within your systems registry is also capable of causing a shortcut to malfunction. Windows updates are another component capable of breaking shortcuts, something that is all too common. Whatever the cause of your problem, fixing them is a priority. Continue reading for a tutorial on how to best remedy a broken shortcut on your system.
The Main Causes of Broken Shortcuts
- A failed uninstallation. When you attempt to uninstall an application that you no longer want, traces of the application remain behind, such as shortcut icons, registry entries and program folders.
- Orphaned files lingering in your system. Your hard drive may contain a number of these files along with their shortcuts. Although this may not have any visible impact on your system, the files and the shortcuts to them exist within your system.
- Registry conflicts; which are the result of you going through the installation process of an application, which entails the creation of system icons, shortcuts, registry entries and files. Then manually removing the application, by deleting the programs folder, and installing it again in a different directory path, causing a conflict within the registry, as the initial shortcut points to the previous location of the executable file.
To address this problem, there are a number of things that you can do, they are as follows.
Reinstall the Application
The fasted and probably easiest solution to a broken shortcut is to reinstall the program at fault, that’s assuming the shortcut is to an application, and not a file or folder. In order to carry out this task, simple do the following:
Note: The easiest and most efficient way of uninstalling an application is through the use of an uninstallation tool like Express Uninstaller. Such tools are capable of not only removing an application through the InstallShield but also by scanning the registry and operating system for remaining fragments of that program. Anyway, you can pick this tool up here:
CLICK HERE TO CHECK OUT EXPRESS UNINSTALLER
1. First, ensuring you have logged into your computer with administrative rights.
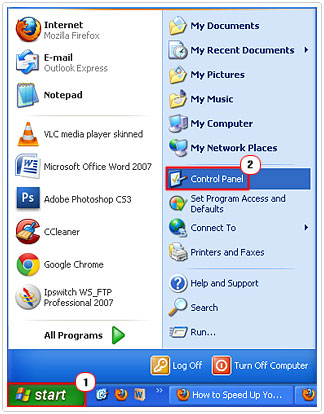
2. Click on Start -> Control Panel.
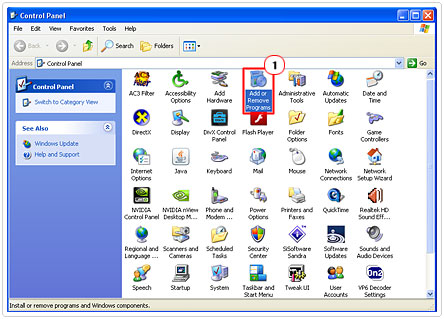
3. Once Control Panel loads up, double click on Add or Remove Programs. [Windows Vista/7: Uninstall a program]
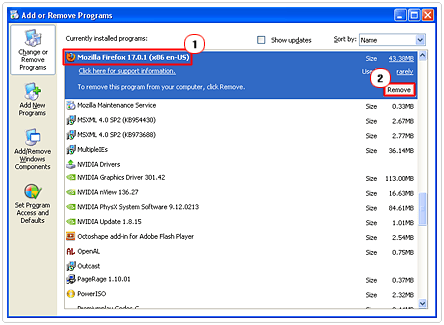
4. Then locate the application at fault, and click on Remove. [Windows Vista/7: Uninstall]
5. Once the application has been removed, restart your computer. Then reinstall the application.
Note: Depending on the application, the installer applet may give you the option to run a repair reinstallation. Using this option is a fast track method to remedying the broken shortcut.
Repair or Recreate the Shortcut
Reinstalling the application in question works almost all the time. However, in the event that you do not or are unable to reinstall the application, you should considering repairing or recreating your broken shortcuts.
Of the two options, recreation of the shortcut is what you might want to try first. This process entails navigating to the directory path of the application/folder and manually creating a shortcut of the main executable file or folder, then dragging it to your desktop. To do this, simply do the following.
1. First, right click on the Start button and click on Explore.
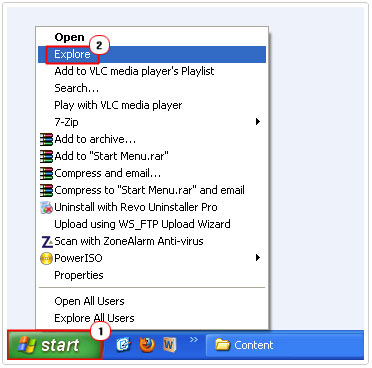
2. This will load up Windows Explorer; from here you’ll want to navigate to the directory of the file or folder in question.
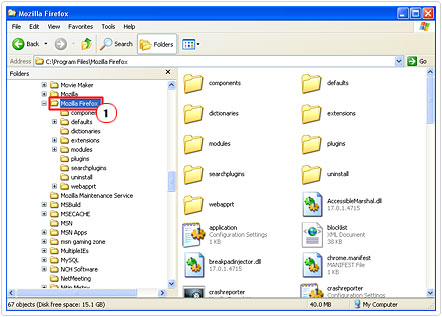
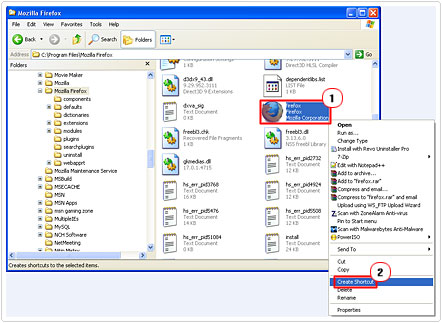
3. Then right click on the file/folder and select Create Shortcut. This will create a new shortcut within the same directory as the file/folder.
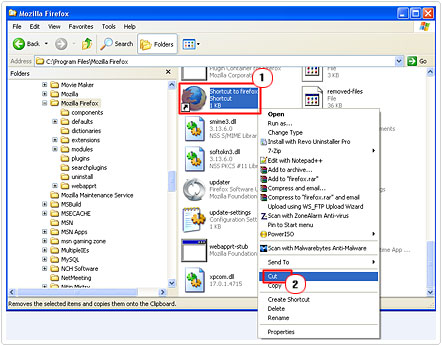
4. From here, you’ll want to Cut the shortcut file from its present location.
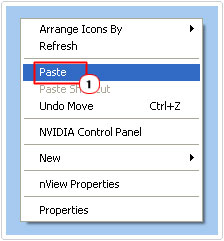
5. Then Paste it to the desktop.
To repair a shortcut, you’ll want to do the following.
1. Follow the previous steps 1 – 2.
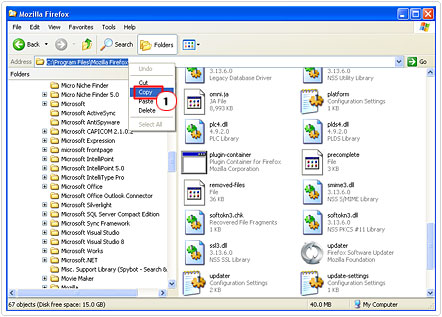
2. Once you’ve located the file/folder, right click on the path in the Address bar and click on Copy.
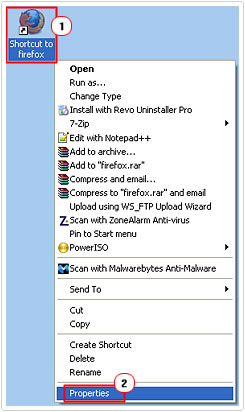
3. Then go to the icon on your desktop and right click on it and select Properties.
4. Then paste the directory path into the Target: area, and click on Apply and OK.
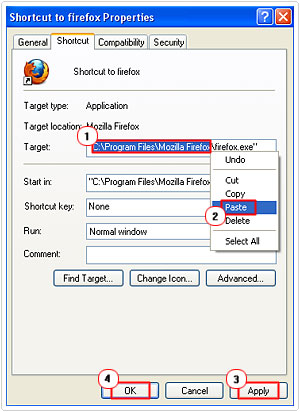
Note: Be sure to keep the ” “ around the path and the executable file at the end. The executable file is present solely for applications and not folders.
Automated Solution
If none of the methods mentioned above worked for you, then your broken shortcut may be due to errors within your registry. Because of the complexity of your registry and the fact that each individual program and folder shortcut is represented by a unique entry within the registry, it’d be impractical for me to go through all the different possibilities. Instead, your best option would be to use Shortcutsman, which is a freeware tool designed for fixing shortcuts. This tool will display all the shortcuts on your computer, indicating to you whether the shortcuts are working or are broken, and then presenting you with the option to fix them.
This tool works on both 32-bit and 64-bit operating systems, which is another plus when attempting to fix broken shortcuts on your system.
Using Shortcut Manager
Shortcutsman is a standalone executable file, which means you don’t have to install it. Simple download the zip file to your desktop from here: http://www.nirsoft.net/utils/shman.html
Then Extract the contents to a folder and double click on shman.exe.
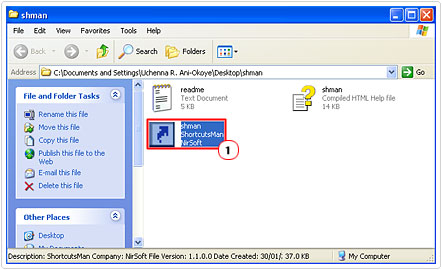
1. Once you’ve executed the program, it will quickly scan your computer and present you with a list of all the shortcuts on your computer, indicating to the ones that are functional and those that are broken.
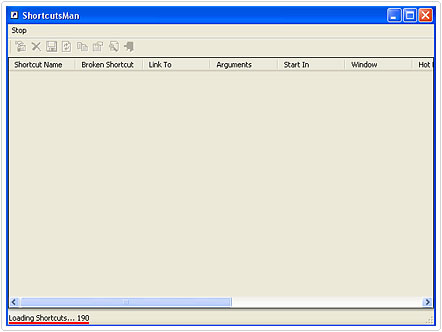
2. From here, you can select as many broken shortcuts as you want by ticking the boxes next to them, and then you can resolve them, by clicking on File -> Resolve Selected Shortcuts.
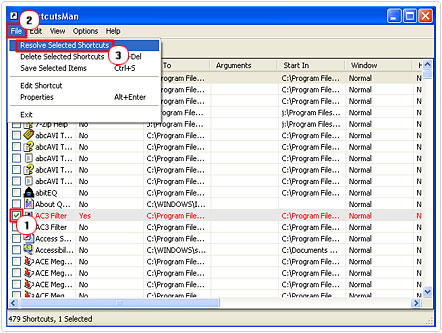
3. A dialog applet will then pop up asking you Do you want to resolve the selected shortcuts, select Yes.
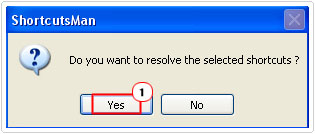
The program will then attempt to resolve the shortcut by scanning your system for the original file or folder that the shortcut linked to.
4. If the program is unable to resolve the broken shortcut(s), then you should delete them by clicking on File -> Delete Selected Shortcuts.
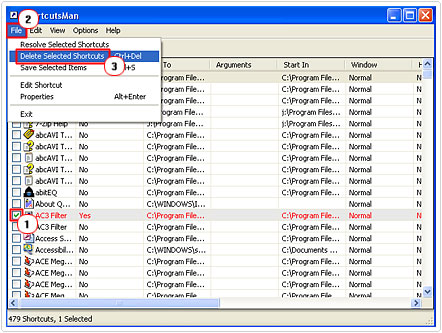
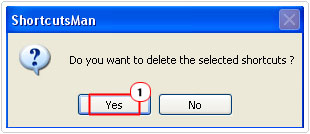
5. The dialog applet Do you want to delete the selected shortcuts will pop up, select Yes.
Once you get the hang of how to use this tool, it can prove to be very useful for cleaning up broken shortcuts. Having the capabilities to display all of the shortcuts present on your system within a single dialog box is its main advantage, as it saves you a great deal of time.
Are you looking for a way to repair all the errors on your computer?

If the answer is Yes, then I highly recommend you check out Advanced System Repair Pro.
Which is the leading registry cleaner program online that is able to cure your system from a number of different ailments such as Windows Installer Errors, Runtime Errors, Malicious Software, Spyware, System Freezing, Active Malware, Blue Screen of Death Errors, Rundll Errors, Slow Erratic Computer Performance, ActiveX Errors and much more. Click here to check it out NOW!

