

| Attention Before you read this post, I highly recommend you check out my resources page for access to the tools and services I use to not only maintain my system but also fix all my computer errors, by clicking here! |
Cmicnfg.Cpl is a file that belongs to the Windows Control Panel component, used for loading specific Windows configuration settings. Cmicnfg.Cpl errors are triggered by the installation and uninstallation of a failed C-Media WDM Audio driver update; an update which may have led to the audio no longer working; the result of a failed update, as the old files and registry entries are left behind, when the end user attempts to undo the previous damage.
Is Cmicnfg.Cpl a Safe File?
For the most part, cmicnfg.cpl is not known to pose any real risk to your system, so you needn’t worry about its presence or any errors that may or may not be linked to it.
What Causes Cmicnfg.Cpl Errors?
When the end user attempts to update their C-Media WDM Audio Driver, they may lose the ability to hear audio altogether. In typical fashion, the end user may attempt to uninstall the recently installed update, this uninstall may fail to remove all of the related registry entries and files from the system.
As a result, when the computer restarts, it may attempt to load the cmicnfg.cpl file, which is the Control Panel component for the C-Media WDM Audio Driver, and because the component has already been removed (or at least, most of it), the computer will read error.
When it comes to repairing this error, clearing out old settings data left behind from the C-Media install, is probably one of your better options. Reinstalling the drivers is another.
How to Fix It
Below I have outlined a number of solutions that you can use when attempting to fix this error. Ultimately, the solution you attempt should reflect your level of expertise.
Run a Registry Scan
Once you have uninstalled the C-Media Audio Driver Update, specific files and settings data will have been left behind, primarily in the registry area of the Windows operating system. Not many people are aware of the registry and its importance to your system. The registry is basically a database system, and is the most vital area of Windows.
The unfortunate thing is that, the error is typically caused by the uninstallation of the C-Media update, as the update itself is not properly removed – invalid registry data is left behind. This is where a professional registry cleaner tool like Advanced System Repair Pro comes most in handy, as a tool designed to scan, detect and remove invalid entries within the registry, thus rectifying the cause of this error.
With that said, you can acquire this powerful tool from the link below:
CLICK HERE TO CHECK OUT ADVANCED SYSTEM REPAIR PRO
 The solution(s) below are for ADVANCED level computer users. If you are a beginner to intermediate computer user, I highly recommend you use the automated tool(s) above! The solution(s) below are for ADVANCED level computer users. If you are a beginner to intermediate computer user, I highly recommend you use the automated tool(s) above! |
Reinstall Original C-Media Audio Drivers
If you’re system is bogged down with cmicnfg.cpl file errors, then you may want to consider reinstalling the original audio drivers. Essentially, you’ll want to remove the old drivers and download and install a more up-to-date version of them.
You will need to check the official website to see whether or not there are any later versions of the driver set. File errors are typically caused by the corruption of more than one file, which is why, restoring just a single file, in many cases, just won’t cut it.
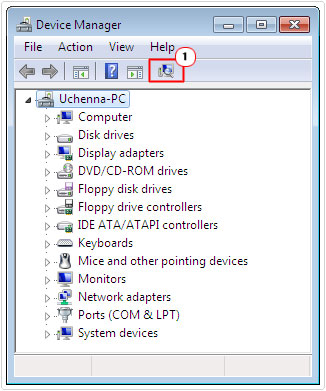
The first thing you’ll need to do is uninstall the drivers for the device through Device Manager.
For step by step instructions on how to uninstall a component through Device Manager, I suggest you check out my post on repairing Windows error code 0x800706BE.
Once you have successfully removed the device, you will need to reinstall the device but without the official drivers. In order to do that, just click on Scan for Hardware Changes icon.
The operating system will then scan the entire system for any available Plug and Play devices. If done correctly, it should find your Sound Card and install it using generic Audio drivers, and not the official C-Media WMD Audio Drivers you previously removed.
Once that’s done, you will need to download up-to-date drivers from the official website. As I previously mentioned, make sure you carry out this procedure first, before uninstalling anything; just in case.
You should be able to find the most recent drivers for your device here: https://www.cmedia.com.tw/support/download_center
Manual Registry Edit
This is a method that you should attempt, only if you have the required expertise level (Intermediate to Advanced User) and the confidence to carry it out. Remember, any mistakes here can render your system inoperable.
With that said, you can carry out this registry tweak by doing the following:
1. First, boot into your computer with full administrative rights.
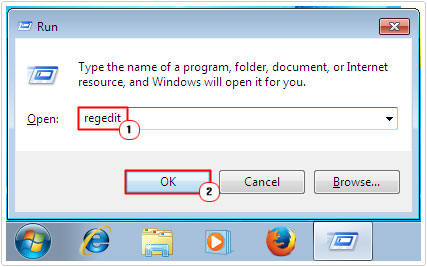
2. Then press  + R, type regedit and click on OK.
3. Once Registry Editor loads up, navigate to the following path:
HKEY_LOCAL_MACHINE\Software\Microsoft\Windows\CurrentVersion\Run
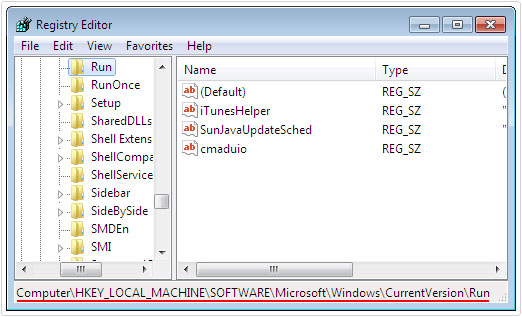
4. Once there, on the right pane, right click on cmaduio and select Delete.
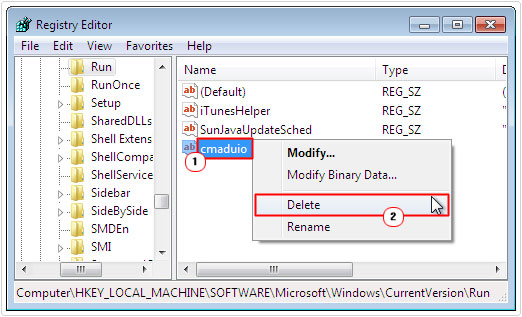
Note: Removing the cmadio registry string will prevent the cmicnfg.cpl error from appearing during system startup. However, the error will still persist, despite the error message no longer appearing. So keep that in mind.
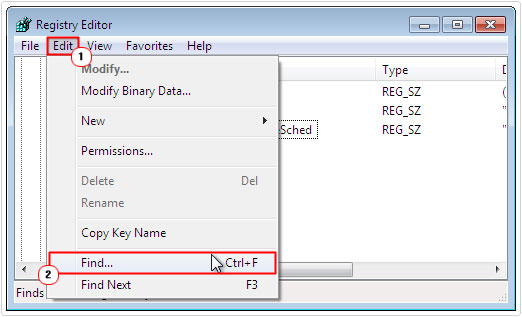
5. The next step is to click on Edit -> Find, then carry out a search on all things related to cmaudio and C-Media, and delete everything.
Note: Be careful not to delete any important registry entries, as it will impair your operating system.
6. Lastly, navigate to the following path:
HKEY_LOCAL_MACHINE\SOFTWARE\Microsoft\Windows\CurrentVersion\Control Panel\Cpls
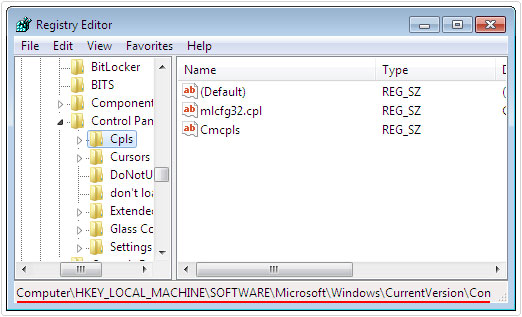
7. Once there, delete the Cmcpls string, by right clicking on it and selecting Delete.
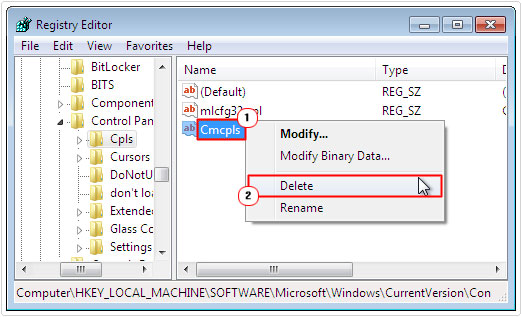
Note: This will remove the WDM Audio Driver Icon from the Control Panel.
It’s probably best that you create a backup of the registry before you carry out any of these procedures, or you can just use Advanced System Repair Pro, which carries with it, no risk.
Manual Driver Removal
If you opted to manually remove the driver’s entries from the registry, the last step you’ll need to follow, before carrying out any reinstallation, is the full removal of all program files. To do this, you will need to do the following:
1. First, boot into your computer with full administrative rights.
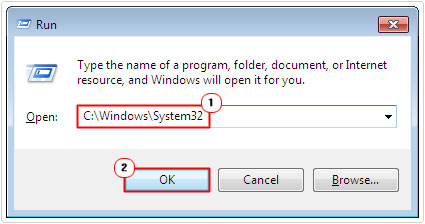
2. Then press + R, type C:\Windows\System32 and click on OK.
3. Once the System32 folder opens, locate and delete the following files:
cmirmdrv.exe
cmirmdrv.dll
cmuda.dll
cmicnfg.cpl
C:\WINDOWS\System32\Drivers\cmuda.dll
C:\WINDOWS\System32\LastGood\cmicnfg.cpl
4. You will also need to delete any associated files present within any Windows temp folders. There are many programs you can use to do this, but I personally recommend you use Ccleaner, as it’s free and easy to use.
5. Once completed, you can now reinstall the drivers.
Run System Restore
If the cmicnfg.cpl error is a recent occurrence, then the recommended solution is the reinstallation of any and all associated programs. In the event that this does not work, you have the option of restoring your system back to an earlier state.
System Restore allows you to roll your systems files and settings back to an earlier state. This action has proven to be pretty effective at fixing a plethora of computer issues, such as poor system performance, software errors, driver issues, and poses no real risk to your personal data, like music, documents and picture files.
However, it is likely to erase any previously configured drivers or settings data. For step by step instructions on how to use this tool, I suggest you visit my post on Windows System Restore.
Are you looking for a way to repair all the errors on your computer?

If the answer is Yes, then I highly recommend you check out Advanced System Repair Pro.
Which is the leading registry cleaner program online that is able to cure your system from a number of different ailments such as Windows Installer Errors, Runtime Errors, Malicious Software, Spyware, System Freezing, Active Malware, Blue Screen of Death Errors, Rundll Errors, Slow Erratic Computer Performance, ActiveX Errors and much more. Click here to check it out NOW!