

| Attention Before you read this post, I highly recommend you check out my resources page for access to the tools and services I use to not only maintain my system but also fix all my computer errors, by clicking here! |
In this post I’ll be talking about the data error cyclic redundancy check, what is it, why it was created, and what to do when you encounter one of these errors.
Cyclic Redundancy Check or CRC is basically a method developed to ensure that data does not become corrupted during transmission. This particular cyclic code was conceived by Wesley Peterson in 1961. The main advantage of this error-correcting code is the fact that it’s much simpler to implement than other methods, and is also well suited for the detection of a number of different error types, particularly burst errors. The reasons why that is so important is because burst errors are the most common, as they occur in a number of difficult communication channels, such as optical and magnetic storage components. The CRC n-bits that are applied to each data block, work to ensure that the data that is sent, is the same data received, on the other end.
How Does It Work?
How exactly does this data error Cyclic Redundancy Check work, well let’s say for example you have a backup application that is transmitting data to another device, such as a tape drive, and during the transmission a Data Error Cyclic Redundancy Check is issued. When this occurs, the drivers of the device (tape drive), will report an event Id 7. At which point, it’s left to you to determine where exactly the data error cyclic redundancy check is occurring.
Most tape drives that you’ll purchase today, do support CRC, which means the error could have occurred in the drive itself.
However, it’s also possible for the CRC to occur in the backup software. This means you must consider both possibilities, as it could be the software or the hardware. With that said, in most cases, if the data error cyclic redundancy check is due to the tape drive, then you’ll receive a write error, which should abort transmission.
Once that’s established, it’s left to you to make the necessary steps to fix the problem. I’ve outlined a number of solutions here; however, I won’t get into them just yet.
Checksum
This is another method, much older than CRC that is designed to safeguard the integrity of data sent over a communication channel. Checksum also provides a kind of authentication, as an incorrect checksum value indicates that the data sent has been altered in some way. There is one of two ways in which a checksum is determined. For example, a checksum packet is 1 byte in length. Each byte consists of 8 bits, and each bit is capable of existing in one of two states, leading to a total of 256 (27) different combinations.
| 20 | 21 | 22 | 23 | 24 | 25 | 26 | 27 | |
| Binary | 1 | 1 | 1 | 1 | 1 | 1 | 1 | 1 |
| Base-10 | 0 | 2 | 4 | 8 | 16 | 32 | 64 | 128 |
Because the very first combination is zero, this puts the value at a maximum of 255.
- If the sum of the transmitted data is 255 or less, then the checksum will be the remaining value of 256 data packets.
- If the sum of all the transmitted data is more than 255, then the data is divided by 256, and the remainder is the checksum.
An example:
Total: 2,535 bytes
2,535 / 256 = 9.906 (round to 9)
9 x 256 = 2.304
2,535 – 2.304 = 231 checksum
Data Correction
The primary purpose of all of these different processes is to ensure that information sent and received, whether it’s over the internet, or through an optical device, is secure. In fact, sending information through a network is amongst the most secure ways for you to distribute data. This is because, devices like your home phone, especially cordless ones, are easily susceptible to eavesdropping, all one needs is a radio scanner.
With other physical forms of medium, like traditional mail, the sent object typically passes through a number of different hands before it finally arrives at its destination, this has the adverse effect of increasing the chances of corruption. Having some understanding of data correction, and ensuring that you’re effectively utilising it, should considerably ease your conscious.
HDD Data Error Cyclic Redundancy Check
In a situation where you’ve encountered the data error cyclic redundancy check while using your hard drive, the cause may simply be the result of incorrect data being written to the hard drive. There are a number of different reasons why this may occur, such as a sudden loss of power to your system, and data corruption in your operating system. To fix this problem, I’d recommend running CHKDSK, which can be done by following the instructions below.
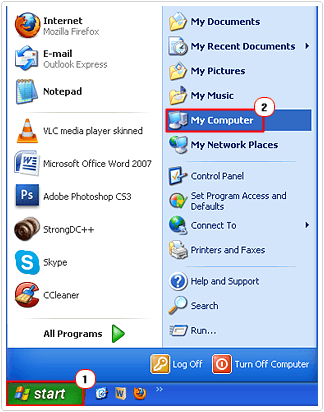
1. First, ensure you’ve logged into your computer with administrative rights.
2. Then click on Start -> My Computer. [Windows Vista/7: Computer]
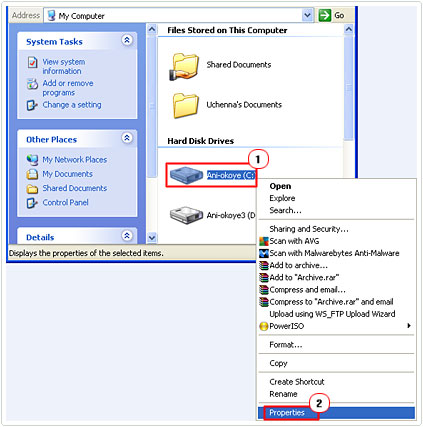
3. This will take you to your Hard Disk Drives, from here, right click on the Hard Drive at fault, and select Properties.
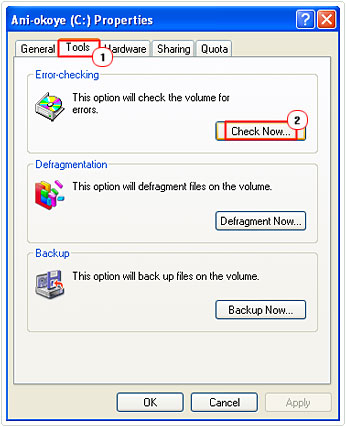
4. A Properties applet for your Hard Drive will pop up, from here select the Tools Tab, and then click on Check Now.
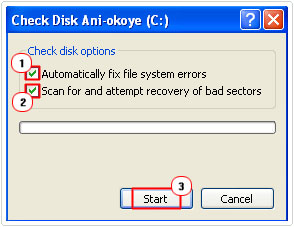
5. A Check Disk applet will pop up, make sure both automatically fix file system errors and Scan for and attempt recovery of bad sectors are checked, and then click on Start.
6. A notification should appear, stating that the application was unable to check your disk and asking whether you’d like to schedule a disk check on next system restart; select Yes, then restart your computer.

Alternatively, if your access to the affected Hard Drive is blocked by repeated data error cyclic redundancy check notifications, then you will need to execute these commands from Command Prompt; to do this, following the instructions below.
1. First, ensure you’ve logged into your computer with administrative rights.
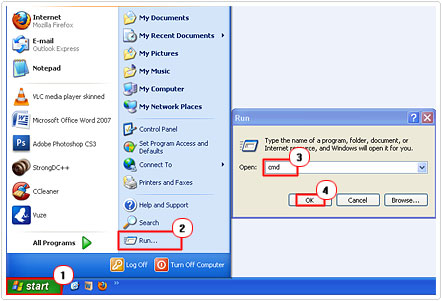
2. Then click on Start -> Run, type cmd then click on OK. [Windows Vista/7: Start -> Type cmd (into the Search programs and files box) and Press CTRL + Shift + Enter, then click on Continue]
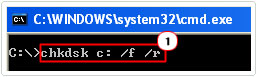
3. Once Command Prompt loads up, type chkdsk C: /f /r (‘C’ represents the affected drive), then press Enter.
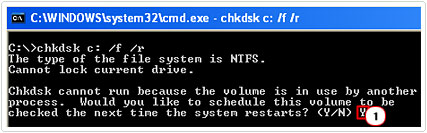
4. You should receive a similar message indicating that the system was unable to check the disk, asking you whether you’d like to schedule a check on the next restart. Type Y, then press Enter, and restart your system.
The next step is to run DiskPart, which is a command-line tool, which is very similar to the Disk Management tool; it’s a very powerful and useful tool, especially when you’re unable to access Windows. However, be warned, you should only use this tool if you are having difficulties accessing the troubled hard drive. Anyway, to use this tool, follow the instructions below.
1. Boot into your system with full administrative rights.
2. Then click on Start -> Run, type cmd and click on OK. [Windows Vista/7: Start -> Type cmd (into the Search programs and files box) and Press CTRL + Shift + Enter, then click on Continue]
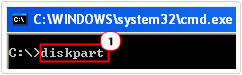
3. Once you have Command Prompt up, type diskpart and press Enter.
4. Once the utility has finished loading, type rescan and Press Enter.

This command will tell the program to conduct a scan on your system for available hard drives. Once it’s complete, your hard drive should become accessible again.
Note: If the data error cyclic redundancy check messages become more and more commonplace, then it’s best that you purchase a new hard drive and copy the data from your old hard drive to the new one. If you don’t know how to do this, I suggest you check out my post on copying your hard drive.
Optical Disk CRC Errors
If you’re having problems installing a computer game or application from disc, then you should first consider cleaning the disc. To do this, use a lint-free cloth, this is so to avoid leaving behind any built up residue on the surface of the disc.
Use a short stroke method by wiping from the center of the disc to the edge, in an outwards motion. Avoid wiping in a circular motion as it can heighten the chances of you scratching the disc, thus rendering it unreadable.
Use a liquid scratch remover for the cleaning process. Then place the disc on a hard surface, then wipe firmly, using a quick and consistent motion, do this for at least 30 seconds. Once you’ve done that, use a soft cloth in order to wipe the scratch remover off the disc surface, and then leave it in a dry location for no more than three hours.
Note: There are incidences when cleaning the disc is not sufficient in improving its readability. In this particular situation, you’ll either have to purchase the disc again or, if you burned the data to the disc yourself, then re-burn the same data to a new disc, but this time, consider setting the burn speed to the lowest. As this lowers the chance of any IO errors, after the burning process has been completed.
Are you looking for a way to repair all the errors on your computer?

If the answer is Yes, then I highly recommend you check out Advanced System Repair Pro.
Which is the leading registry cleaner program online that is able to cure your system from a number of different ailments such as Windows Installer Errors, Runtime Errors, Malicious Software, Spyware, System Freezing, Active Malware, Blue Screen of Death Errors, Rundll Errors, Slow Erratic Computer Performance, ActiveX Errors and much more. Click here to check it out NOW!