| Attention Before you read this post, I highly recommend you check out my resources page for access to the tools and services I use to not only maintain my system but also fix all my computer errors, by clicking here! |
Dealing with issues related to low disk space can be very problematic. This especially reigns true when you’re in the middle of an important document but are unable to save changes to it due to low disk space. This is a pervading issue that isn’t restricted solely to saving documents, but installing programs, downloading media files etc.
Our hard drives do not have infinite space, so it should come at now surprise. Your hard drive comes with a limited amount of space that you can use to install programs and documents. It’s only when your close to exceeding this limited will you be confronted with repeated low disk space messages, in addition to various other issues. However, freeing up space in the form of removing unused programs is the quickest way for you to rectify this problem.
For those of you who would you like to know how best deal with situations like this, I recommend you continue reading for a number of viable solutions that you can deploy today. Most of which should work on all versions of Windows.
Remove Windows Update Uninstall Files
This particular tip works solely for Windows XP users, and it involves deleting folders that have $NtUinstall in their name. You can find these folders in a number of locations, but primarily in your Windows directory.
They are basically references to past hot fixes. If a hot fix was applied to your system in order to weed out specific vulnerabilities, then it’s unlikely that you would want to remove it. Which makes it pointless having the uninstall files on your system, and if you have low disk space issues, this is a good place to start in alleviating this problem. All of these files are safe for you to remove.
To locate these folders follow the instructions below.
1. First, ensure you’re logged into your system with a user profile with administrative rights.
2. Then press  + R, and type in %windir% and click on OK. This should load up your Windows Directory.
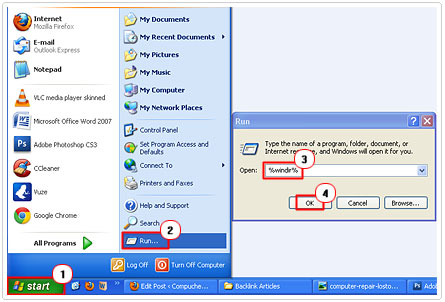
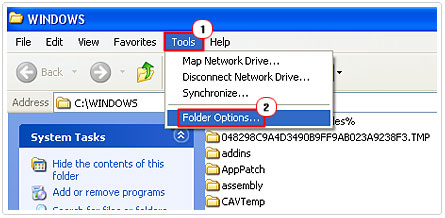
3. Once there, in the top menu system, click on Tools -> Folder Options. [Windows Vista/7: Organize -> Folder and search options]

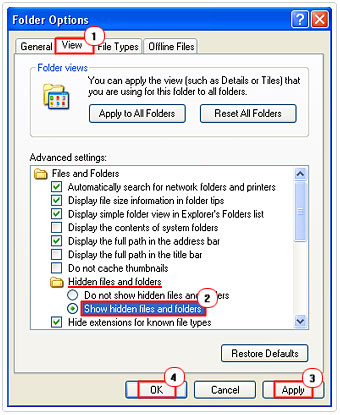
4. From Folder Options, click on the View Tab, and under Hidden files and folders, click on Show hidden files and folders, and click on Apply and OK.

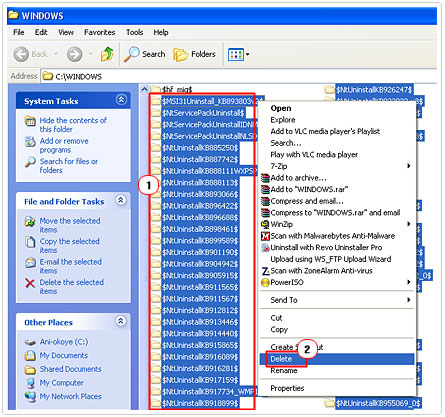
5. This will bring up all the $NtUinstall folders on your computer. Simply highlight all of these folders, right click and select Delete -> Yes.

Purchase a Bigger Hard Drive
If you’ve tried everything, but are still battling with low disk space, then maybe it’s time you purchased a bigger hard drive. If you’re afraid to open your computer up to install it, then you can always opt for an external one. However, if you do decide to purchase an internal hard drive, make sure you purchase one that is compatible with your motherboard. There are tons of cheap hard drives that you can purchase today, but buying a new one should be seen solely as a last measure.
With that said, consider following all the provided solutions here, before making the decision to purchase any new components.
File Compression for Low Disk Space
Our computers are affected by the amount of available hard disk space, there’s no question there. That’s why it’s important you familiarise yourself with all the options available to you. Compressing files is a viable option, as this makes files on your system smaller, alleviating any low disk space worries.
There are two ways that you can actually achieve this task, the first is as follows.
1. Ensure you’re logged into your computer with administrative rights.
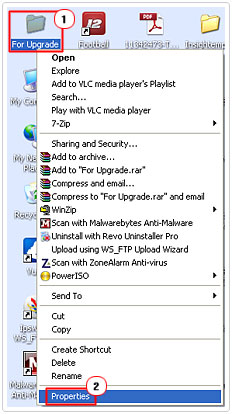
2. Locate a File and/or Folder (that you would like to compress), then right click on it and select Properties.

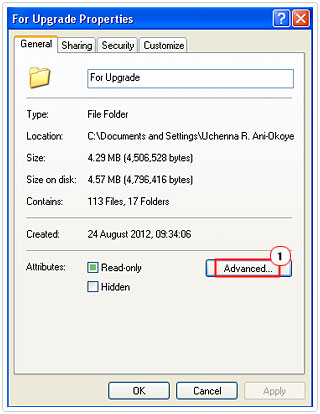
3. From there, click on the Advanced Button.

4. Then click on the box next to Compress contents to save disk space.
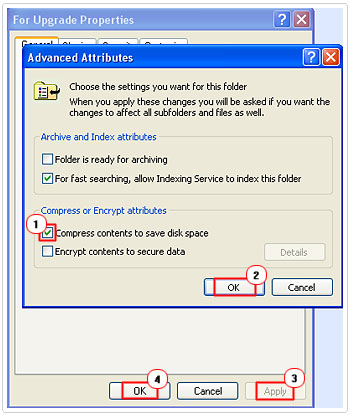

5. Repeat this process for all the Files and/or Folders you would like to compress.
The second method is through the use of Disk Cleanup. To compress files and/or folders through this tool, do the following.
1. Ensure you have the appropriate administrative rights, while logged in.
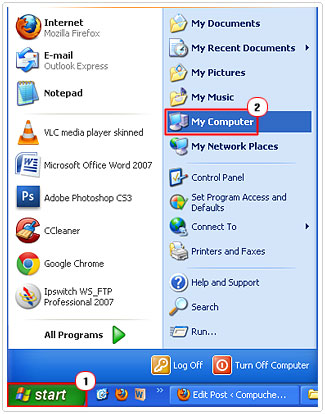
2. Then click on Start -> My Computer. [Windows Vista/7: Computer]

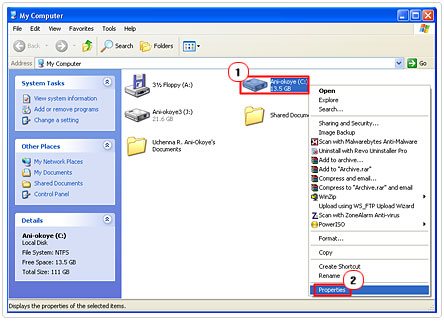
3. Then right click on your main hard drive (which is typically C:\) and select Properties.

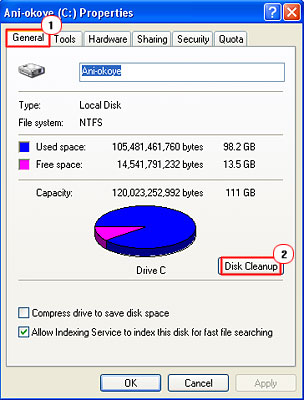
4. From the Properties menu, click on Disk Cleanup.

5. Once Disk Cleanup has finished loading up, deselect all Files to delete options except Compress old files, and click on OK.
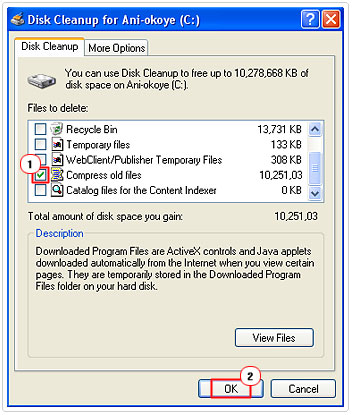

This will only compress the old files on your computer. So it’s likely you’ll need to use a combination of both methods for optimal results.
Disable the Hibernation Feature
For the vast majority of computer users, I’m sure they’ve never used the Hibernation option; usually preferring either to switch their system off or restart it. However, the unfortunate thing is that despite not using the hibernation feature, it still consumes a considerable amount of hard disk space; up to 8GB in some operating systems.
The good thing is that you can turn it off and alleviate your low disk space problem. To do so, follow the instructions below.
1. Ensure you’ve logged into your system with administrative rights.
2. Then click on Start -> Run [Windows Vista/7: Press 


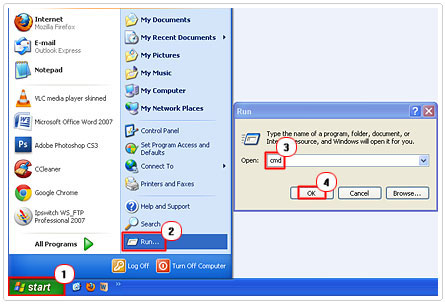

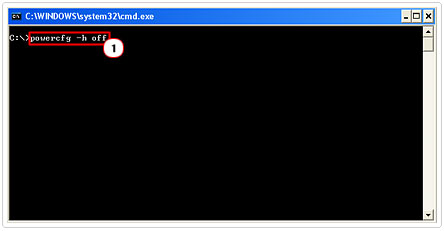
3. Once Command Prompt loads up, type in “powercfg –h off” and hit Enter, to disable this feature.

Remove Restore Points
One quick method you can use when you have low disk space is to delete old restore points on your computer. The amount of restore points created is typically proportionate to the amount of hard disk space you’ve allocated to it. By default this is around 3%, which is fairly substantial, especially if you have a fairly large hard drive. However, removing these restore points is an economical approach to freeing up space on your hard drive.
Follow the instructions below to do this.
1. First, ensure you have administrative rights on your user profile.
2. Then click on Start -> My Computer. [Windows Vista/7: Computer]


3. Then right click on your main hard drive and select Properties.


4. From the Properties menu, click on Disk Cleanup.


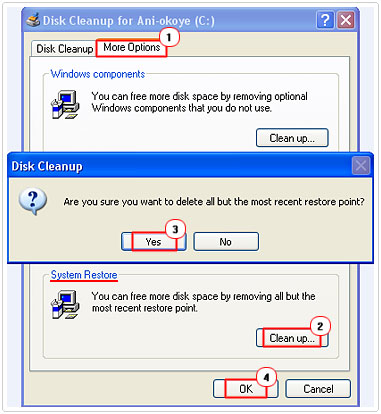
5. Once Disk Cleanup has finished loading up, click on the More Options Tab. Finally, under the System Restore section click on Clean Up, followed by Yes.

Uninstall Redundant Programs
Most of your hard disk space will be taken up by the programs you’ve installed. Most people have the habit of installing a program on their system and forgetting about it. It’s these redundant programs which add up over the years, that you should be targeting for deletion. Uninstalling a program is fairly easy, just follow the instructions below.
Note: The best way to remove an application from your operating system is through the use of an uninstallation tool, like Express Uninstaller. This is because the Windows installer is flawed in that, it rarely uninstalls an application in its entirety usually it’ll leave remnants of the program scattered all over your system, whether it be a folder or a registry entry.
Express Uninstaller on the other hand is designed to not only remove an application through the InstallShield, but to also scan the registry for remaining entries and double scan the operating system for remaining files and folders.
For more information on this powerful tool, visit here:
CLICK HERE TO CHECK OUT EXPRESS UNINSTALLER
1. First ensure you have administrative rights on your user profile.
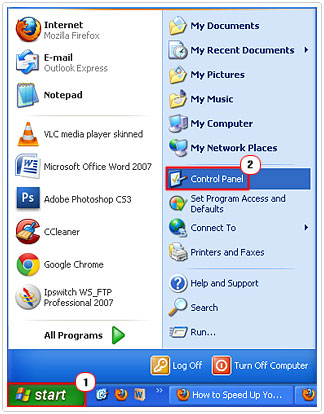
2. Then click on Start -> Control Panel.


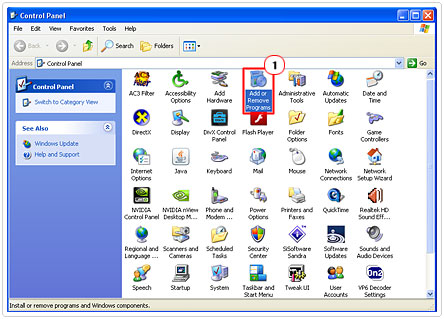
3. Then double click on Add or Remove Programs. [Windows Vista/7: Uninstall a program]

4. From here, select the program you would like to uninstall and click on Remove. [Windows Vista/7: Uninstall]
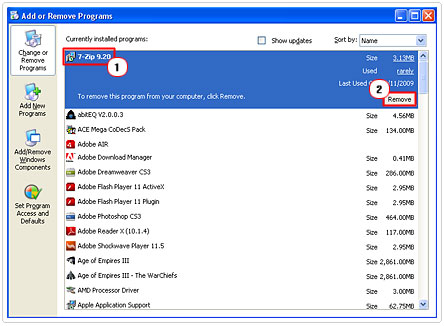

After you’ve removed the program from your system, there are likely to be traces of it left over in the form of registry entries. To remove these files, you will need to download Advanced System Repair Pro and run a registry scan. It’s a fairly simply process.
Clear you’re Internet Cache
When it comes to low disk space issues, you’ve got to consider the internet cache, which is basically a series of files that are stored in a temporary folder. These files are typically called upon, when revisiting a website. However, there are times when this folder can grow very large, filled up with redundant files. It’s at this point that you’ll want to remove all the files in this temporary folder and start afresh.
To empty your temporary internet folder, follow the instructions below:
Note: As a viable alternative, you can use Advanced System Repair Pro, which is a specialised internet privacy shredding tool, amongst other things, designed to not only clear your browsing history, but also your Windows cache history, chat and instant messaging history and much more.
This tool also enables scheduling, which means you can configure it to clear your browsing history every day, one a week, once a month or whatever time frame best suits you. Anyway, find out more about this tool here:
CLICK HERE TO CHECK OUT ADVANCED SYSTEM REPAIR PRO
1. First ensure you have administrative rights with your user profile.
2. Then click on Start -> Control Panel.


3. Then double click on Internet Options.
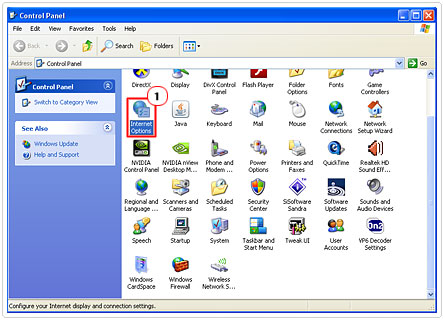

4. From the Internet Options, click on Delete under Browsing History.
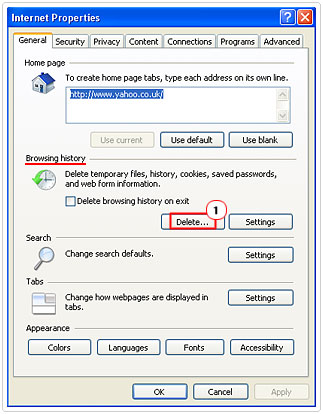

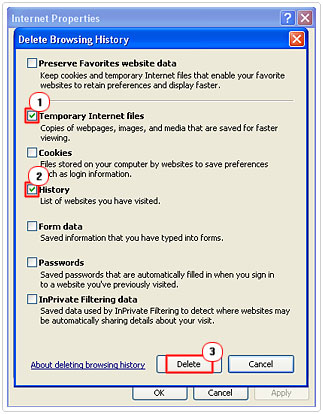
5. Lastly, select Temporary Internet Files and History and click on Delete.

Optimise Your Recycle Bin
Your Recycle Bin has a default setting of 10% of your hard disk space for holding all deleted files. When Windows XP was originally introduced to the market, the average hard drive size was around 30GB. This equals to around 300MB for deleted files in your recycle bin, which is fairly substantial. Today, with hard drives of 500GB, 10% of that drive, which is 50GB, would be allocated to the Recycle Bin, which is huge.
However, the good thing is that you can adjust these settings, in the event you’re dealing with low disk space issues. Just follow the steps below.
1. First, right click on the Recycle Bin (on your desktop) and select Properties.
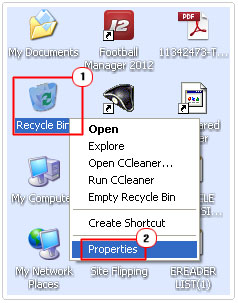

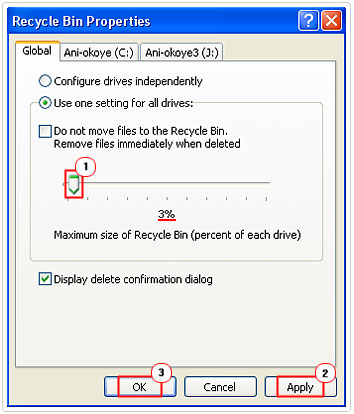
2. In the Properties Menu, move the slider to no more than 3% (preferable 1%). Then click on Apply and OK.

Are you looking for a way to repair all the errors on your computer?


If the answer is Yes, then I highly recommend you check out Advanced System Repair Pro.
Which is the leading registry cleaner program online that is able to cure your system from a number of different ailments such as Windows Installer Errors, Runtime Errors, Malicious Software, Spyware, System Freezing, Active Malware, Blue Screen of Death Errors, Rundll Errors, Slow Erratic Computer Performance, ActiveX Errors and much more. Click here to check it out NOW!

