

| Attention Before you read this post, I highly recommend you check out my resources page for access to the tools and services I use to not only maintain my system but also fix all my computer errors, by clicking here! |
The rtvscan.exe process is an integral part of the Symantec Internet Security Suite responsible for the real-time scanning component of the application.
Its duties are to detect malicious code hidden within files before they get onto your system. This works by the rtvscan.exe file scanning the file(s) as and when they are first copied to your system, notifying the user when or if it detects a suspicious file. The rtvscan.exe feature is also capable of cleaning a file, once it has detected a virus.
In addition to its ability to provide real-time scanning for the user, notifying him or her when a malicious file enters their system, the rtvscan.exe process is also capable of logging reports, after it has conducted a scan. Through these logs the user is able to acquire information about the files that have been scanned, their location(s) on the hard drive, the malicious files that it discovered on these files and the course of action taken by the user.
If you have Symantec Internet Security software running on your computer, then this process will automatically run and scan your system files as and when it deems necessary.
Is Rtvscan.exe Resource Hungry?
The rtvscan.exe process is known to consume quite a considerable amount of system resources, this however varies depending on amount of files it has to scan, but there are reports of it utilising 99% of CPU resources, for extended periods of time.
Symantec is however, aware of these issues and has taken the necessary steps to minimise the toll its software takes on your system. If you find that this process is consuming too much resource, then you may want to consider other solutions.
Can You Disable It?
Yes, it is possible for you to disable rtvscan.exe; in order to do this you will need to disable the real-time scanning feature in the application. However, the major drawback to this is that viruses will be able to get onto your computer, as the virus scanner will no longer run a scan on files entering your system. The user will thus be forced to run regular manual scans to ensure the security of his/her system.
That said you’ll no longer have to contend with the toll this process originally imposed on your system. In addition to that, disabling this feature will also prevent the application from creating anymore logs on your computer, which is known to, over time, add up and consume a great deal of hard disc space.
To disable this feature, there are a number of ways you can do it; the quickest way is via Windows Services, which can be done by doing the following:
1. First, boot into your computer with an administrative user profile.
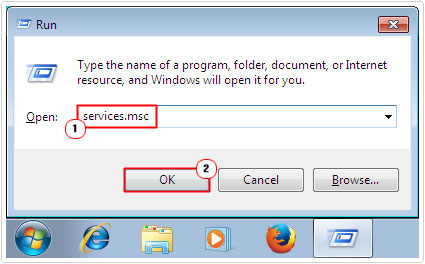
2. Once in, press  + R, type Services.msc and click OK.
3. Once Services loads up, locate the Symantec Internet Security Suite Real-Time Scanning process and right click on it and select Stop.
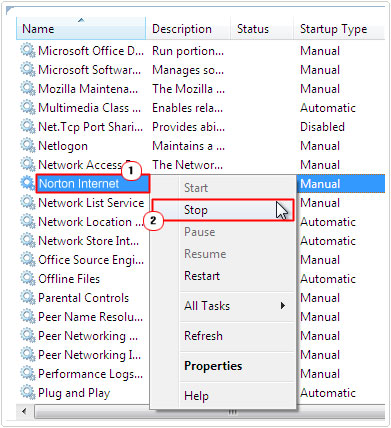
Note: Choosing to stop the process will only halt the components activities until you restart your computer. If you would like to permanently stop this feature, you will need to disable real-time scanning in the programs options.
Common Rtvscan.exe Issues & Error messages
There are several rtvscan.exe related error messages and issues that users report experience. However, of the various issues, the most common are as follows:
Rtvscan.exe – Application Error: The instruction at “0x44fca2e2” referenced memory at 0x00000001. The memory could not be read or written. Click OK to terminate the program.
This particular error message is usually the direct result of a computer having an outdated version of DirectX installed on their operating system.
Rtvscan.exe – Application Error – The Instruction at “0x47200f56” referenced memory at “0x69184d2c”. The memory could not be read.
This is a fairly common error message on older versions of Symantec Antivirus. Users report encountering it while shutting down their computers.
Another issue that users report experiencing entails the rtvscan.exe process consuming 100% of CPU resources for extended periods of time almost immediately after installing Symantec Antivirus.
This problem is caused by a number of different things. One probable cause of this conflict lies within the Windows registry path to NavLogon.dll, located here:
HKEY_LOCAL_MACHINE\SOFTWARE\Microsoft\WindowsNT\CurrentVersion\Winlogon\Notify\NavLogon\DllName
Another reason why this issue occurs is because when your operating system updates itself, it stores a substantial amount of files in the following folder:
C:\WINDOWS\SoftwareDistribution
Many of these files tend to be nested zip files, which is essentially zipped files within zipped files. As a result, this causes the rtvscan.exe process to use a considerable amount of CPU resources while attempting to scan these nested files for viruses. Fortunately, this is not likely to continuously occur.
How to Fix These Errors
The type of remedy you will need to deploy will reflect the type of error you’re experiencing. With the error messages and issues I have outlined above, I have provided a number of solutions that you, the end user can use to repair them.
So, continue reading for those solutions.
Use Registry Fix
Note: For this method, you will be required to edit the Windows registry. The registry is an integral component of the operating system and so I recommend you only attempt these steps if you’re 100% comfortable working with the registry. As a precautionary method, you may want to back things up beforehand.
Alternatively, if you feel you lack the required expertise to carry out the instructions outlined below, you can use the professional registry cleaner Advanced System Repair Pro, which is capable of detecting and repairing conflicts within the registry. You can download this powerful tool from the following link:
CLICK HERE TO CHECK OUT ADVANCED SYSTEM REPAIR PRO
 The solution(s) below are for ADVANCED level computer users. If you are a beginner to intermediate computer user, I highly recommend you use the automated tool(s) above! The solution(s) below are for ADVANCED level computer users. If you are a beginner to intermediate computer user, I highly recommend you use the automated tool(s) above! |
That said if you’re having CPU utilisation issues with the rtvscan.exe process, then you can fix it by doing the following:
WARNING: Tread with caution as you can irreparably damage your operating system if you delete or modify the wrong registry entry.
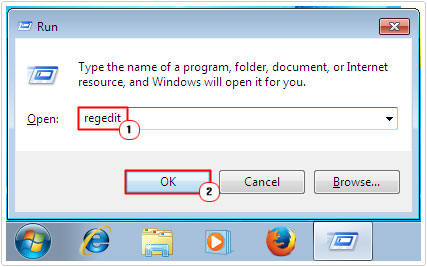
1. First, boot into your computer with a user profile that has full administrative rights.
2. Once in, press + R, type regedit and click on OK.
3. When Registry Editor loads up, navigate to the following path:
HKEY_LOCAL_MACHINE\SOFTWARE\Microsoft\WindowsNT\CurrentVersion\Winlogon
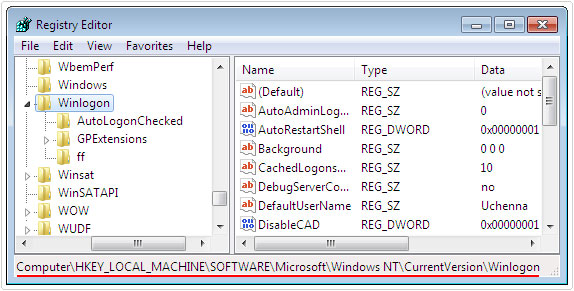
4. From here, right click on the right pane and select New -> Key.
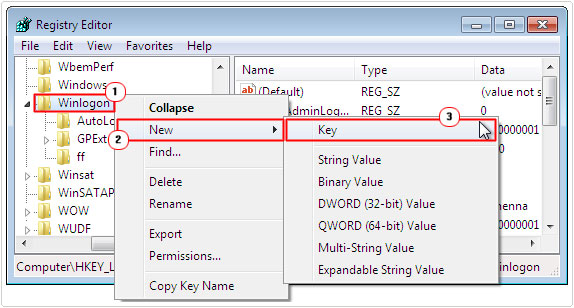
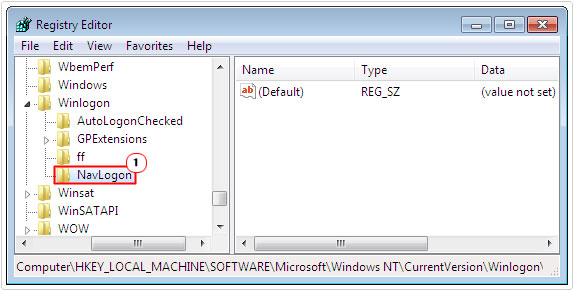
5. Name the Registry Key NavLogon.
6. Next click on NavLogon and right click on the right pane and select New -> String.
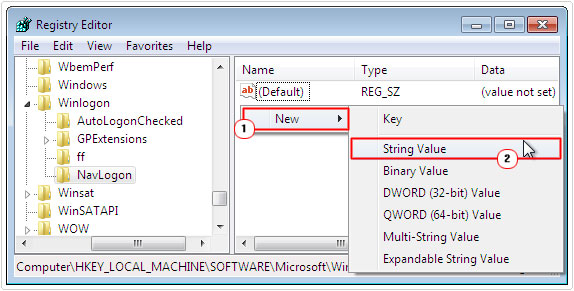
7. Name this new Registry String DllName.
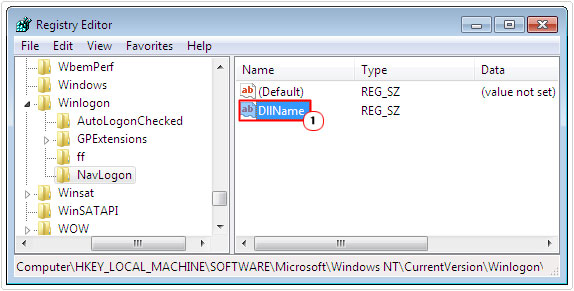
8. Once you have created the Registry String, double click on it, then type C:\WINDOWS\system32\NavLogon.dll into the Value data box and click on OK.
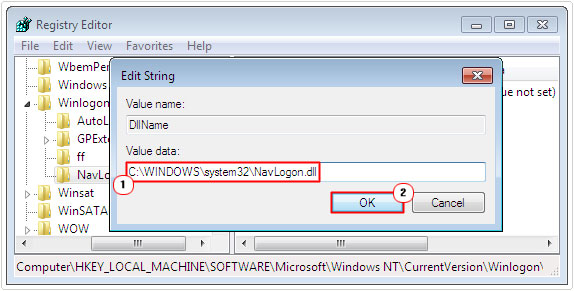
9. Close the Registry Editor and restart your system.
Update DirectX Version
Before you consider downloading a newer version of DirectX, you will first need to determine what version of DirectX is currently installed on your computer. To do this, simply do the following:
1. First, boot into your computer with full administrative rights.
2. Then press + R, type dxdiag and click on OK.
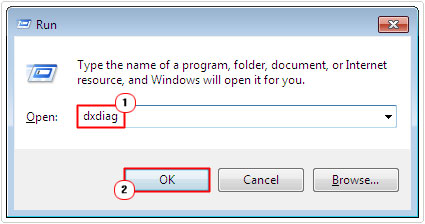
3. This will load up the DirectX Diagnostic Tool, from here, under the System Tab; you should be able to see the version beside DirectX Version.
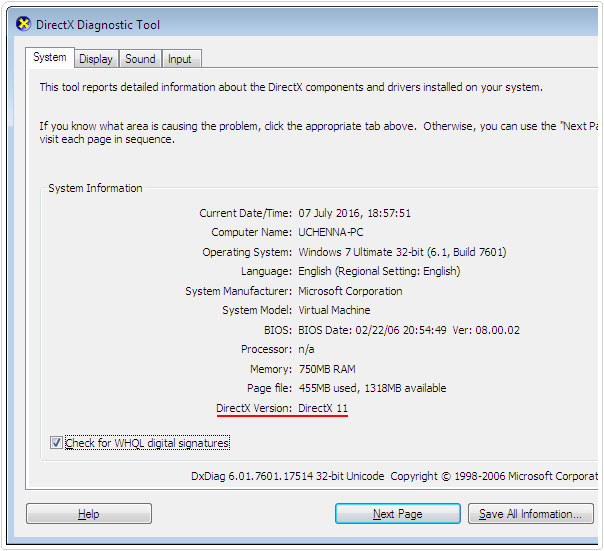
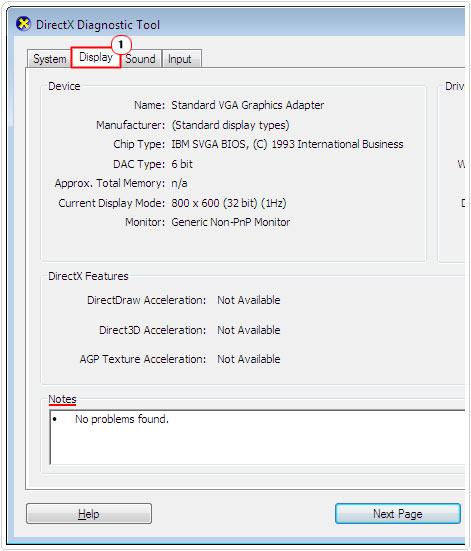
4. If you have a DirectX Version of 8.1 or later, then you should click on each Tab and check whether there are any issues contained in the Notes section.
Note: If you do find any listed issues, you should be able to fix them with the provided notes. Solutions may involve reinstalling DirectX or updating a specific hardware driver.
Moreover, if it’s found that you have a DirectX Version that’s lower than 8.1, then you will need to update it. In order to do that, simply download the latest version of DirectX from the following link: https://support.microsoft.com/en-gb/kb/179113
Update Symantec Antivirus
For those users that encounter an error message every time they shut their computers down. Fixing this issue is relatively simple, since Symantec has already released a number of different patches that specifically tackle this particular issue.
Thus, I recommend either you use the built-in virus updater or you visit the official website and locate and download the latest patch for your application.
Exclude Files
If the CPU utilisation issue on Symantec Antivirus is due to the C:\Windows\SoftwareDistribution folder, then you can rectify this issue by putting that folder into the exclude list. You can find this option in the advanced settings area of the application.
Are you looking for a way to repair all the errors on your computer?

If the answer is Yes, then I highly recommend you check out Advanced System Repair Pro.
Which is the leading registry cleaner program online that is able to cure your system from a number of different ailments such as Windows Installer Errors, Runtime Errors, Malicious Software, Spyware, System Freezing, Active Malware, Blue Screen of Death Errors, Rundll Errors, Slow Erratic Computer Performance, ActiveX Errors and much more. Click here to check it out NOW!