| Attention Before you read this post, I highly recommend you check out my resources page for access to the tools and services I use to not only maintain my system but also fix all my computer errors, by clicking here! |
In this tutorial, I’ll explain exactly how to setup port forwarding on the most common router brand.
Porting forwarding, which is also referred to as port mapping is a technique that is made up of the following:
* The destination of a packet (data) is translated to a specific port number
* These packet(s) are then taken through a filter (firewall)
* Then forwarded to their predetermined destination using the routing table
I know that probably seems like quite a handful, especially for those new to computers, but essentially, porting forwarding is about determining which ports should be accessible to the outer world, and what traffic to funnel down these opened ports.
How Is It Used
You can setup port forwarding for remote computers, such as those online, to be able to communication with other services and computers over a private network, such as a LAN (Local Area Network).
For the average PC user, their computer gains access to the internet through a DSL or cable modem, which is typically, connected to a network address translator (NAT) or router. Computer users within a private network are connected to one another through the use of a switch or hub. While the NAT device is assigned a public IP address by an internet service provider (ISP). All the computers that function behind the router (NAT) are invisible to internet, as they communicate using their own privately assigned IP address.
When port forwarding is configured, it means a port number on the router has been set aside to be used for communicating with specific services/programs between the private network and external host (internet). In order for the external host to interface with the router, it must know the address and the port number of the gateway (router). Oftentimes, the port number of more commonly known web services such as HTTP (which is used by your web browser), is used for port forwarding, in order to make certain services accessible to hosts within a private network.
Router/NAT
When you connect your computer to the internet through the router, it’s the external IP address of your router that other machines see, irregardless of the amount of PCs that may exist within your home network. An internet user will thus have no idea whether you have one to possibly ten computers in your home all patched in to the internet at the same time. This is because their only route of communication is via your router, as it determines how connections are routed and to which computers within the network to route packets (data) to.
With the advent of ports, it has enabled routers to divide a single IP address into multiple channels. This means a single IP address can be shared amongst several services/programs at the same time, as different ports are used for routing packets (data). As a standard, all computers on a network have 0 – 65536 ports and it’s through these ports that packet(s) (data) is sent when computers on a network attempt to communicate with one another.
UPnP
UPnP stands for Universal Plug and Play and is essentially a network protocol that enables devices within a network, such as a computer, printer, or mobile device to seamlessly find one other and create a functional line of communication between these devices for the sharing of entertainment, and data. UPnP is most often used as a viable alternative to manually setup port forwarding over a network.
UPnP is basically an extension to the old plug and play technology, which was originally conceived for the purpose of making the attachment of new devices to your computer much easier. UPnP on the other hand is not directly related to this technology, but utilises the same concepts, in that when services are connected to one another using this architecture via a network, working configurations are automatically established, which may and does include the opening of ports.
Disadvantages of UPnP
However, despite how easy it is to use this technology, as an alternative to setup port forwarding, it’s not without its disadvantages, which are as follows.
- In order for you to use this protocol, the service you intend to use it on, must have native support for it.
- The UPnP doesn’t come with its own form of authentication, this means, any device/service that you intent to use UPnP on, must come with its own authentication mechanic, otherwise your system will be vulnerable to hackers, while in use.
- The performance of UPnP tends to be intermittent.
With that said if the service you want to use UPnP on, supports the technology, then it’s recommended that you disable UPnP on your router after you’ve finished using it.
To Enable/Disable UPnP (NETGEAR)
In order to enable and disable this feature on your router, simply do the following.
1. First, log into your computer with a user profile that has administrative rights.
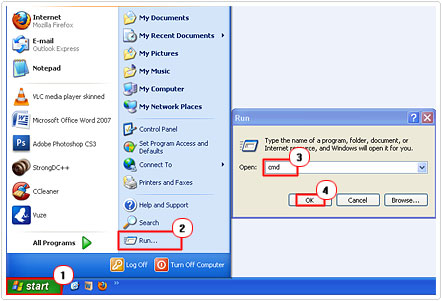
2. Then click on Start -> Run, type cmd and click on OK. [Windows Vista/7: Start -> Type cmd (into the Search programs and files box) and Press CTRL + Shift + Enter, then click on Continue]
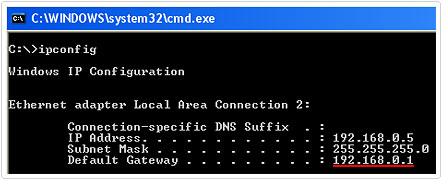
3. Once Command Prompt loads up, type ipconfig and hit Enter.

4. This will bring up your Windows IP Configuration, simply take note of Default Gateway IP address.
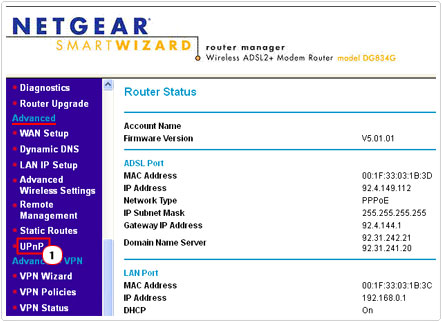
5. Once you’ve taken note of it, load up your internet browser, then type the IP address of your Default Gateway into the address bar and hit Enter.

6. A small dialog box labelled Authentication Required should pop up, simply put in your User Name: (default: admin) and Password: (default: password) and click on OK.

7. This will bring up the NETGEAR Router settings, simply scroll down to the Advanced section in the left menu column and click on UPnP.
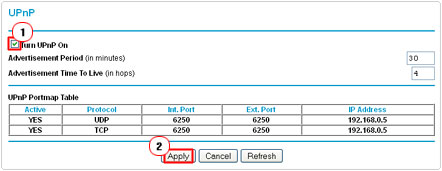
8. Lastly, check the box next to Turn UPnP On and click on Apply.
To Setup Port Forwarding
If the service you intend to use doesn’t support UPnP or if you’re put off by the pitfalls of using UPnP, then you may want to setup port forwarding manually.
Opening the Port
To setup port forwarding, the first you’ll want to do is open the port you want to use for forwarding, this can be done, by doing the follow.
1. First, follow steps 1 – 6 from “To Enable/Disable UPnP (NETGEAR)”.
2. On the NETGEAR Router settings screen, scroll down to Content Filtering section and click on Services.
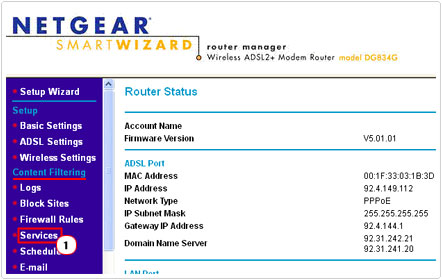
3. When Services loads up, click on Add Custom Service.

4. The first definition is the Name: call it something you can remember, under Type, click on the drop down menu and select TCP/UDP and for the Start Port: and End Port: enter a port number between 1024 and 65535, and then click on Apply.
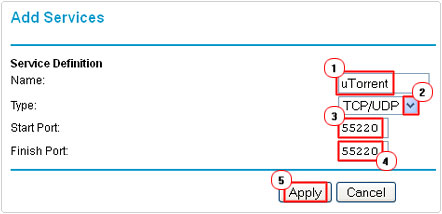
Set Firewall Rules
Once you’ve opened or setup port forwarding, you’ll need to configure the routers built-in firewall to allow packets (data) to be sent through it; otherwise it’ll be blocked it. This can be done by doing the follow.
1. First, follow steps 1 – 6 from “To Enable/Disable UPnP (NETGEAR)”.
Note: Make sure you take note of your IP Address.
2. From the NETGEAR Router settings screen, scroll down to the Content Filtering section, then click on Firewall Rules.
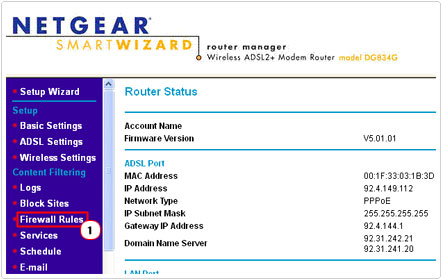
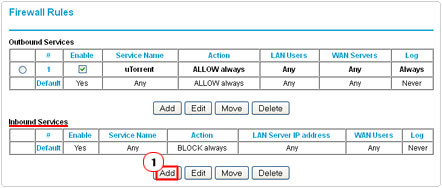
3. Under Outbound Services, click on Add.
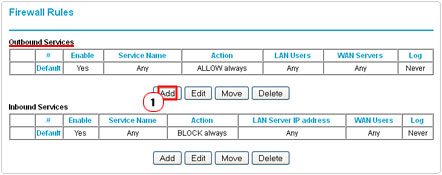
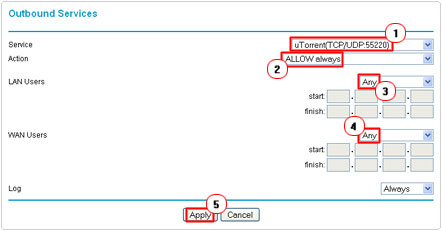
4. This will take you to the Outbound Services screen, from here; select the service you made from the drop down menu, besides Service. Beside Action, select ALLOW always from the drop down menu, then ensure Any is selected for both LAN Users and WAN Users, then click on Apply.
5. This will take you back to the Firewall Rules screen, under Inbound Services, click on Add.
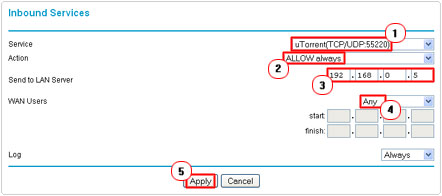
6. On the Inbound Services screen, select the service you made from the drop down menu next to Service. Besides Send to LAN Server put in the IP address of your computer, then ensure that Any is selected for WAN Users and click on Apply.
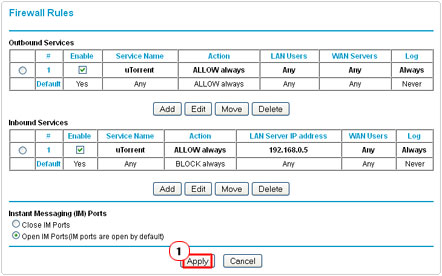
7. This will take you back to the Firewall Rules screen, from here, click on Apply at the bottom of the page.
Are you looking for a way to repair all the errors on your computer?

If the answer is Yes, then I highly recommend you check out Advanced System Repair Pro.
Which is the leading registry cleaner program online that is able to cure your system from a number of different ailments such as Windows Installer Errors, Runtime Errors, Malicious Software, Spyware, System Freezing, Active Malware, Blue Screen of Death Errors, Rundll Errors, Slow Erratic Computer Performance, ActiveX Errors and much more. Click here to check it out NOW!

