| Attention Before you read this post, I highly recommend you check out my resources page for access to the tools and services I use to not only maintain my system but also fix all my computer errors, by clicking here! |
I don’t think I need to explain how frustrating it can be when trying to watch a video stream that is constantly stopping and starting. If you use a DSL connection (which is more than likely), then the vast majority of video streams, whether on Veoh or YouTube, should play without the annoying intermittent performance. However, there are times when this just isn’t the case, and so it’s up to you to try and figure out what’s causing the constant slow streaming video. In this tutorial I intend to give you a number of tips that you can use to alleviate this problem.
What Is Streaming Video?
Streaming video is basically compressed media content that you’re able to view before the file has been completely transmitted to your system. This enables users to avoid having to download the file to their system before they can watch it. The compression rate of the media is what enables your system to be able to broadcast it, while downloading it. Depending on the compression rate and the media player you’re using, the overall performance will vary.
Streaming video is accessible to multiple users at the same time due to the multi-cast feature of the server the content is hosted on. When you attempt to watch a video stream, portions of the file is buffered before you are able to view anything. It’s this buffering process that is primarily responsible for choppy playback and long loading times.
Intermittent and slow streaming video is typically the result of two components. The first is your systems ability to receive the file and the second is your systems ability to play the media content.
Reinstall Your Internet Browser to Fix Slow Streaming Video Issue
The first cause of action, when attempting to rectify your slow streaming video issue, should be to reinstall your internet browser. The web browser plays a big role in the overall performance of the streamed content, thus, if your browser is in anyway damaged and/or corrupt, then it would inadvertently prohibit your system from running the media content smoothly.
Make sure you delete your user profile along with the browser, in order to ensure that the new installation of your web browser doesn’t inherit the same adverse characteristics. To complete this task, follow the steps below.
Alternatively, you could use an uninstallation tool like Express Uninstaller, which will make the process far less complicated and far more efficient. You can find out more about this tool here:
CLICK HERE TO CHECK OUT EXPRESS UNINSTALLER
Using Firefox
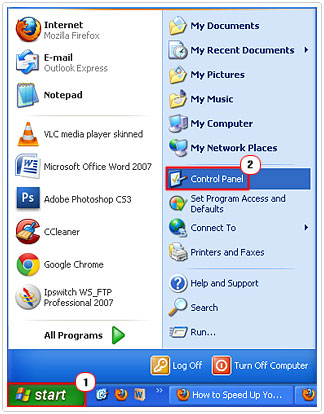
1. First, click on Start -> Control Panel.
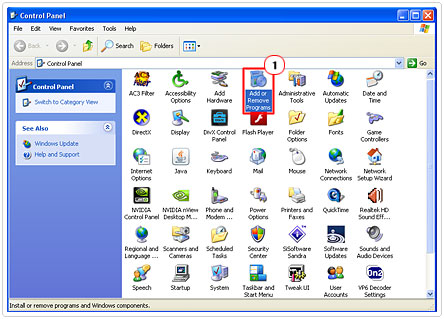
2. Once Control Panel loads up, double click on Add or Remove Programs. [Windows Vista/7: Uninstall a program]
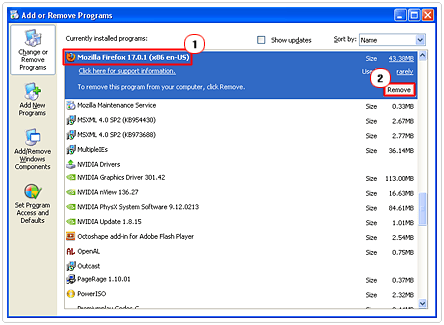
3. When Add or Remove Programs [Windows Vista/7: Uninstall or change a program] loads up, click on your Mozilla Firefox in the Currently Installed Programs area, and then click on Remove. [Windows Vista/7: Uninstall]
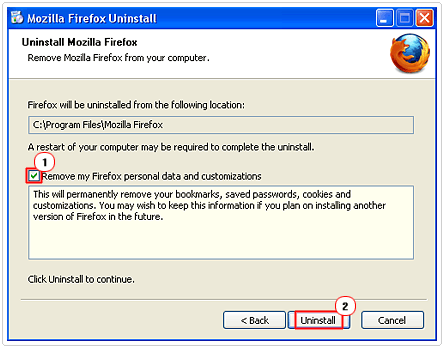
4. This will load up the Mozilla Firefox Uninstall applet, make sure you check the box next to Remove my Firefox Personal data and customizations.
Notes
This will ensure that all data corruption is removed during the uninstallation process. Reinstalling Firefox is self-explanatory; you can download the latest copy of it here: http://www.mozilla.org/en-US/
The removal process for other third party web browsers shouldn’t be too dissimilar from this.
This solution should be enough to rectify the slow streaming video problem for the majority of PC users.
Free Up Hard Drive Space for the Media Content
The whole process of watching streamed content entails your computer having enough hard disk space to temporarily hold the transmitting data. The data from the stream is typically loaded into your temporary internet folder. If this folder fills up, then it can result in slow streaming video issues. For a step by step tutorial on how to empty out your temporary internet folder, check out my post on low disk space.
Close All Unnecessary Programs
The intermittent streaming performance could be due to insufficient memory or lack of bandwidth. When streaming media content, it’s always best to prioritise the programs that are running in the background. Consider the following.
- Shutting down all programs not in use
- Watching only one video at a time
- Disabling and/or removing redundant browser add-ons
1. Use Windows Task Manager to close down all unnecessary programs. You can access this tool by simultaneously clicking on Ctrl+Alt+Del.
2. Then clicking on the Applications Tab, selecting a Running Task and clicking on End Task.
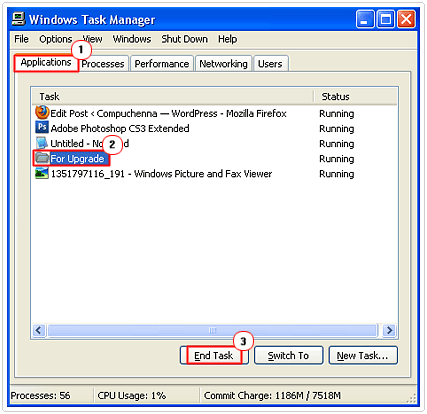
You should also consider cutting down on the amount of programs that load during the boot up phase. You can accomplish this by doing the following.
1. First, ensure you’ve logged into your computer with administrative rights.
2. Then click on Start -> Run [Windows Vista/7: Press  + R], type msconfig and click on OK.
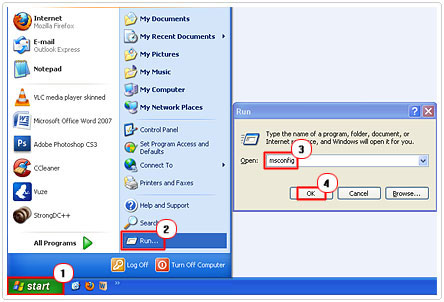
3. Once the System Configuration Utility loads up, click on the Startup Tab, then uncheck the box next to any programs you feel don’t have to be loaded during boot up, then click on Apply and Close.
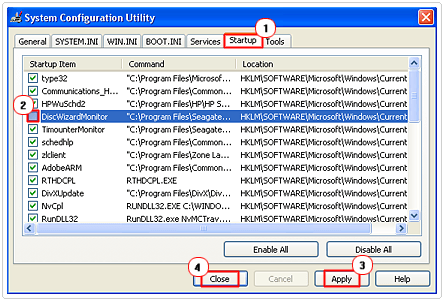
Check with Your ISP
Obviously a fast internet connection is paramount when it comes to running streamed content. If you feel your internet connection isn’t running as fast as it used to, then it could be due to a fault on your line. Consider contacting your ISP (Internet Service Provider) to determine whether or not it’s the cause of your slow streaming video problem.
Increase Your Virtual Memory
One optional step that you can take to increase the performance of streamed content is to optimise your virtual memory settings. Virtual memory uses space on your hard drive to increase system performance, so it’s possible that altering the amount of reserved space for virtual memory could eliminate your intermittent performance.
For more information on how to do this, check out my post on how to increase your virtual memory.
Optimise Your Internet Connection
Optimising your internet connection so that you get the best possible performance will also have a positive impact on streaming videos online. Your internet connections ability to buffer media content is determined greatly by your bandwidth, there are a number of things that you can do to ensure your internet connection is running at its best. For an in-depth look into all the things you can do to accomplish this, check out my post on speeding up your internet connection.
Lower Video Quality
Streaming media content in higher definition takes a considerable amount of your bandwidth. If your internet connection is not up to speed, then you can expect performance to be very choppy. One certified way of improving your streaming performance is to lower the quality of the media content. All of the major streaming sites give you this option. On YouTube, just click on the Cog Icon and select a lower bit rate.

Stop Intermittent Choppy Video Playback
Choppy intermittent slow streaming video playback is typically a symptom of lack of system resources. Thus, it’s in your best interest to ensure your system is in peak working order. One way of doing this is by regularly running a registry cleaner program such as Advanced System Repair Pro. Running such tools is necessary in maintaining the overall integrity of your computer.
You can find out more about this program here:
CLICK HERE TO CHECK OUT ADVANCED SYSTEM REPAIR PRO
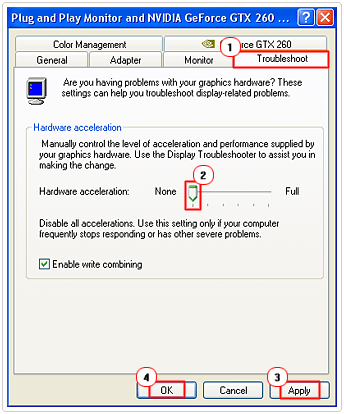
Disabling hardware acceleration is another way of eliminating choppy video playback, as it enables the media player that you’re using to set the requirements for the media content. To disable this feature, do the following.
1. First, click on Start -> Control Panel.

2. Once Control Panel loads up, double click on Display.
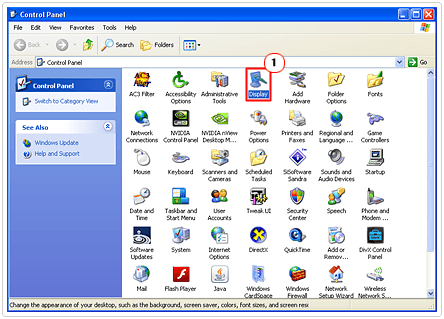
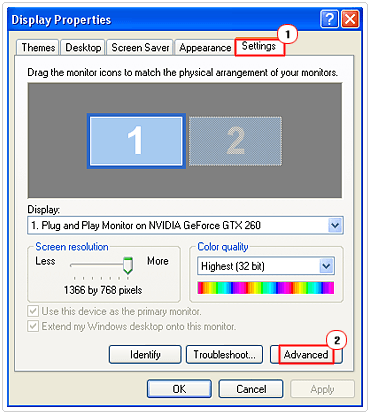
3. This will load up your Display Properties, from here, click on the Settings Tab, followed by the Advanced Button.
4. This should take you to the Advanced Settings of your Graphics Card, click on the Troubleshoot Tab, then set the slider to None and then click on Apply and OK.
Are you looking for a way to repair all the errors on your computer?

If the answer is Yes, then I highly recommend you check out Advanced System Repair Pro.
Which is the leading registry cleaner program online that is able to cure your system from a number of different ailments such as Windows Installer Errors, Runtime Errors, Malicious Software, Spyware, System Freezing, Active Malware, Blue Screen of Death Errors, Rundll Errors, Slow Erratic Computer Performance, ActiveX Errors and much more. Click here to check it out NOW!

