

| Attention Before you read this post, I highly recommend you check out my resources page for access to the tools and services I use to not only maintain my system but also fix all my computer errors, by clicking here! |
There are a number of valid reasons why you may be reading this post, you may have stumbled upon the splwow64.exe process while looking through Windows Task Manager and wondered what it was, why it was running on your computer, or whether it was a virus. Additionally, you could have come face to face with a splwow64.exe related error, either way; this file is not a virus, so you needn’t worry there.
To put it simply, splwow64.exe is a Windows system file. This program runs in the background, of which I’m sure you’re already aware of and it is a digitally signed process, meaning it has been tried and tested by Microsoft. In Windows Task Manager you will find that it is listed as:
“Printer driver host for 32 bit applications”
The purpose of this process is to enable 32-bit applications to be able to utilise a 64-bit printer spooler service on a 64-bit Microsoft operating system.
The default location for this file is the following:
C:\Windows\splwow64.exe
This process is loaded during system boot up by the process spoolsv.exe.
Should You Remove It?
You’re probably better off just leaving it running on your system. It won’t and doesn’t adversely affect system performance and it doesn’t use any additional memory over what your typical print spooler uses. The only time you would consider removing this process is if you didn’t have an actual printer installed on your computer. In which case, you could disable the process by doing the following:
1. First, boot into your operating system with full administrative rights.
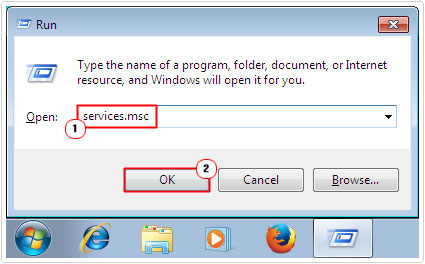
2. Then press  + R, type Services.msc and click on OK.
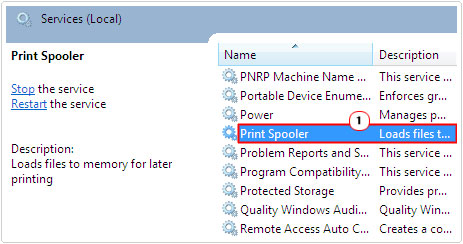
3. Once Services loads up, double click on Print Spooler.
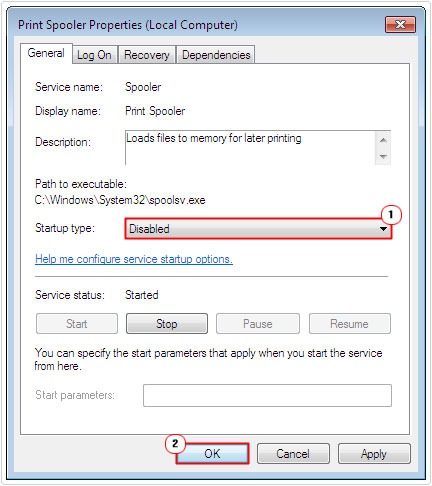
4. This will bring up the Print Spooler Properties applet, from here, select Disabled for Startup type and click on OK.
Common Splwow64.exe Errors
The splwow64.exe process is not without its issues as many users report experiencing Splwow64.exe related system errors, when attempting to print a document on their computers. A relatively common issue that occurs when the print process fails to end when printing in Windows 7/8 based systems. Such errors occur most commonly on Xerox printers, but are not limited to them.
Cause of Errors
To elaborate further, these errors occur because the splwow64.exe process remains in system memory longer than proscribed, in order to increase system performance, right after a print job has finished. This inadvertently leads to the Splwow64.exe process not ending when expected.
How to Fix It
Fortunately, there are many things that can be done to fix this issue. I recommend that you attempt them all, in the order that they are arranged. Some methods are more complicated than others, which is why I started with the easiest solutions first.
That said, continue reading for the many solutions, others in your position have used to alleviate this problem.
Update Printer Drivers
If you’re experiencing any problems with this process, the first thing you’ll want to do is update your drivers, as the problem is most likely caused by driver corruption or incompatibly.
So, go ahead and download the most up-to-date drivers from the official website of your printer. Alternatively, if you are unable to locate those drivers, then you can use the driver updater tool called DriverFinder. This tool is designed to automatically search the internet for the most up-to-date drivers for not just your printer, but all your hardware devices and download and install them. It’s very easy to use, making it ideal for all levels of users.
Anyway, you can download DriverFinder from here:
CLICK HERE TO CHECK OUT DRIVERFINDER
 The solution(s) below are for ADVANCED level computer users. If you are a beginner to intermediate computer user, I highly recommend you use the automated tool(s) above! The solution(s) below are for ADVANCED level computer users. If you are a beginner to intermediate computer user, I highly recommend you use the automated tool(s) above! |
Disable Client Side Rendering
Another method that many users have adopted in order to fix this particular splwow64.exe error is to disable the client side rendering feature for your printer. This can be done, by doing the following:
1. First, boot into your computer with full administrative rights.
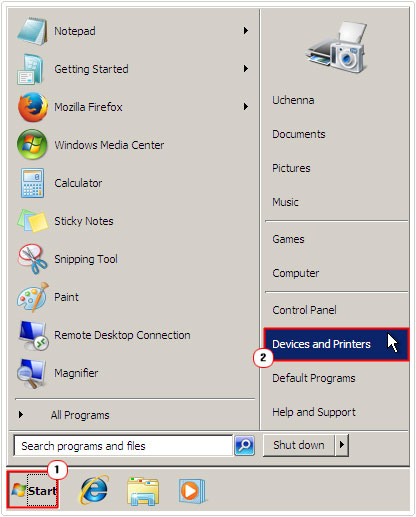
2. Then click on Start -> Printers.
3. Once Printers loads up, right click on your Printer Icon and select Properties.
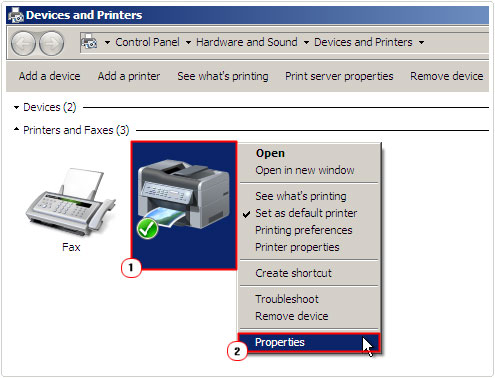
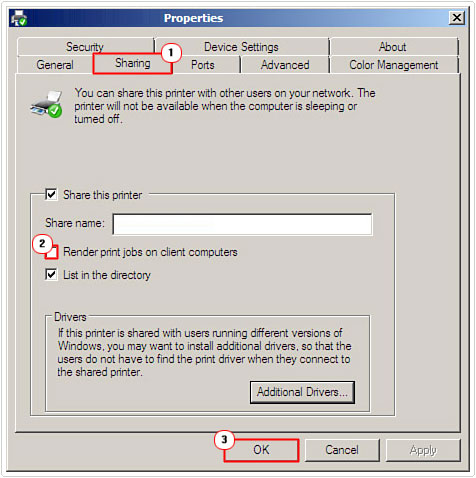
4. This will load up <Your Printer> Properties applet, from here, click on the Sharing Tab, then un-check the box next to Render print job on client computers and click on OK.
Use Registry Fix
Another method that has proven quite affective at fixing splwow64.exe based errors entails changing the time-out value for the process. This is a fairly complex task, as it requires you to edit the registry, so you should only attempt this, if you feel you have the confidence and expertise to do it.
WARNING: If you modify the registry incorrectly, it can render your system inoperable. Thus, it’s very important that you follow all of the steps outlined below carefully. For additional protection, you may want to consider backing up the registry before making any changes to it, that way, if you encounter any problems, if you can restore the registry back to its previous state.
To carry out this method, simply do the following:
1. First, ensure you have booted into your computer with a user profile that has full administrative rights.
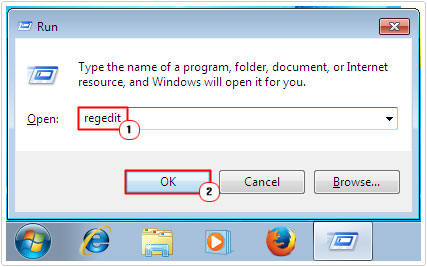
2. Then press + R, type regedit and click on OK.
3. Once Registry Editor loads up, navigate to the following path:
HKEY_LOCAL_MACHINE\SYSTEM\CurrentControlSet\Control\Print
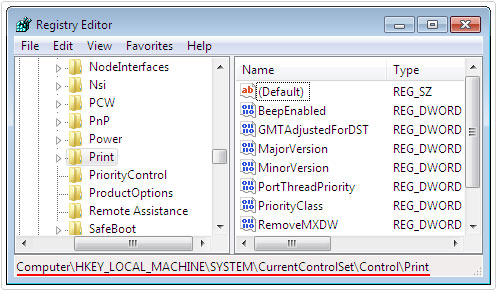
4. Once there, right click on the right pane and select New -> DWORD Value.
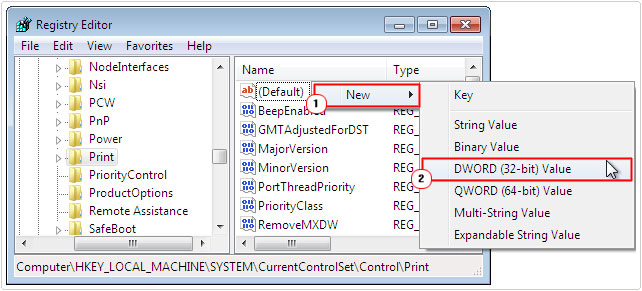
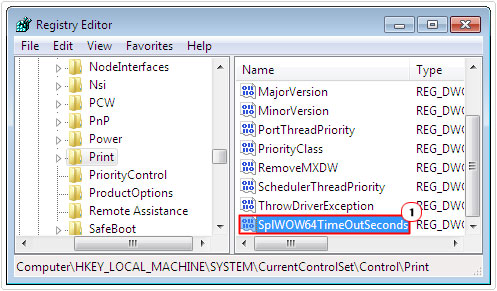
5. Enter the following name SplWOW64TimeOutSeconds for the new DWORD Value then press Enter.
6. Then double click on SplWOW64TimeOutSeconds, which will open up an Edit DWORD Value applet, from here, enter a value greater than 0 inside the Value data box and click on OK.
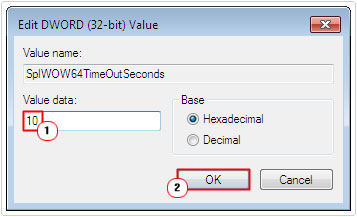
Note: The value that you enter inside the Value data box, should be greater than 0 because the value that you enter will be the number of seconds that your computer will wait before it checks to see whether or not the splwow64.exe process should be unloaded.
The splwow64.exe process will be unloaded when the number of seconds specified in the SplWOW64TimeOutSeconds DWORD Value has lapsed after the last 32-bit print has been carried out and closed.
This way, whenever the system is asked to print, the print service is not released until after the print job has been carried out, followed by the additional seconds that you entered within the DWORD Value.
For example, if you were to enter 10 into the Value data box, and the last print job takes three minutes to complete, the printer service will be released between three minutes and 10 seconds and three minutes and 20 seconds. If you did not specify a time-out value, then the default time-out value will be automatically set to 120 seconds.
Are you looking for a way to repair all the errors on your computer?

If the answer is Yes, then I highly recommend you check out Advanced System Repair Pro.
Which is the leading registry cleaner program online that is able to cure your system from a number of different ailments such as Windows Installer Errors, Runtime Errors, Malicious Software, Spyware, System Freezing, Active Malware, Blue Screen of Death Errors, Rundll Errors, Slow Erratic Computer Performance, ActiveX Errors and much more. Click here to check it out NOW!