

| Attention Before you read this post, I highly recommend you check out my resources page for access to the tools and services I use to not only maintain my system but also fix all my computer errors, by clicking here! |
For clarification purposes, both the Windows error 127 and iTunes error 7 refer to the same computer incident. It is essentially the same error referred to by two different names, and it relates to the bad installation, data and registry corruption of iTunes and other apple related products.
Both QuickTime and iTunes are two related applications that people most commonly install and use on their systems. However, despite its widespread use and efficiency, there are times when problems can occur, such problems typically occur when an update fails or an associated file is accidently deleted. Reinstallation of iTunes or QuickTime in many situations may not be sufficient in rectifying this problem, and although the program(s) may load up and work as it is supposed to, you may still experience random Windows error 127 error message pop ups.
Common Causes for This Error
There are numerous kinds of error messages that you could be presented with, depending on the situation that lead to your iTunes fault. Below are a number of the most common symptoms and associated error messages:
- “Error 7 (Windows Error 127)” this error dialog box will appear, blocking you from accessing the application window.
- The “Error 7 (Windows Error 127)” occurs randomly crashing your operating system every time you attempt to start iTunes.
- Your operating system runs significantly slower, with a delayed reaction to your keyboard and mouse input.
- Your computers performance becomes intermittent with frequent freezing.
Keeping track of when you experience the Windows error 127 is extremely important when it comes to solving the problem, as the error can occur at any time, due to a plethora of different reasons.
If you’ve received any of the above error messages along with the specified symptoms, then it’s more than likely that you have a damaged iTunes installation. The exact reason why this may have occurred is plentiful, however the most common reasons are as follows:
- You downloaded a corrupted iTunes installation file or the installation process didn’t fully complete.
- You made changes to an application associated with iTunes, which adversely affected the program.
- A virus or malware infection has caused irreparable damage to a Windows file or a file iTunes requires for smooth functionality.
- The installation of an Apple related program, resulted in the removal of a file iTunes requires.
Although there may be other reasons that caused the Windows Error 127, the reasons outlined above tend to be the most common.
Note: Another titbit relates to the corefoundation.dll which you may or may not see references to in your error messages, in addition to various other DLL files that are copied to your system during the iTunes installation process.
The reason why references may be made to these files is because of the Apple Application Support program, which may also have become corrupted (in addition to iTunes). Corruption to an associated DLL file is enough to adversely affect an Apple application. This is because single DLL files are shared amongst all of Apple’s products such as QuickTime, iTunes, Mobile Me etc, a programming method that was adopted for efficiency, but also has its flaws, especially when problems occur.
Windows Error 127 Solution
When it comes to solving this problem, there are a number of things that you will have to do. Thus, it’s very important that you follow the process I’ve laid out below in its entirety.
Note: Make sure you follow all the steps below, as adopting one or two of the methods will NOT sufficiently tackle Windows error 127.
Uninstall Apple Applications
The first thing you will need to do is remove all programs on your computer that were developed by Apple. This is a fairly simple process, that you should be able to do using the operating systems uninstaller. Anyway, the step by step instructions are as follows.
1. First ensure that you have logged into your system with administration rights.
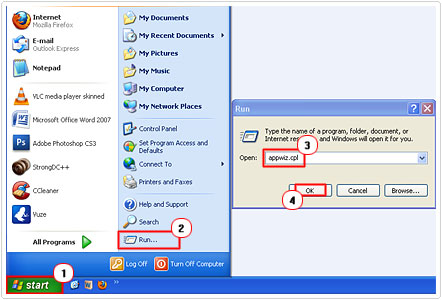
2. Then click on Start -> Run, [Windows Vista/7: Press  + R], type appwiz.cpl and click on OK.
3. This will bring up the Add or Remove Programs [Windows Vista/7: Uninstall or change a program] applet, from here you will need to click on the Apple Application, and then click on Remove. [Windows Vista/7: Uninstall]
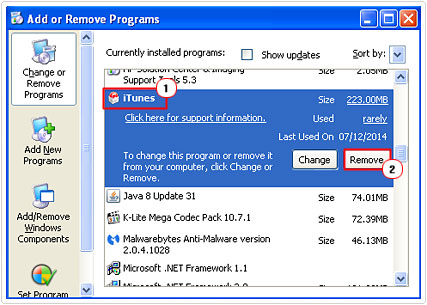
Note: The Apple applications that you will need to uninstall are as follows:
- Bonjour
- iTunes
- iPod Drivers
- QuickTime
- Apple Application Support
- Apple Mobile Device Support
- Apple Software Update
So you will need to repeat the uninstall process for each of these applications. Be sure not to restart your system until you have removed all of the applications first.
Verify Uninstallation
The next step is to verify that the application folders have been totally removed from your computer, as it is quite common for the uninstaller to leave remnants of the application behind.
Keep in mind, it’s very important that these applications are completely removed from your system, before you reinstall them, otherwise the reinstalled applications will inherit the attributes of the old install.
Anyway, to verify its removal, you will need to access your Programs Files and Windows folder and check to see whether the following applications folders are still present and delete them:
- C:\Program Files\iTunes
- C:\Program Files (x86)\iTunes
- C:\Program Files\iPod
- C:\Program Files (x86)\iPod
- C:\Program Files\Bonjour
- C:\Program Files (x86)\Bonjour
- C:\Program Files\Common Files\Apple
- C:\Program Files (x86)\Common Files\Apple
- C:\Program Files\QuickTime
- C:\Program Files (x86)\QuickTime
- C:\Windows\System32\QuickTime
- C:\Windows\System32\QuickTimeVR
For a step by step tutorial on how to do this, I suggest you check out my post on fixing uninstall issues.
Run Virus Scan
Once you’ve successfully removed the Apple applications from your computer, the next thing you will want to do is run a Virus and Malware scan of your computer. This is because of the possibility that your problem may have been brought about by a virus. Thus, it’s important that it be removed before you begin any reinstallation procedures.
Anyway, for this procedure I recommend running both an antivirus and anti-malware scan. I’m going to assume you already have an antivirus program on your computer, but in the event that you do not, I highly recommend you check out my post on the very best antivirus tools.
1. For the anti-malware scan, I recommend you use SpyHunter to carry out this task. You can download this program from here:
CLICK HERE TO CHECK OUT SPYHUNTER
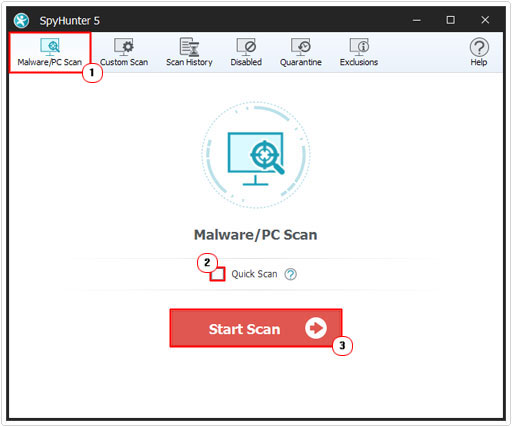
2. Once you have downloaded the program, install and run it, and it should automatically scan your system, but in the event that it does not, simply click on Malware/PC Scan, then un-tick the box next to Quick Scan, then click on Start Scan.
Note: If SpyHunter requires updating prior to scanning your system, it should do that, automatically.
Run Registry Cleaner
The next thing you will need to do is run a registry scanner in order to remove any registry entries that are linked to any of the Apple programs that you have recently uninstalled.
There are a number of applications around that can do this for you, but I personally recommend Advanced System Repair Pro, and that’s because of its efficiency, and proven track record, anyway you can access this tool here:
CLICK HERE TO CHECK OUT ADVANCED SYSTEM REPAIR PRO
Repair Microsoft .NET Framework
Once you’ve successfully removed all the Apple applications and all references to it, on your operating system, the next step you will need to take is to repair the .Net framework on your computer, which can be done by doing the following.
1. First visit the following Microsoft page: http://www.microsoft.com/en-us/download/details.aspx?id=17718
2. Then download and install the most up-to-date version of Microsoft .NET Framework onto your computer.
3. Once the installation process has completed, restart your system, and you are done.
Reinstall iTunes
Once you have successfully removed, scanned and updated your computer, you should now be in the position to reinstall iTunes.
1. You can download and install the latest version of iTunes from here: http://www.apple.com/itunes/
2. Once you have it running, verify that it is working correctly, and then proceed to reinstall all the other Apple applications you previously uninstalled.
Are you looking for a way to repair all the errors on your computer?

If the answer is Yes, then I highly recommend you check out Advanced System Repair Pro.
Which is the leading registry cleaner program online that is able to cure your system from a number of different ailments such as Windows Installer Errors, Runtime Errors, Malicious Software, Spyware, System Freezing, Active Malware, Blue Screen of Death Errors, Rundll Errors, Slow Erratic Computer Performance, ActiveX Errors and much more. Click here to check it out NOW!