

| Attention Before you read this post, I highly recommend you check out my resources page for access to the tools and services I use to not only maintain my system but also fix all my computer errors, by clicking here! |
There are times when it may seem like Windows keeps restarting and without prior warning. Windows operating systems are designed to automatically detect and repair system errors. However, it’s not without its faults, as your system is prone to restarting on its own accord, and the fact that you’re not presented with an error message, can leave you somewhat bemused to what just happened. Errors that cause the operating system to automatically restart are referred to as fatal errors.
When Windows keeps restarting in most instances it’s simply a preventative measure, implemented by the operating system in order to limit the amount of damage the error is able to exact on your computer. Your registry is especially vulnerable to these kinds of errors. However, your system randomly restarting without giving you any feedback on the cause is in no way a long term solution, as the error will continue to manifest itself within your system. Thus, if your Windows keeps restarting, then the first thing you’re going to want to do is prevent your computer from doing this, that way, if the computer does encounter a fatal error, it will present you with the appropriate error message.
One thing that you should be aware of is the fact that not all errors are the result of a virus, thus, taking the typical action of running a full virus scan may not reap the kind of results that you initially hoped for. To effectively fix this problem, you may have to think outside of the box.
There are so many reasons why your computer may encounter a fatal error. It could be due to a registry error, corrupt system file, defective memory, virus, corrupt hardware driver etc. So you’ll want to adopt a more holistic approach, to ensure you cover every possible angle.
With that said, there are a number of steps that you can take if Windows keeps restarting for you. Continue reading for more on the solutions.
Detect and Remove Possible Virus Infection
Though I previously stated that a virus scan isn’t your be all, end all, there is still a possibility that Windows keeps restarting because of a potential virus infection.
Viruses work by attaching themselves to your boot up sequence so that they are unintentionally executed as your computer starts. In order to resolve issues such as this, you must first start by installing a good antivirus program onto your computer and running a full system scan.
To complete this task, I suggest you do the follow.
1. First, download SpyHunter and install it on your system. You can find the program at the following link:
CLICK HERE TO CHECK OUT SPYHUNTER
2. Once it has reached the end of the installation phase, it should automatically update virus definitions and run a scan of your system.
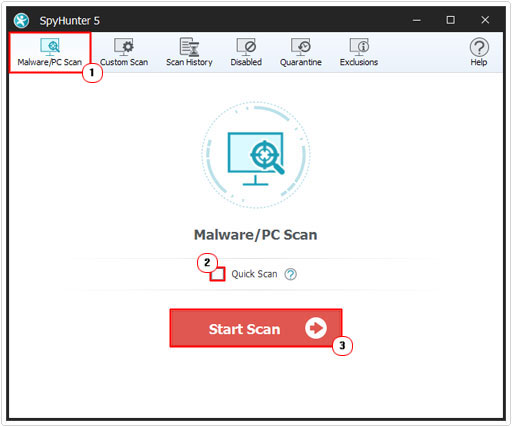
3. However, in the event that it does not automatically scan your computer, you should click on Malware/PC Scan, then un-tick the box next to Quick Scan and click on Start Scan.
Note: Because it’s a full system scan, it may take in excess of an hour to complete. So be sure to set aside enough time to complete the whole process.
Update Your Device Drivers If Windows Keeps Restarting
It’s very important that the device drivers installed on your computer are designed specifically for your operating system. Symptoms such as when Windows keeps restarting are very common when using an incompatible driver or a driver that is not working as it should. Thus, it’s in your best interest to ensure that all your drivers are up-to-date and working.
To complete this task you have two options. The first option entails the use of specialised driver update software that, through the use of comprehensive scan technology is able to check the drivers of every device on your system and make the appropriate updates where necessary. This is definitely the best option for the sake of time and feasibility. For those of you interested in the automated approach, you can download DriverFinder from the following link:
CLICK HERE TO CHECK OUT DRIVERFINDER
The second option entails manually checking every device on your computer, verifying that it’s working correctly, and checking for updates. This task can be accomplished by following the steps below.
1. First, ensure you’ve logged into your computer with administrative rights.
2. Then click on Start -> Control Panel.

3. From Control Panel, double click on System.

4. Once System Properties loads up, click on the Hardware Tab, followed by the Device Manager Button.

5. From Device Manager, you’ll have to click on the [+] beside each category, and then double click on the specific device.

6. From [Device] Properties, the Device Status will tell you whether the drivers are working correctly.

7. To update the drivers, click on the Drivers Tab, followed by Update Drivers. Then follow the onscreen instructions.

Note: The Update Drivers feature uses the Windows Update service in order to locate the most recent drivers for that specific device. As a result, there is a strong chance that it will be unable to find more recent drivers for your device, even when more recent drivers exist. Thus, you may be required to manually locate these drivers from the website of the manufacturer of the device.
Switch Off Automatic Restarts
You have no idea why Windows keeps restarting, it could be due to a driver, an application or a hardware component. By switching off the automatic restart feature, you will force your system into providing you with the appropriate error code. This means, instead of your system restarting, you will be presented with a blue screen, which will provide you with crucial information on the specific error that you can then use to rectify the problem.
1. To switch off this feature, begin by logging into your computer with administrative rights.
2. Then click on Start -> Control Panel.
3. From Control Panel, double click on System.
4. This will load up System Properties, from there, click on the Advanced Tab followed by the Settings Button, under Startup and Recovery.

5. From the Startup and Recovery Menu, uncheck the box next to Automatically Restart and click on OK.

Use Event Viewer to Find the Error
Event logs have been an integral part of Windows since 1993. Both the operating system and applications use this log service in order to report system events, such as an applications failure to complete a set action or to start a particular Windows component. The logs on Event Viewer are split into three types: Security, Application and System; which are fairly self explanatory.
Thus, Event Viewer is a powerful tool that you may be able to use to determine why Windows keeps restarting. The logging process of Event Viewer is very detailed, providing you with information on the specific applications or files accessed during a specific period. Because we’re dealing with a fatal error, you’ll want to pay close attention to the Error and Critical log types.
1. To start Event Viewer, first log into your computer with administrative rights.
2. Then click on Start -> Control Panel.
3. From the Control Panel, double click on Administrative Tools.

4. Then double click on Event Viewer.

5. Once Event Viewer loads up, click on System, under Event Viewer (Local), then navigate to the time of your random restart and double click on the corresponding log (it should be an error log type).

6. This will load up the logs Event Properties. Read the Description for a synopsis of the error, and possibly, a Microsoft link for additional information and support.

Use System File Checker
In most cases, you should be able to solve why Windows keeps restarting within a user session. One of such methods that you can use to that end is the System File Checker. Through the use of this utility, you will be able to detect and repair corruptions within your operating system, as it will scan all system files and replace any that it finds to be missing or corrupt. If you have a Windows XP or earlier system, then you will need a copy of your Windows CD so that the corrupt or missing files can be restored with the ones on the CD. For Windows Vista/7 users, the operating system will restore the files from a compressed folder stored within your System32 folder. To use this tool, follow the instructions below.
1. First, ensure you’ve logged into your computer with administrative rights.
2. Then click on Start -> Run, type cmd and click on OK. [Windows Vista/7: Start -> Type cmd (into the Search programs and files box) and Press CTRL + Shift + Enter, then click on Continue]

3. Once Command Prompt loads up, type “sfc.exe /scannow” and press Enter.

Note: If you’re running Windows XP, then you will need to put the installation CD into your CD ROM drive, prior to starting the System File Checker.
Are you looking for a way to repair all the errors on your computer?

If the answer is Yes, then I highly recommend you check out Advanced System Repair Pro.
Which is the leading registry cleaner program online that is able to cure your system from a number of different ailments such as Windows Installer Errors, Runtime Errors, Malicious Software, Spyware, System Freezing, Active Malware, Blue Screen of Death Errors, Rundll Errors, Slow Erratic Computer Performance, ActiveX Errors and much more. Click here to check it out NOW!
Thank you for your help!
by Raj