| Attention Before you read this post, I highly recommend you check out my resources page for access to the tools and services I use to not only maintain my system but also fix all my computer errors, by clicking here! |
Are you currently bogged down with the Winsock error? If so, you’ve come to the right place, as I intend to explain all.
Winsock is short for Windows Socket and is an application programming interface or API that is used by developers to create applications that communicate with other computer systems through the TCP/IP protocol. Both Windows 95 and Windows NT come with a DLL file called winsock.dll, it’s this file that does the mediation between the application and the internet protocol.
The winsock.dll file is available in a variety of versions, on one side you have the Microsoft version, and on the other, you have a number of shareware and freeware versions, the Winsock API does not have an official standard, so each version may differ somewhat from the other.
What Is A Winsock Error?
A Winsock error typically occurs within the Winsock itself, which is used as the interface between windows applications and internet connectivity. Winsock’s primarily responsibility is to govern how windows applications interface with other applications over the internet.
All Windows based computers come with at least one physical port (the Ethernet port), however, there are also ports that you can’t see, called virtual ports, and it’s these ports that are used when your computer makes multiple connections to the internet from various sources. Every computer has exactly 65535 ports. At least 60% of these ports are used by applications that require access to the internet, while some ports (0 – 1024) are reserved solely for the operating system. If any application on your computer attempts to access the internet through one of these ports, it will be denied and/or result in an error. However, this very rarely happens, since the vast majority of developers are aware of which ports are accessible and which are reserved for the OS, and for those individuals that aren’t totally up to speed on which ports they can use, and which ports are reserved, they can always checkout any public index list online.
Winsock’s responsibility in all of this is to open and close these ports that applications on your computer are using to get online. If the Winsock file gets corrupted or if a resource that Winsock requires gets corrupted, then applications on your system that require internet connectivity as part of their functionality, will cease to function as they should. The Winsock error is always the result of this particular scenario, which makes it pretty easy for you to determine what the problem is. However, when it comes to fixing it, it can be rather difficult, especially if you no idea of where to start.
What Causes The Winsock Error?
The vast majority of internet connection issues are the result of corrupt Winsock settings. Because of the various programs on your computer that use Winsock, it can be rather difficult to identify which program is the root cause of the problem. The Winsock is also a primary target for malware, as hackers attempt to access your computer through the net.
The most common culprits of the Winsock error are:
- The registry keys of the Winsock component are corrupt.
- The drivers for the TCP/IP protocol on your system are corrupt or missing.
- The drivers for your NIC (Network Interface Card) are corrupt or missing.
- An application is trying to receive or transmit data through a reserved system port.
Of the main culprits highlighted above, a corrupt registry key is the most common; however, a corrupt registry key typically results in other areas of the registry being corrupt to. The manual approach to rectifying this issue is fairly comprehensive, however, I’ve taken the time to jot down the entire procedure; continue reading for more information.
However, the recommended approach to addressing this issue is to use automated software.
Automated Tools
The majority of Winsock errors are typically the result of registry corruption. Just one simple mistake is capable of causing all kinds of heartache which in some cases, only automated tools are capable of fixing. The good thing is that, despite the difficulties in fixing the problem manually, if you use the right tool, you can fix the problem in a matter of minutes. The first tool I’ll like to recommend is Advanced System Repair Pro, and that’s because of its proficiency in repairing corrupt registries. You can find out more about this program here:
CLICK HERE TO CHECK OUT ADVANCED SYSTEM REPAIR PRO
The two other tools that I think you should try are WinSock XP Fix and WinSockFix, both of which are capable of fixing errors related to the Winsock and have the testimonials to prove it.
 The solution(s) below are for ADVANCED level computer users. If you are a beginner to intermediate computer user, I highly recommend you use the automated tool(s) above! The solution(s) below are for ADVANCED level computer users. If you are a beginner to intermediate computer user, I highly recommend you use the automated tool(s) above! |
Verifying Your Internet Protocols
The first thing you’re going to want to do is ensure that you have all the appropriate internet protocols present on your computer.
1. First, log into your computer with a user profile that has administrative rights.
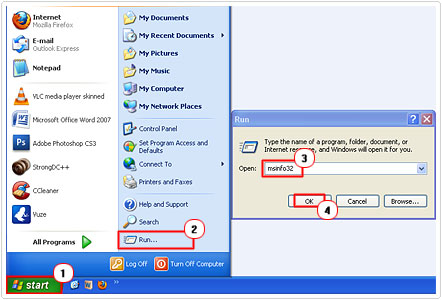
2. Then click on Start -> Run [Windows Vista/7: Press  + R], type msinfo32, and click on OK.
3. This will load the System Information applet, on the left pane, click on the + symbol next to Components -> Network -> Protocol.
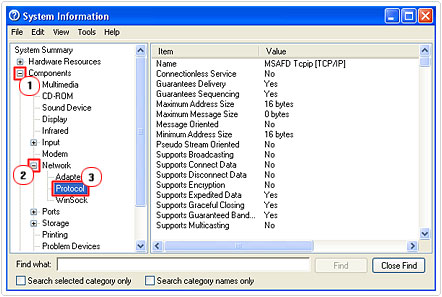

Within the Protocol, on the right pane, as you scroll down, you should have at least 10 sections labelled with the following names:
- MSAFD Tcpip [TCP/IP]
- RSVP UDP Service Provider
- MSAFD NetBIOS
If on your computer its showing less than ten sections with names that differ from those listed above, then it means you have missing data that Winsock requires in order to function properly. To rectify this problem, you’re going to have to rebuild the Winsock component.
Rebuild the Winsock
One thing you should be aware of when rebuilding or resetting the Winsock, is that if you’re running Windows XP with Service Pack 2, then it will restore all Winsock settings including your third-party LSPs back to their factory defaults. LSPs are settings created by applications that use the Winsock, this means, you will have to reinstall some applications on your computer after completing this procedure.
1. First start by logging into your system with administrative rights.
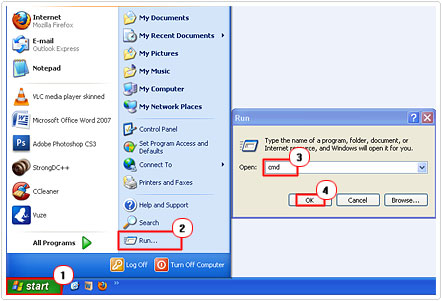
2. Then click on Start -> Run, type cmd and click on OK. [Windows Vista/7: Start -> Type cmd (into the Search programs and files box) and Press CTRL + Shift + Enter, then click on Continue]

3. Once Command Prompt loads up, type “netsh winsock reset” and hit Enter.


After you’ve run this command, you must reboot your computer in order for the changes to take effect.
Deleting the Corrupt Registry Keys
The next step is to remove the corrupt registry keys created by Winsock, so that new ones can be made in their stead.
WARNING: Editing or deleting the wrong registry entry can damage your operating system beyond repair.
1. First, log into your computer with administrative rights.
2. Then click on Start -> Run [Windows Vista/7: Press 


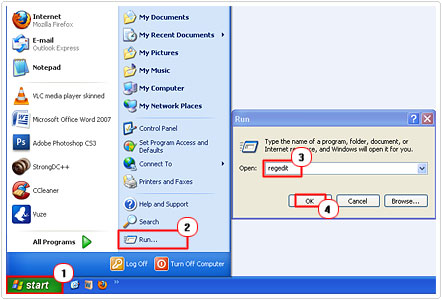

3. Once the Registry Editor loads up, navigate to the following path:
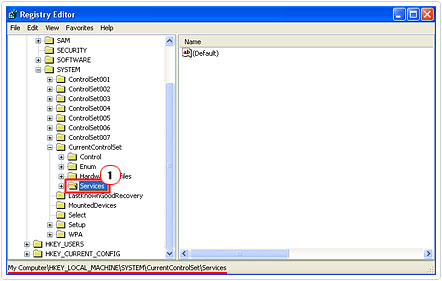

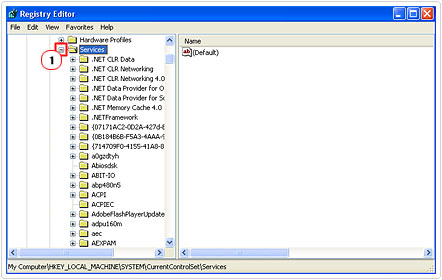
4. Once there, click on the + symbol next to Services to reveal all its sub keys.

5. Then scroll down to you find the registry sub keys Winsock and Winsock2 and right click on each one and select Delete.
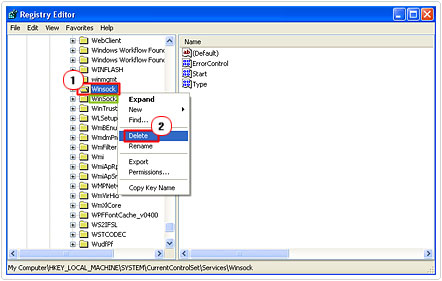

Once you’ve removed both sub keys, restart your system.
Reinstall the Internet Protocol Drivers
Once you’ve removed the sub keys from your registry, you’ll want to reinstall the Internet Protocol drivers, so that connections to the internet are possible through third party applications.
1. To complete this procedure, you must first log into your computer with administrative rights.
2. Then click on Start -> Control Panel.
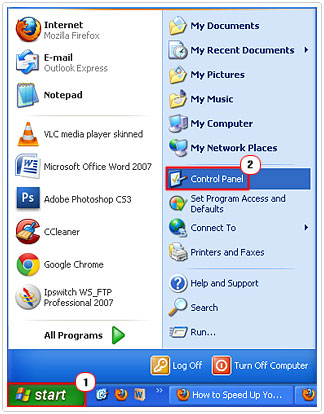

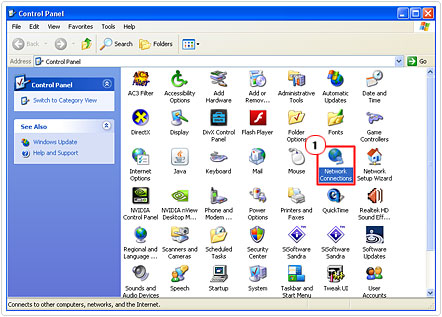
3. Once Control Panel loads up, double click on Network Connections.

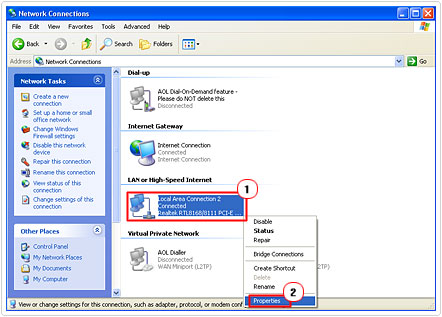
4. From Network Connections, under LAN or High-Speed Internet, right click on Local Area Connection and select Properties.

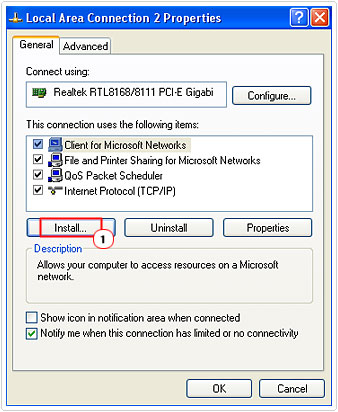
5. This will bring up the Local Area Connection Properties applet, from here, click on Install.

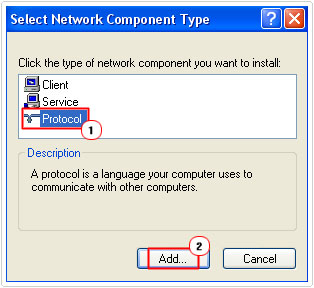
6. For the Network Component Type, select Protocol and click on Add.

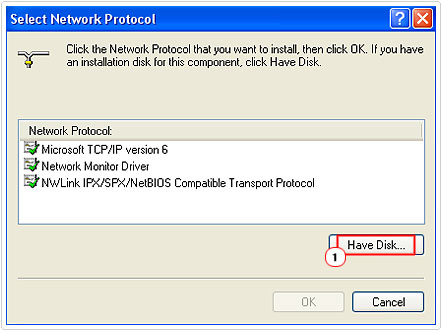
7. On the Select Network Protocol applet, click on Have Disk.

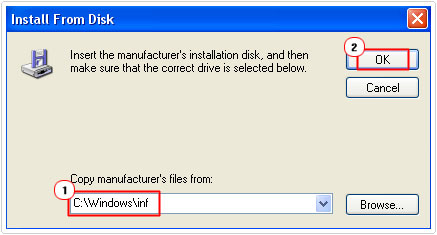
8. Then type “C:\Windows\inf” and click on OK.

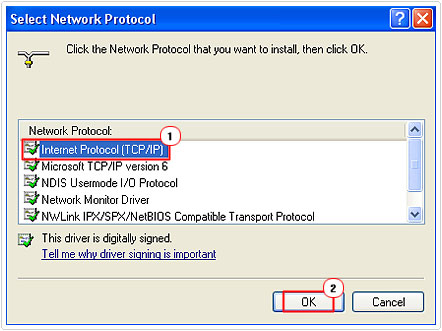
9. Lastly, select Internet Protocol (TCP/IP) from the list and click on OK.

The steps above should be sufficient in rectifying any issues you have with the Winsock, however, in the event that it’s not, you should consider running system file checker.
System File Checker
The system file checker is a Windows utility tool that will scan your system for any missing or corrupt system files and replace them. In order for you to run this tool, you must have your operating system on CD.
1. First, begin by logging into your computer with administrative rights.
2. Then click on Start -> Run, type cmd and click on OK. [Windows Vista/7: Start -> Type cmd (into the Search programs and files box) and Press CTRL + Shift + Enter, then click on Continue]


3. Once Command Prompt loads up, type “sfc /scannow” and press Enter.


Note: Make sure you have your OS CD in your CD/DVD Rom drive before you hit Enter.
If after following all the steps below, you’re still getting a Winsock error, then you should consider running a repair installation. For more information on how to do this manually, you can check out my post on how to speed up your system.
However, the manual option requires a certain level of expertise and also for you to have your Windows CD, which can be a problem, as most systems come with their operating system pre-installed. However, as an alternative, you can use a Windows repair tool called Reimage, which can automatically reinstall your operating system on the fly, without the requirement of a Windows CD and at no risk to your personal files.
For more information on this product, visit the following link:
CLICK HERE TO CHECK OUT REIMAGE
Are you looking for a way to repair all the errors on your computer?


If the answer is Yes, then I highly recommend you check out Advanced System Repair Pro.
Which is the leading registry cleaner program online that is able to cure your system from a number of different ailments such as Windows Installer Errors, Runtime Errors, Malicious Software, Spyware, System Freezing, Active Malware, Blue Screen of Death Errors, Rundll Errors, Slow Erratic Computer Performance, ActiveX Errors and much more. Click here to check it out NOW!

