| Attention Before you read this post, I highly recommend you check out my resources page for access to the tools and services I use to not only maintain my system but also fix all my computer errors, by clicking here! |
Error 0x0000007e is a critical error that occurs when the operating system is unable to access certain system files and components, such as the hard drive, motherboard ports or third party hardware devices attached to the system. In most cases, during the boot up sequence, the operating system will discover the problem prior completing the sequence, and display the error message immediately, halting the boot up.
However, there are those instances when the error is discovered after the boot up, so the computer successfully loads up, the end user logs in, and at some point during usage, error 0x0000007e displays, halting whatever activity that was being carried out on the computer.
What Causes Error 0x0000007e?
There are so many different things on your computer system that are known to causes error 0x0000007e. To name a few, they include:
- A potential faulty hard drive.
- The storage capacity on the hard drive is completely full.
- The BIOS is outdated or incompatible with newly installed components and/or software, and thus, requires an update.
- Graphics card drivers are incompatible.
Because there are so many potential causes for this error, it can be quite difficult to pinpoint the exact cause in each individual cases.
How to Fix It
With that said, there are a number of things that you can do, in your attempt to repair this error.
The first thing you’ll want to do, before anything else, is verify whether or not your hard drive space is full.
Error 0x0000007E is known to occur when a hard drives storage capacity has been almost completely filled. Thus, you’ll want to check that you have sufficient space on your hard drive by doing the following:
1. First, boot into your computer with full administrative rights.
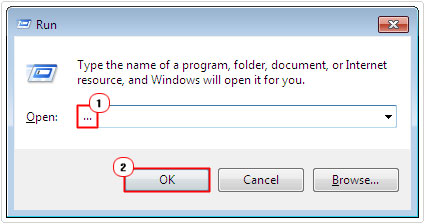
2. Then press  + R, type … and click on OK.
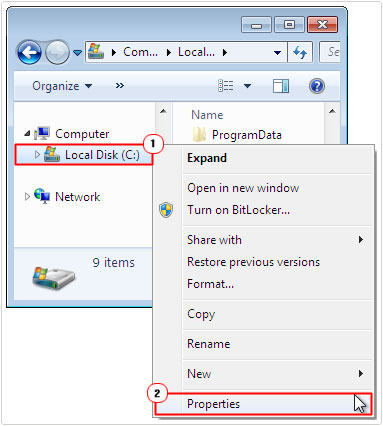
3. When Windows Explorer loads up, right click on your Primary (C:) Hard Drive, in the left hand pane, and select Properties.

4. This will bring up your Hard Drive Properties applet, from here you should be able to verify your hard drive space, under the General Tab.
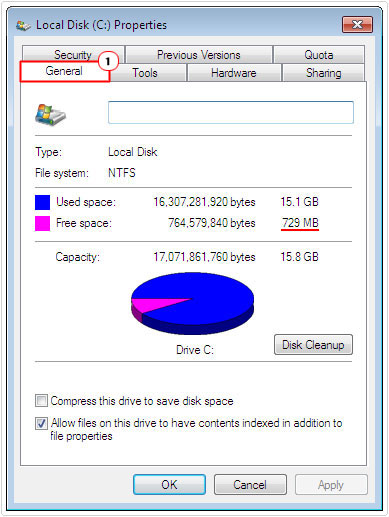

If you’re hard drive has a reasonable amount of hard drive space, then you can rule this out as a potential cause. In which case, I recommend you attempt the many solutions highlighted below, in the order that they appear. However, if the hard drive is full, I suggest you check out my post on low disk space, on what to do next.
Update Device Drivers
If you’re hard drive has more than enough available storage space, then you may want to look at an outdated or incompatible device driver as the potential cause of error 0x0000007E. If the STOP error message that appears lists a device driver, then it’s more than likely that it is to blame for the error. Thus, you should definitely consider updating it.
However, if no device driver is listed, then you may need to try updating as many device drivers as you possibly can.
To update a device driver, you will need the most up-to-date version of the devices driver. You should be able to find them on the manufacturers website, depending on the component and brand.
Be sure to download the driver that is specifically compatible with your version of Windows. Once you’ve done that, run the driver install and follow the onscreen instructions. You can also update the software, directly from Device Manager. My post on igfxsrvc.exe will provide you with step by step instructions on that.
Alternatively, if you are unable to find the most up-to-date drivers for all the different components attached to your computer, then you should use DriverFinder, which is an automated driver updater tool. This tool will scan your system, recognise all the different components attached to it, and find the most recent and compatible drivers for it.
To use this tool, you won’t need to figure out what components are installed on your system. You also won’t have to worry about the risks of downloading the wrong drivers for your system, as this tool eliminates that risk.
With that said, you can find out more about this powerful tool, from the link below:
CLICK HERE TO CHECK OUT DRIVERFINDER
  |
Check for Hard Drive Failure
If there is the odd chance that error 0x0000007E is due to a faulty hard drive, then you’ll want to back everything up, before doing anything else.
However, before you go ahead and do that, you’ll first want to check whether or not your hard drive is indeed, faulty.
To do that, simply do the following:
1. Follow steps 1 – 3 of How to fix it.
2. Once the Hard Drive Properties applet loads up, click on the Tools Tab, then click on Check Now.
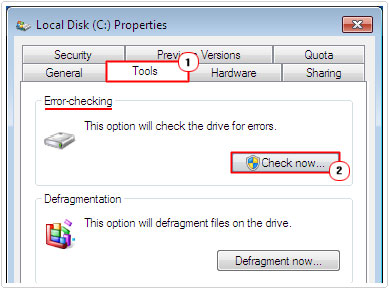

3. This will bring up a Check Hard Drive applet, make sure both boxes next to automatically fix file system errors and scan for and attempt recovery of bad sectors are ticked, and click on Start.
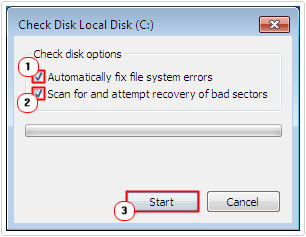

Note: You will have to restart your computer, to initiate the process.
Remove Unsigned Drivers To Fix Error 0x0000007E
If you’ve carried out all the solutions above, that means, you’ve updated all your device drivers, and you’re still getting error 0x0000007E. There is a strong chance that the error may be due to an unsigned driver installed on your system.
These unsigned drivers may not be compatible with your version of Windows or BIOS. Basically, all drivers that have been tested by Microsoft Windows Hardware Quality Labs or WHQL carry a Microsoft digital signature. Fortunately, it is possible to locate all the unsigned drivers on your computer, and remove them, where applicable. To do that, simply do the following:
1. First, boot into your computer with full administrative rights.
2. Then press 


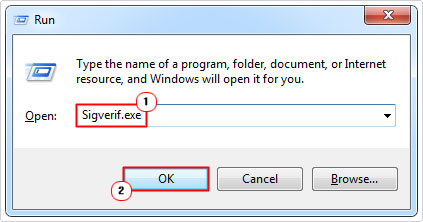

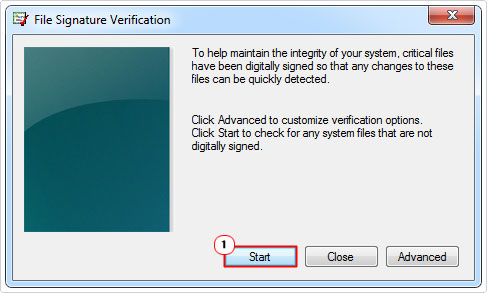
3. This will load up the File Signature Verification tool, from here, click on Start.

Note: Once the scan has completed, another applet will appear. It should present you with a list of all the unsigned drivers on your computer. It will include the folder they are installed in and the date they were created/modified.
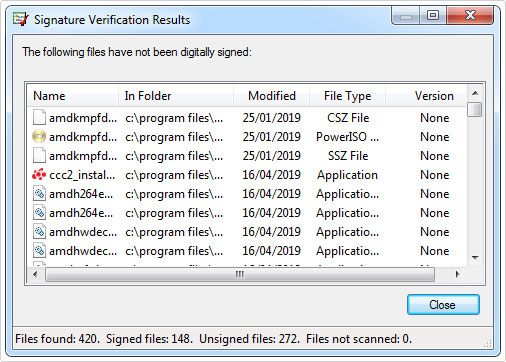

The next thing you’ll want to do is create a folder on your C:\ drive and move all the unsigned drivers into it. You can use the Cut and Paste method to do so.
Note: Its better you move the drivers to a folder in the C:\ main directory, as this will make it easier for you to recovery those files, in the event that the operating system refuses to load up.
4. Once you have moved the files over, restart your computer.
Update BIOS to fix Error 0x0000007E
If you’re hard drive has sufficient storage space and is working fine, and your device drivers are all up-to-date and you’re still encountering problems. You may want to look at your BIOS as a potential cause for error 0x0000007E.
The BIOS is the first piece of software that is loaded, which is designed to get your operating system up and running. It’s responsible for locating all the different components installed on your system. Notifying the operating system, whether or not the devices are accessible.
Similar to any other software tool you may have installed on your computer, motherboard manufacturers regularly update the BIOS for their components. When the BIOS is updated, it’s typically done to your system compatible with new hardware devices and to fix any incompatibilities; this in turn improves system performance.
You should be able to find the latest BIOS for your computer’s motherboard, from the manufacturer’s website.
If your computer is fairly new (purchased in the past couple of years), then the BIOS update process will be much simpler for you. After exhausting all the solutions above, you should go ahead and download the latest BIOS for your specific motherboard.
Once you’ve done that, you should be able to update the BIOS from within Windows. Just run the update, and follow the onscreen instructions. In other situations, you may be required to enter the BIOS, but that’s only on older motherboards, which require you to have a floppy disk drive.
If you’re updating the BIOS on your laptop computer, make sure the laptop is connected to the mains. This is because, if the system shuts down during the update process it will brick (kill) your system.
Older Systems
If you have a much older computer, then you will need to copy the BIOS update to a floppy disk. Log into your BIOS during the POST (Power on Self-Test). There should be an option to update the BIOS from within the BIOS menu screen. Alternatively, you may be able to create a boot disc, allowing you to copy the update to a CD. Simply put it into CD-ROM drive and restart your computer.
Once you’ve successfully updated your BIOS, restart your computer and error 0x0000007e should be fixed.
Are you looking for a way to repair all the errors on your computer?


If the answer is Yes, then I highly recommend you check out Advanced System Repair Pro.
Which is the leading registry cleaner program online that is able to cure your system from a number of different ailments such as Windows Installer Errors, Runtime Errors, Malicious Software, Spyware, System Freezing, Active Malware, Blue Screen of Death Errors, Rundll Errors, Slow Erratic Computer Performance, ActiveX Errors and much more. Click here to check it out NOW!

