| Attention Before you read this post, I highly recommend you check out my resources page for access to the tools and services I use to not only maintain my system but also fix all my computer errors, by clicking here! |
Error 0x8007000d, like so many of its kind, is relatively common. Fortunately, for you, there are several ways that you can rectify it, all of which are outlined in this post.
The Microsoft Windows operating systems are excellent pieces of technology. Of all the various platforms, Windows is without a doubt, the most sought after. This is because of a combination of things. It combines a wide feature set, with an easy intuitive user interface. In short, anyone can get to grips with it.
But despite that, Microsoft Windows is not without its faults. With everything in this world, you’ll always find a balance between the good and bad. In the case of Windows, it’s the disadvantages. The most inconvenient aspect of Microsoft Windows, is its numerous errors. Error messages that seem to get bigger and bigger, and no less perplexing.
Error code 0x8007000d is one of these annoying errors that a great many people have encountered throughout the use of their operating system. This particular error occurs when the end user attempts to update Windows. Either during the update process or just before it, halting the entire process.
The generally believed reason why error 0x8007000d occurs, is because of an inability to access a particular file, when required. Essentially, the operating system attempts to load a file that has either been corrupted or deleted – for some unknown reason. Whatever the cause, there are several solutions that you can adopt. So continue reading for those; all of which have proven very effective at rectifying this problem.
What Causes Error 0x8007000d
The main causes of error 0x8007000d is the following:
- Corruption or deletion of an integral Windows file.
- Damaged Windows Update component.
- Damaged or missing driver files.
Error 0x8007000d is a pretty straightforward issue. As it alludes, almost exclusively to some form of file corruption. This means, any solution you adopt must be able to either replace or repair the infraction.
How to Fix It
There are several things that you can do, to this fix problem. The solution that works for you, will depend greatly on the error cause. That said, I recommend you attempt all of the solutions, in the order that they appear.
Use Windows Repair Tool to Fix Error 0x8007000d
Error 0x8007000d is a common issue, but so are Windows Update errors in general. If you want a quick and efficient way of rectifying these problems, as and when they arise, then I recommend you use the Windows repair tool, Advanced System Repair Pro.
This tool comes with a wide assortment of features and capabilities. Able to detect and remove malicious files. Repair Windows Update errors, DLL errors, System errors and move.
Thus, before attempting anything else, I’d recommend you installed and ran this problem.
You can learn more about this tool, and how it can help you, from the link below:
CLICK HERE TO CHECK OUT ADVANCED SYSTEM REPAIR PRO
Reset Windows
In more severe cases, you’ll find that the missing or corrupted files, caused by error 0x8007000d, are so extensive, that the only solution is a Windows restoration. That is, an actual replacement of the missing files.
If you regularly backup your files, maybe, you create images of your operating system, then you can load one of those up, and you’ll be fine. Otherwise, if you’re like the rest of us, then you’ll need to restore your operating system some other way.
This is where Reimage comes into the equation. As a tool, capable of restoring your Windows files on the fly. This means, restoring Windows, without you losing any of your personal files or programs. And without any of the inherent risks, associated with the process.
So, as a second solution, I’d recommend you ran this tool. You can find out more about Reimage from the link below:
CLICK HERE TO CHECK OUT REIMAGE
 The solution(s) below are for ADVANCED level computer users. If you are a beginner to intermediate computer user, I highly recommend you use the automated tool(s) above! The solution(s) below are for ADVANCED level computer users. If you are a beginner to intermediate computer user, I highly recommend you use the automated tool(s) above! |
Run DISM
If in the unlikely case, that the solutions above failed to fix error 0x8007000d, then you can try using the Deployment Image Servicing and Management tool. This is a built-in Windows tool that was designed, specifically to fix Windows errors.
For step-by-step instructions on how to use this tool. I suggest you check out my post on repairing error 0x80240017.
Open Group Policy Editor
It’s not uncommon for error 0x8007000d to be caused by a configuration issue. The Group Policy Editor allows you to access and alter integral Windows configuration data.
For this solution, I suggest you do the following:
1. First, boot into your computer as an administrator.
2. Then press  + R, type gpedit.msc and click on OK.
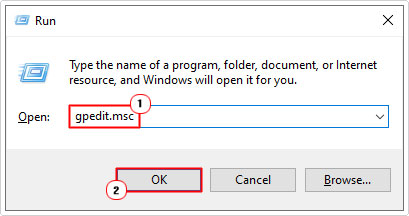
3. When Group Policy Editor loads up, go to the following path:
Computer Configuration > Administrative Templates > System
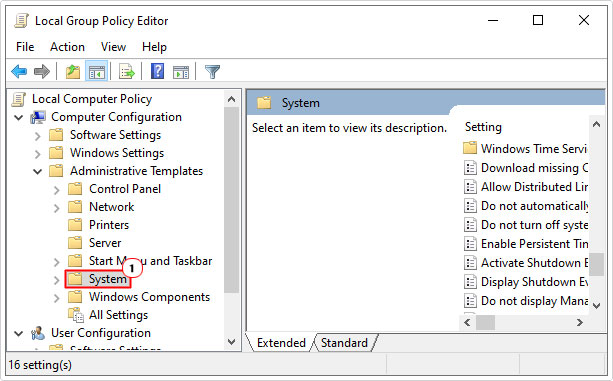

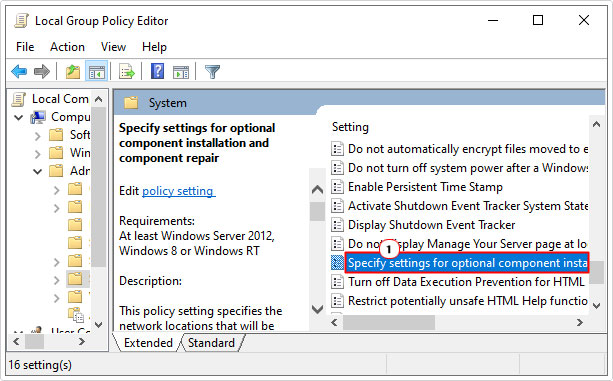
4. Once there, double click on Specify settings for optional component installation and component repair.

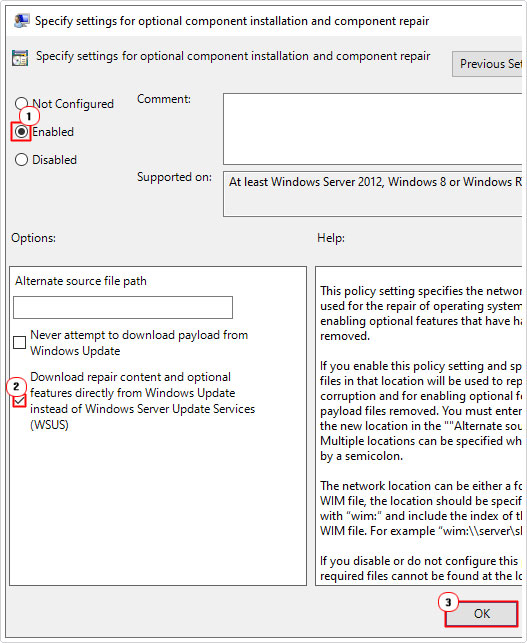
5. When the applet for Specify settings for optional component installation and component repair loads up, click on Enabled, then click on Download repair content and optional features directly from Windows Update instead of Windows Server Update Services (WSUS) and click on OK.

6. Close everything, now retry Windows Update.
Reset Windows Update to Fix Error 0x8007000d
When you have a Windows Update related issue, like error 0x8007000d, resetting the entire component has proven, in many instances, to be effective at fixing this problem.
To do that, follow the instructions below:
1. First, ensure you’ve booted into your computer as an administrator.
2. Then press 


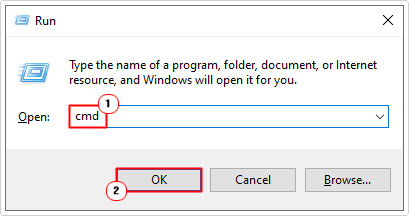

3. When Command Prompt loads up, type the following commands (pressing Enter after each line).
net stop bits
net stop wuauserv
net stop appidsvc
net stop cryptsvc
4. The next step is to erase the qmgr*.dat files. To do that, type the following command in Command Prompt, and press Enter.
Del “%ALLUSERSPROFILE%\Application Data\Microsoft\Network\Downloader\qmgr*.dat
5. Once you have successfully initiated that command, you will need to access the System32 folder. To do that, type the following command, and press Enter.
CD %windir%\system32
6. Once you’re in the Windows\System32 directory, you can start to re-register the various Windows Update .dll files. To do that, type the following commands below, followed by Enter.
regsvr32.exe wuapi.dll
regsvr32.exe wuaueng.dll
regsvr32.exe wuaueng1.dll
regsvr32.exe wucltui.dll
regsvr32.exe wintrust.dll
regsvr32.exe dssenh.dll
regsvr32.exe rsaenh.dll
regsvr32.exe gpkcsp.dll
regsvr32.exe sccbase.dll
regsvr32.exe slbcsp.dll
regsvr32.exe cryptdlg.dll
regsvr32.exe oleaut32.dll
regsvr32.exe wups.dll
regsvr32.exe wups2.dll
regsvr32.exe wuweb.dll
regsvr32.exe mshtml.dll
regsvr32.exe shdocvw.dll
regsvr32.exe browseui.dll
regsvr32.exe jscript.dll
regsvr32.exe vbscript.dll
regsvr32.exe scrrun.dll
regsvr32.exe msxml.dll
regsvr32.exe msxml3.dll
regsvr32.exe msxml6.dll
regsvr32.exe qmgr.dll
regsvr32.exe qmgrprxy.dll
regsvr32.exe wucltux.dll
regsvr32.exe muweb.dll
regsvr32.exe wuwebv.dll
regsvr32.exe atl.dll
regsvr32.exe urlmon.dll
regsvr32.exe actxprxy.dll
regsvr32.exe softpub.dll
regsvr32.exe ole32.dll
regsvr32.exe shell32.dll
regsvr32.exe initpki.dll
7. Once you have finished typing those commands. The next step is to reset the Winsock and Proxy settings. You can do that, by typing the two commands below, followed by Enter.
netsh winsock reset
netsh winhttp reset proxy
8. The last thing you want to do, is restart the services you previously stopped. To do that, type the following commands, pressing Enter after each line.
net start bits
net start wuauserv
net start appidsvc
net start cryptsvc
9. Once complete, restart your computer, and then retry Windows Update.
Are you looking for a way to repair all the errors on your computer?


If the answer is Yes, then I highly recommend you check out Advanced System Repair Pro.
Which is the leading registry cleaner program online that is able to cure your system from a number of different ailments such as Windows Installer Errors, Runtime Errors, Malicious Software, Spyware, System Freezing, Active Malware, Blue Screen of Death Errors, Rundll Errors, Slow Erratic Computer Performance, ActiveX Errors and much more. Click here to check it out NOW!

