| Attention Before you read this post, I highly recommend you check out my resources page for access to the tools and services I use to not only maintain my system but also fix all my computer errors, by clicking here! |
While attempting to update your operating system, using the Windows update component, there are a number of things that can possibly go wrong. And one of the most common issues, that a great many computer users report encountering, while attempting to do this, is the Windows error 0x8007000E.
Error 0x8007000E is one of hundreds of different error codes that you can invoke while attempting to use Windows update. With each code used to identify a different cause for why the update failed. When an end user encounters error 0x8007000E it’s usually represented in the same or similar fashion:
We can’t finish the update. Try restarting your device and we’ll try again. Error code: (0x8007000e)
That said, error code 0x8007000E is known to occur in more than one circumstance. There are end users that have also reported encountering this error, while using Windows Backup. The general cause of this issue, is typically tied to memory allocation:
0x8007000E, E_OUTOFMEMORY, Failed to allocate necessary memory
So, if you’re experiencing this error while using Windows Backup or Update, then these are things to consider.
The last circumstance I’ve heard end users encounter this error in, is while attempting to upgrade to Windows 10. However, this is a less common occurrence.
What Causes Error 0x8007000E
Error 0x8007000E is an old error, that’s been around, since the beginning, and thus, is known to affect virtually every version of Windows.
The actual cause of this error however, varies, depending on the system, and the circumstances that it occurs in:
- A third-party antivirus application could be interfering with the Windows Update component.
- Important system files could be missing and/or corrupted.
- The SoftwareDistribution folder could be corrupted.
- The hard drive may be filled with a lot of junk files, which are adversely affecting system performance.
- Certain DLL files and entries within the Windows registry may have been erased or corrupted by a third-party tool.
Since, there are so many reasons why error 0x8007000E may be showing up on your computer, there are equally as many possible solutions. Below are some of the methods that were found to be the most effective at rectifying this problem.
How to Fix It
Before attempting any of the many solutions I’ve outlined below. I’d have to recommend that you, firstly, disabled or uninstalled any third-party internet security tools from your system.
It’s not uncommon for third-party security tools to conflict with the operating system, especially the Windows Update component, preventing it from carrying out its normal operation. To eliminate a third-party security tool being the possible cause here, you’ll want to disable (or uninstall) any tool, currently installed on your computer.
Once you’ve done that, you can then try running Windows Update.
Uninstalling a program is very simple, simply use the built-in Windows InstallShield and follow the onscreen instructions. For step-by-step advice on how to do this, check out my post on repairing error 0x80070426.
Alternatively, you can go down the disable route. My post on System Restore Failed 0x800700b7, goes into more detail on the subject.
If, after disabling and/or removing your security tool, the problem still persists, then you should verify that the Windows Update component is actually running and properly configured. To do that, follow the instructions below:
1. First, ensure you’ve booted into your computer with the correct administrative privileges.
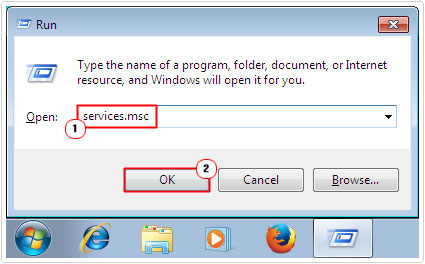
2. Then press  + R, type Services.msc and click on OK.

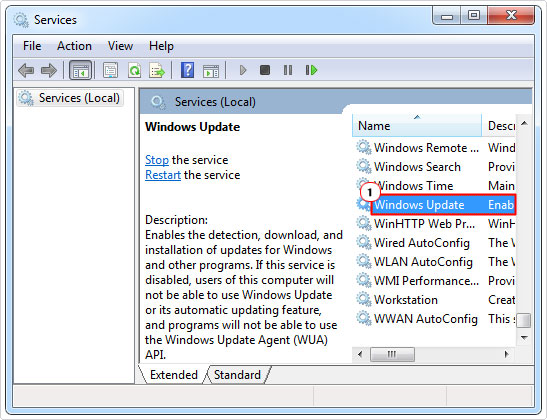
3. When Services loads up, navigate to Windows Update and double-click on it.


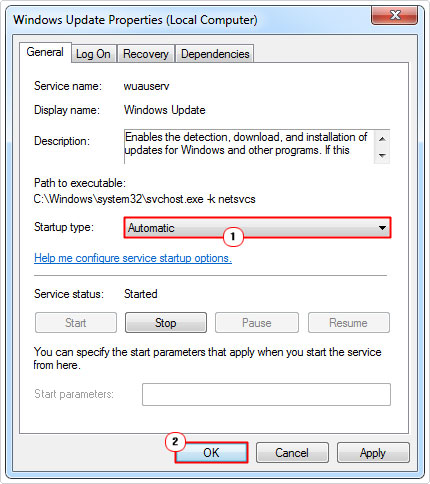
4. This will bring up the Windows Update Properties applet, from here, set Startup type to Automatic and click on OK.


Note: If the Service Status is stopped, be sure to click on Start, before closing the applet.
Only after attempting these simple steps above, and if they shall fail to rectify this error 0x8007000E, do I recommend the many solutions outlined below.
Run a Registry Scan to Repair 0x8007000E
Corruption within the Windows registry can pose a big problem for your operating system. This is because, whenever Windows attempts to carry out a specific operation, it must consort the registry for specific settings and configuration data. This also reigns true when it comes to running Windows Update.
If the operating system is unable to access the appropriate registry data when the end user attempts to run Windows update, it can result in error 0x8007000E, which is likely what has occurred in your situation.
Fortunately, it is possible to repair the registry, by using a professional registry cleaner tool like Advanced System Repair Pro. This tool will, scan, detect and repair the registry, along with various other areas of your operating system.
Anyway, you can learn more about this tool, from the link below:
CLICK HERE TO CHECK OUT ADVANCED SYSTEM REPAIR PRO
  |
Remove Junk Files
If you’ve encountered error 0x8007000E, while attempting to run Windows Update. Then the next thing you’ll want to look at is your hard drive space. You’ll need to ensure that your drive isn’t nearing full capacity.
You can check your hard drive space, simply by accessing your hard drives properties applet. To get to that, simply follow the step-by-step instructions on my post on fixing 0x0000007e.
If your hard drive is almost full, then there are several things that you can do. Microsoft recommends uninstalling any redundant language packs, you may have installed on your computer.
But there are many other things that you can do to free up space. Advanced System Repair Pro, if you opt to run this tool, will automatically free up hard drive space on your computer. It does this by identifying key areas of the operating system, to remove data from.
Alternatively, you can attempt to do it manually, by following my step-by-step instructions on the post titled dealing with low disk space.
Run System File Checker
System file checker (SFC) is a built-in Windows tool, designed to scan, detect and replace or repair any and all corrupted system files on your computer. It does this, by using a cached copy of the same file, stored on your computer. If you’ve encountered error 0x8007000E, there is a strong chance it is due to corrupted system files.
Thus, it’s recommended that you attempt to rectify this issue, by running this tool. For step-by-step instructions on this, check out my post on how to run SFC Scannow.
Rebuild the SoftwareDistribution Folder
SoftwareDistribution is a folder, created by Windows, used to store your Windows Update data. This folder can be found in the following location:
C:\Windows\SoftwareDistribution
Sometimes, due to repeated use of the Windows Update component, this folder can become corrupted with the data of failed and partially installed updates. This can, in turn, prevent Windows Update from successfully downloading further updates.
As a solution, you can rebuild this folder, in an attempt to repair the Update feature. Anyway, step-by-step instructions on how to rebuild this folder, as well as the entire Windows Update component, can be found on my post on repairing error code 0x80246007.
Rename Spupdsvc.exe to Fix Error 0x8007000E
Spupdsvc.exe is the Windows Update component, tasked with installing new updates (or at least notifying you), as and when they are made available. In certain circumstances, it has been found, due to possible corruption or a virus, that renaming, or disabling this service, has and can repair error 8007000E. There are no guarantees here, but it’s worth a try, if all else has failed, up to this point.
Anyway, simply follow the instructions below:
1. First, properly boot into your computer, with administrative rights.
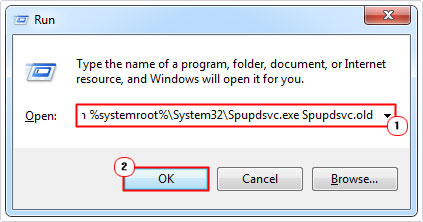
2. Then press 


Once you have successfully executed the command, you can now try rerunning the Windows Update component.
Are you looking for a way to repair all the errors on your computer?


If the answer is Yes, then I highly recommend you check out Advanced System Repair Pro.
Which is the leading registry cleaner program online that is able to cure your system from a number of different ailments such as Windows Installer Errors, Runtime Errors, Malicious Software, Spyware, System Freezing, Active Malware, Blue Screen of Death Errors, Rundll Errors, Slow Erratic Computer Performance, ActiveX Errors and much more. Click here to check it out NOW!

