| Attention Before you read this post, I highly recommend you check out my resources page for access to the tools and services I use to not only maintain my system but also fix all my computer errors, by clicking here! |
Is your Windows operating system preventing you from upgrading to its latest iteration (Windows 10/11) due to error 0x80070070?
Or are you experiencing error 0x80070070 while attempting to carry out a standard Windows Update?
In other circumstances, error 0x80070070 is known to occur while attempting to install a Fall Creators Update or anything similar.
When error 0x80070070 occurs, it typically indicates that there is insufficient space on your hard disc drive (ERROR_DISK_FULL). However, while in some situations, the error is as a result of insufficient space, oftentimes it is caused by other scenarios, some more and oftentimes less related scenarios.
When error 0x80070070 occurs, it’ll usually appear in one of several situations:
- When attempting to update Windows via the Windows Update page – “Windows Update has encountered a problem and cannot display the requested page. 0X80070070”
- After a failed Windows Upgrade – “The installation failed in the Safe_OS phase with an error. 0X80070070”
- When attempting to install Windows via USB or DVD – “Installation Failed – 0X80070070”
What Causes Error 0x80070070?
As is typically the case with Windows errors, there are a wide range of possible causes. The most common of which are outlined below:
- The computer system has been infected with a virus.
- Windows registry is corrupted.
- The system lacks the necessary resources (memory), to complete the desired action.
In addition to the error message and its possible causes, there are also several symptoms commonly associated with it. These are:
- An inability to install any and all available Windows Updates: the error message will present it every time you attempt to run an update.
- You are unable to add additional apps to the system.
- If your system has been infected with a malicious file, then this virus could corrupted other areas of your system.
Fortunately, there are several fixes that you can apply to rectify this problem. All of which will be described below. So continue reading for those much desired solutions.
How to Fix It
When it comes to error 0x80070070, there are several possible solutions. The solution that you’ll be forced to adopt, will depending greatly on the severity of the error.
With that said, all solutions have been arranged in order of effectiveness and ease of execution. So please do attempt them in the order that they are arranged in.
Run Windows Repair Tool to Fix Error 0x80070070
Before attempting any of the more advanced manual solutions, I’d have to recommend a more palatable approach.
This is, the Windows repair tool called Advanced System Repair Pro.
This, advanced multifaceted tool comes with a wide range of features and capabilities. Which including fixing a plethora of error types, including Update errors. In addition to that, it’s also equally adept at fixing registry corruption, BSOD errors, DLL errors and more.
It’s also capable of speeding your system up, by removing virus files, cleaning out system clutter and optimising your systems settings.
With that said, you can learn more about this powerful tool, from the link highlighted below:
CLICK HERE TO CHECK OUT ADVANCED SYSTEM REPAIR PRO
Run a Virus Scan
As previously noted, error 0x80070070 is known to occur, due to a virus infection of your Windows operating system.
Therefore, it’s recommend that you carry out a full scan of your system, using your current internet security solution. However, if you do not have an antivirus scanner or are interested in something better, then I’d recommend you gave SpyHunter a try.
SpyHunter is amongst the most effective and efficient antimalware tools in the marketplace today. You can learn more about this tool, and how it can help you, from the link below:
CLICK HERE TO CHECK OUT SPYHUNTER
 The solution(s) below are for ADVANCED level computer users. If you are a beginner to intermediate computer user, I highly recommend you use the automated tool(s) above! The solution(s) below are for ADVANCED level computer users. If you are a beginner to intermediate computer user, I highly recommend you use the automated tool(s) above! |
Use Disk Cleanup
If you’re attempting to upgrade your Windows operating system, then you’re going to need at least 20GB of free space to successfully complete the installation. If your system lacks sufficient space on its primary partition, then this can cause error 0x80070070.
As a viable solution, you can look to free up space, by removing redundant and unneeded files from your system.
To do this, you’re going to want to use the built-in Windows tool called Disk Cleanup. To use this tool, simply do the following:
1. First, boot into your system as a full administrator.
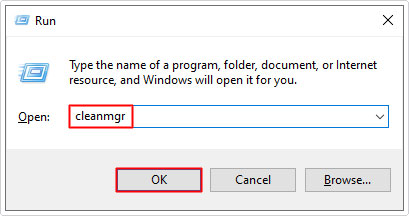
2. Next, press  + R, type cleanmgr and click on OK.
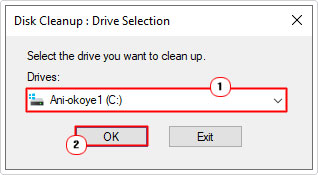
3. This will bring up the Disk Cleanup : Drive Selection applet, from here, select your primary drive (C:\) then click on OK.

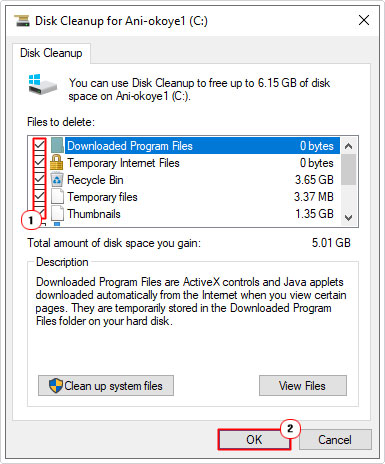
4. Disk Cleanup will now scan your system for available files that can be removed. Once completed a Disk Cleanup for C:\ applet will appear. Simply tick the box next to the corresponding areas of the system that you’d like emptied. Then click on OK, to begin the removal process.

Free Up Space Using Storage Sense
If error 0x80070070 occurs when attempting to install a Creators Update, then you should use Storage sense to free up hard drive space. This is another built-in Windows tool that you can access by doing the following:
1. Boot into your system as a full administrator.
2. Next, press 


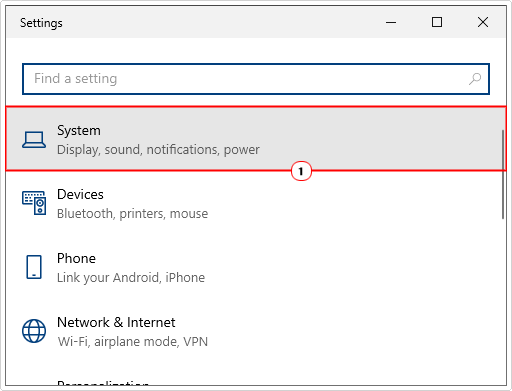

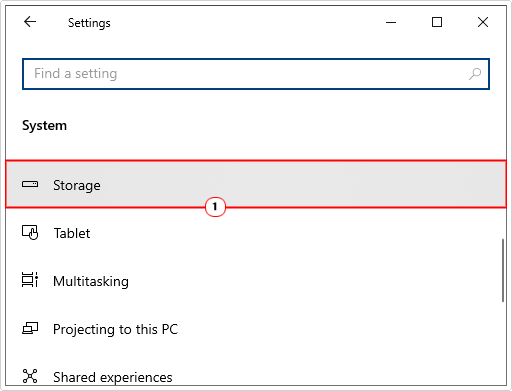
3. This will bring up the Systems applet, from here, click on Storage.

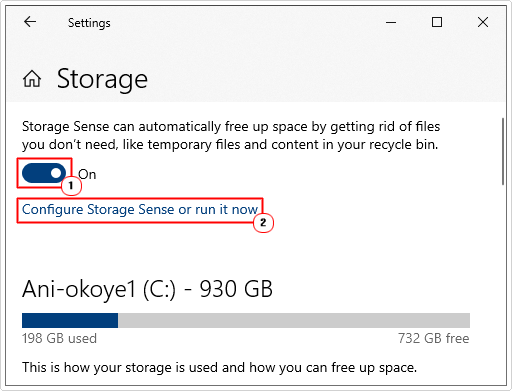
4. When Storage Sense loads up, enable it, by clicking on the Enable button. Then click on Configure Storage Sense or run it now.

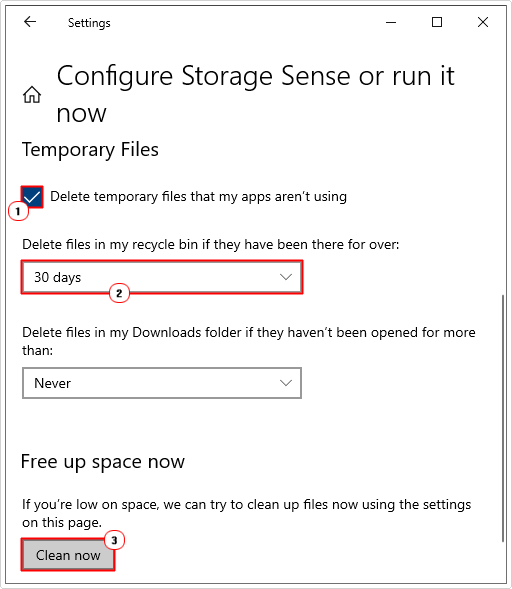
5. Next, make sure the box next to Delete temporary files that my apps aren’t using is checked, and set Delete files in my recycle bin if they have been there for over: to 30 days, then click on Clean now.

Move Temp Folder
Some end users have reported that they were able to fix error 0x80070070 by moving their temp folder to a different location. If you tried all the solutions above and error 0x80070070 continues to persist, then I recommend you attempt this method.
The temp folder is used for storing temporary app files. These files can be big or small. However, when the hard drive runs out of free space, and in turn, the operating system is unable to store data within the temp folder, this can cause error 0x80070070 to rear its ugly head. To avoid this problem, you can simply move the temp folder to a different partition entirely.
To do that, follow the instructions below:
1. First, make sure you’ve booted into your computer as a full administrator.
2. Then press 


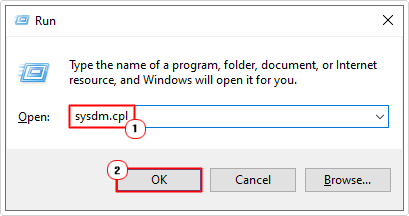

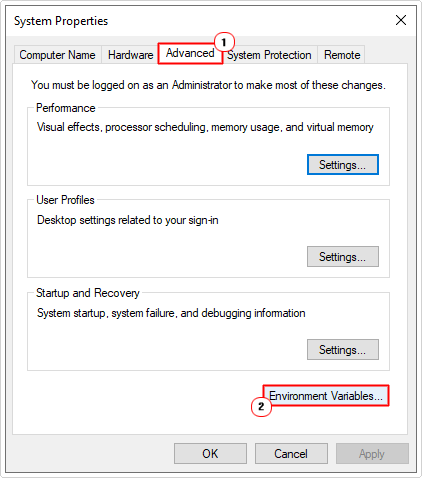
3. This will bring up the Systems Properties applet, from here, click on the Advanced Tab, then click on Environment Variables.

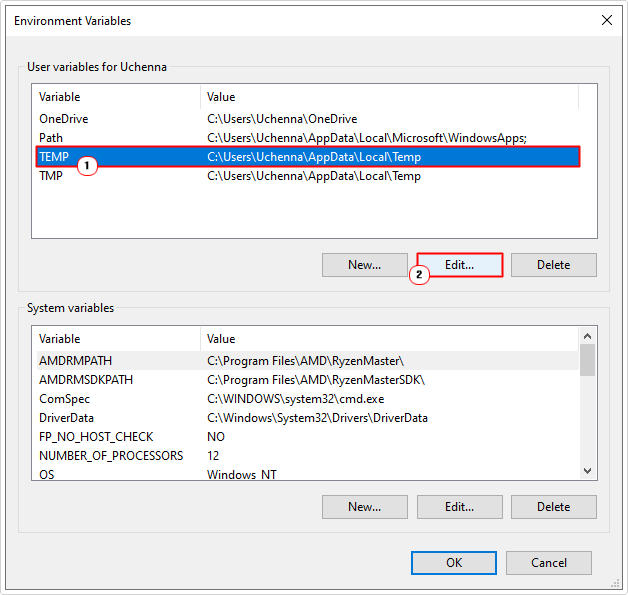
4. Now, click on the TEMP folder, then click on Edit.

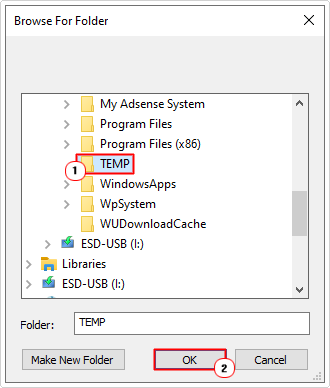
5. This will bring up an Edit User Variable applet, from here, click on Browse Directory.


6. Now select a new location for the TEMP folder. Make sure it’s a different partition. Then click on OK.

7. Finally, reboot your system, then check whether or not it has fixed error 0x80070070.
Upgrade Windows Using Media Creation Tool
If error 0x80070070 prevents you from upgrading your operating system to the latest version, then you could try using the Media Creation Tool, as a bypass. This tool, ordinarily, will allow you to upgrade Windows, even when it previously failed, via other methods.
The Media Creation tool, comes with a fresh set of files, independent of your OS, which should ensure it completes the process, smoothly and without hiccup.
Anyway, to use this tool, simply do the following:
1. First, you will need to download the Media Creation Tool. This can be done from the official Microsoft link, here: https://www.microsoft.com/en-gb/software-download/windows10
2. Once you’ve done that, run it, then select Upgrade this PC.
3. This software will check that your system meets the recommended minimal system specifications, then it’ll attempt to download the required files. If your system meets the requirements, the process should go through.
Note: Your system will restart several times before the process is complete.
Reset Windows Update
It’s not uncommon for the corruption of one or more Windows Update components to cause error 0x80070070. Hence, to successfully overcome this dilemma, end users can reset all of the individual components that make up Windows Update.
For step-by-step instructions on how to do that, check out my post on fixing error 0x80244010.
Are you looking for a way to repair all the errors on your computer?


If the answer is Yes, then I highly recommend you check out Advanced System Repair Pro.
Which is the leading registry cleaner program online that is able to cure your system from a number of different ailments such as Windows Installer Errors, Runtime Errors, Malicious Software, Spyware, System Freezing, Active Malware, Blue Screen of Death Errors, Rundll Errors, Slow Erratic Computer Performance, ActiveX Errors and much more. Click here to check it out NOW!

