| Attention Before you read this post, I highly recommend you check out my resources page for access to the tools and services I use to not only maintain my system but also fix all my computer errors, by clicking here! |
Error 0x800700e1 occurs under two circumstances. The first, is when performing a backup (using Windows Backup) and the second, is when attempting to transfer data from a USB device to your system. In either situation, end users may be greeted with the “Operation did not complete successfully” error message. The preceding action is thus, halted – whether it was a backup attempt or data transfer.
Microsoft Windows is currently, the most popular operating system, originally created in 1985. As of today, more than 1.5 billion individuals use this platform, all over the world. There are numerous reasons why Microsoft Windows was able to attain such success, with the most popular being, its customisation, its user-friendly design and interface and its adaptability.
As is typically the case with human technology, there are always pros and cons. Given the level of complexity of Microsoft Windows, it shouldn’t come as a surprise, the various errors it’s prone to. Many of these issues are minor, which can be resolved by a simple system restart, while others require user intervention, if they are to ever be resolved.
For those of you, looking for a solution to this nagging problem (Error 0x800700e1), you’ve come to the right place. In this tutorial, you’ll find its common causes, along with various solutions, you can implement today.
What Causes Error 0x800700e1?
As previously outlined, error 0x800700e1 can occur in two circumstances. The first, is during a backup, while the other is when transferring or at least, attempting to transfer data to your system from an external storage device.
In situations where a user is trying to transfer information, it could be the internet security tool Windows Defender that blocks the transfer. This is may be because the file (being transferred) is unsigned or from an untrusted source. In situations like this, the security tool is applying extra caution.
I would suggest you discard such a file – if your security tool finds it untrustworthy. However, if you’re adamant in proceeding, then please do at your own risk.
Windows Defender (if you’re unfamiliar with it) is a built-in antimalware tool. Designed to protect your system from a plethora of threat types. Such as malware, spyware, worms, Trojan horses and ransomware, to name a few. Of course, this security tool, isn’t the only reason why you may be experiencing error 0x800700e1. Other reasons may include:
- A malicious file has infiltrated and corrupted integral system files.
- The operating system may be misconfigured.
The installation of a third-party app may also trigger this error.
How to Fix It
Continuing on, the other circumstance that may trigger an error 0x800700e1 is a failed Windows Backup. In most circumstances, this is said to be the result of a malicious file or program. So what are your options?
Well, there are many. Below you will find a rundown of the most common and most effective methods of alleviating this problem.
Run Windows Repair Tool to Fix Error 0x800700e1
Despite how advanced Microsoft Windows may be, it’s not nor will it ever be immune to errors and issues. These issues will naturally vary, in terms of complexity and ferocity. Which is why Windows repair tools like Advanced System Repair Pro are so important.
This tool is highly advanced, with a wide range of features and capabilities. Capable of scanning the entirety of your system, and detecting and fixing the most stubborn of issues.
You can expect it to fix DLL, registry, BSOD, app, and game errors, in addition to detecting and removing malicious (virus) files.
Another great feature of this tool is its ability to enhance the overall performance of your system. So if you’re looking for a way to make your system faster, then look no more.
Anyway, you can learn more about this fantastic tool, from the link below:
CLICK HERE TO CHECK OUT ADVANCED SYSTEM REPAIR PRO
 The solution(s) below are for ADVANCED level computer users. If you are a beginner to intermediate computer user, I highly recommend you use the automated tool(s) above! The solution(s) below are for ADVANCED level computer users. If you are a beginner to intermediate computer user, I highly recommend you use the automated tool(s) above! |
Disable Windows Defender (Temporarily)
If the error 0x800700e1 occurs when attempting to copy (or transfer) a file to your system – then it may have been halted by your security tool. Possibly due to it suggesting the file is either untrusted or a virus.
However, if you’re certain the file is not unsafe, then you can get around this problem, simply by disabling your security tool.
Steps to turning off your security tool is dependant, naturally. If you’re using a third-party solution, then I suggest you consult your online manual.
However, if you use Windows Defender (like I do), then you can follow the instructions below:
1. First, ensure you’ve booted into your system as a full administrator.
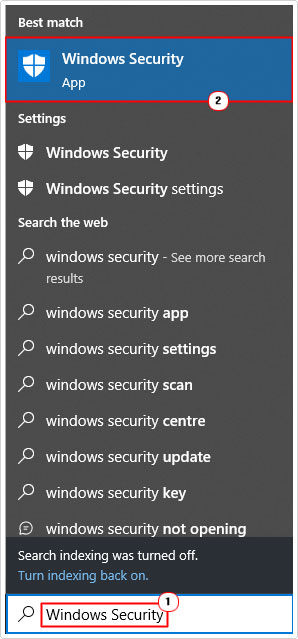
2. Now, type Windows Security into the Type here to search box, then click on Windows Security.
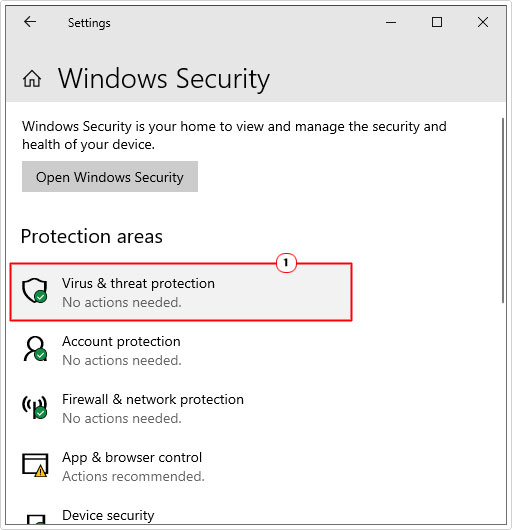
3. When Windows Security pops up, click on Virus & threat protection.
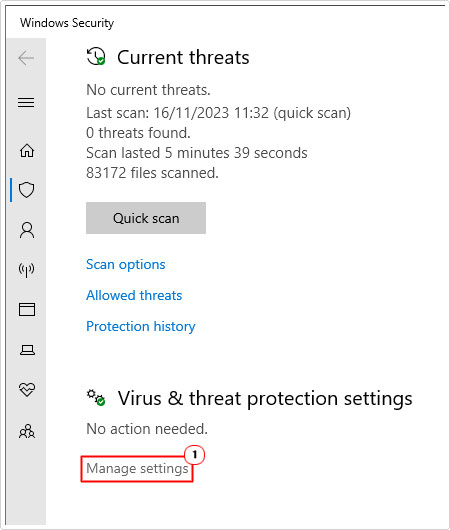
4. Under Virus & threat protection settings, click on Manage settings.
5. Now, set the slider to off for Real-time protection.
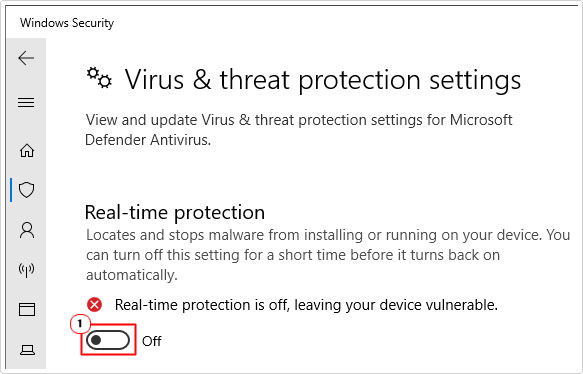
Note: Say Yes to any notifications.
6. Now you can verify whether or not the error 0x800700e1 has been fixed – be sure to reinsert the external (USB) device into the computer.
Fix File Explorer
If the operating system is still preventing you from copying files to your system (from the external device), then the issue may be with the File Explorer app. Fortunately, there is a way to run a check, and possible fix on it.
Just do the following:
1. Boot into your system as a full administrator.
2. Then press  + R, type cmd and click on OK.
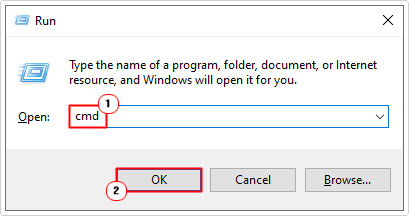

3. When Command Prompt loads up, type the commands below, pressing Enter after each line:
sfc /SCANFILE=c:windowsexplorer.exe
sfc /SCANFILE=C:WindowsSysWow64explorer.exe
4. Once it has completed, you can now open File Explorer, and retry the data transfer.
Erase WindowsImageBackup Folder
It’s possible a malicious file infiltrated your system, and corrupted your original backup file(s). Thus, as a solution, you could try deleting the backup folder.
To alter your WindowsImageBackup folder, you should first enable System Protection, in the event that you’ll need to revert changes. To do that, follow the steps below:
1. First, boot into your system as a full admin.
2. Then press 


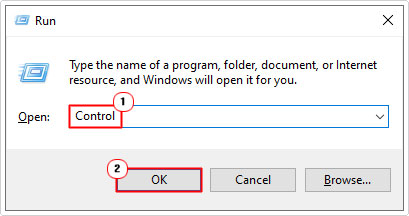

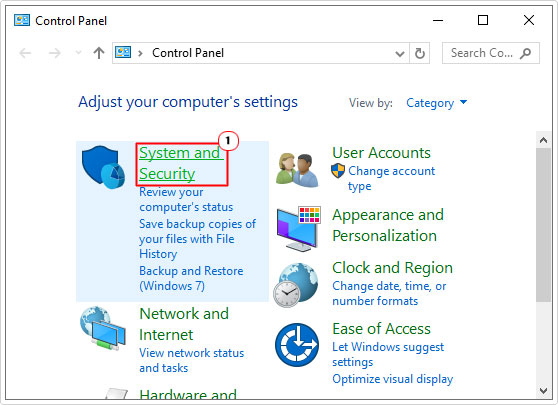
3. On Control Panel, click on System and Security.

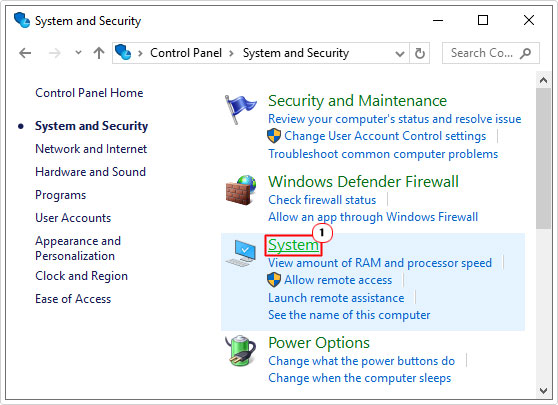
4. Now click on System.

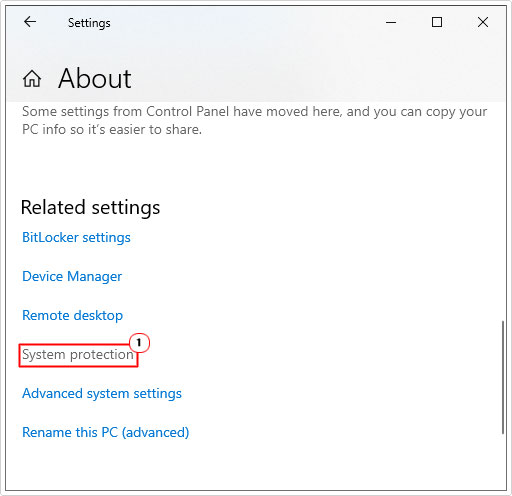
5. This will bring up the about page, from here, scroll down and click on System Protection.

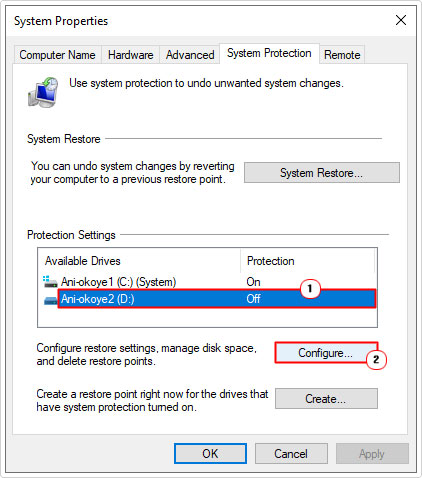
6. To enable it, click on a Drive in the Protection Settings area, then click on Configure.

7. When the applet appears, select Turn on system protection, then click on OK.
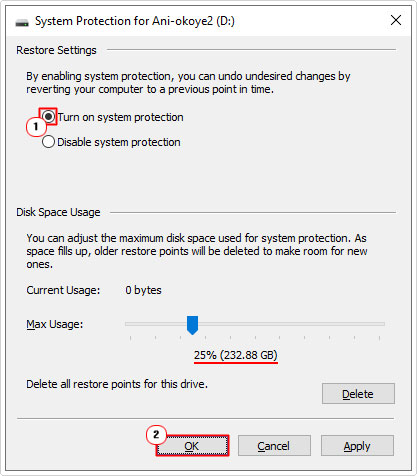

Note: Set Max Usage to at least 25% of Disk. Additionally, repeat these step for all available drives.
3. Now, go back to Control Panel, and type File History into the Search Control Panel box, then click on File History.
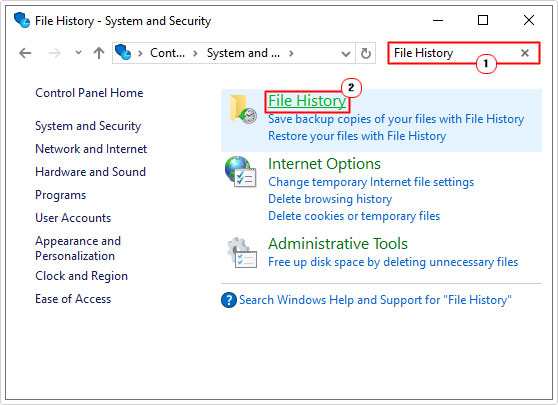

4. When File History loads up, click on System Image Backup.
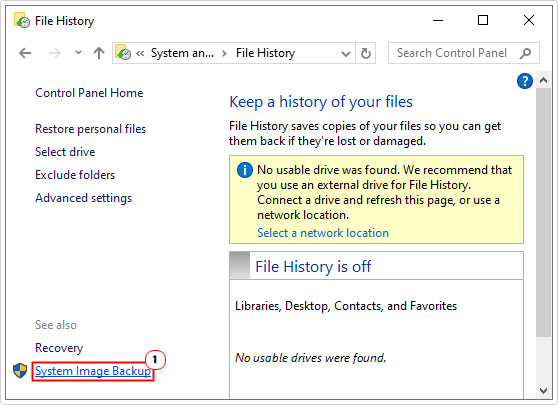

5. Find the location of your WindowsImageBackup Folder, then press 


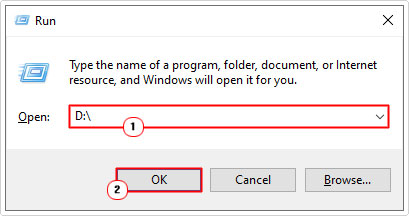

Note: Where D:\ is the drive the WindowsImageBackup folder is saved to.
6. Now, click on WindowsImageBackup then select Delete.
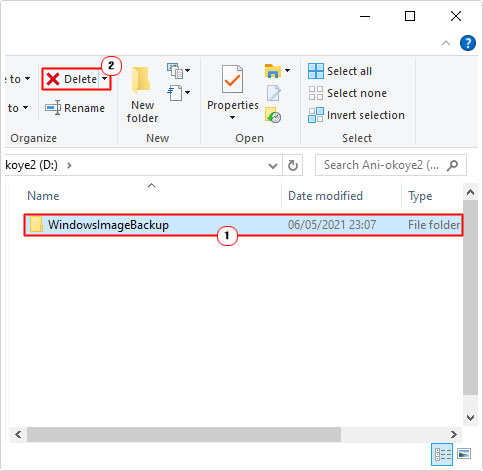

7. Confirm folder deletion, then retry the Windows Backup process.
Create an Exclusion
If you receive an error 0x800700e1 while attempting to transfer a specific file to your system, then you could try creating an exception, specifically for it. This way, the internet security tool will not flag it, as a possible virus or insecure file.
To do this, you will need to consult your online manual. However, if you use Windows Defender, then the instructions are as follows:
1. First, follow steps 1 – 4 of Disable Windows Defender (Temporarily).
2. When the Virus & threat protection settings screen appears, scroll down, and click on Add or remove exclusions, under Exclusions.
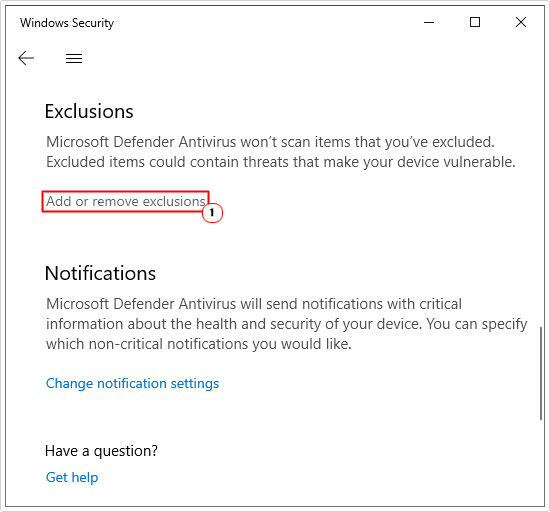

3. This will take you to the Exclusions screen, now, click on Add an exclusion then choose whether it’s a File, Folder, File type or Process.
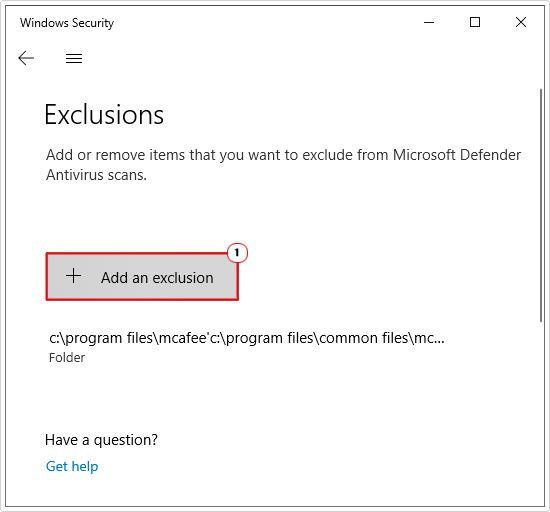

Note: For this example, we’ll choose File.
4. Now, go and select the File in your External Device, and click on Open.
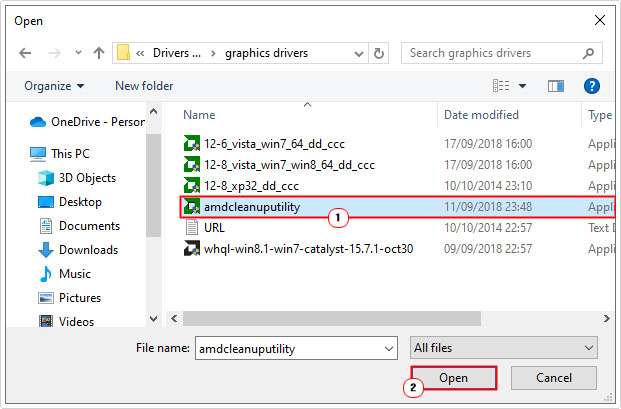

5. You can now retry the transfer process.
Clear Browsing Data
If error 0x800700e1 occurs when attempting a Windows Backup, another method you can use, entails clearing your browser of its cache data.
Depending on which browser you use, this step may vary. If you use Google Chrome, then I suggest you check out my post on fixing err_connection_timed_out errors, for additional help.
For Firefox users, you can find step-by-step instructions on my post on fixing sec_error_ocsp_future_response errors.
If you’re a Microsoft Edge user, then follow the steps below:
1. Boot into your system as an admin.
2. Then press 


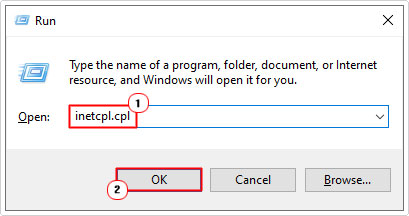

3. This will bring up the Internet Properties applet, from the General Tab, click on Delete under Browsing history.
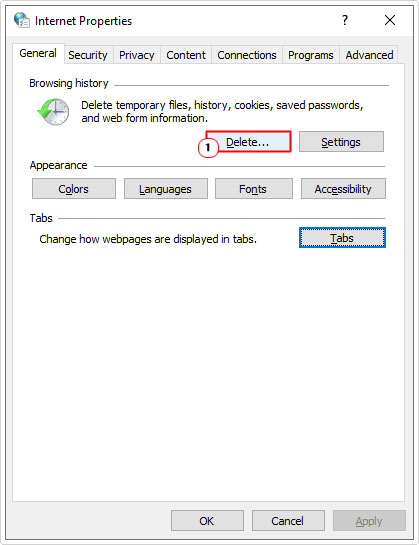

4. A Delete Browsing History applet will appear, be sure to tick the boxes for Preserve Favourites website data, Temporary Internet files, Cookies and History. Then click on Delete.
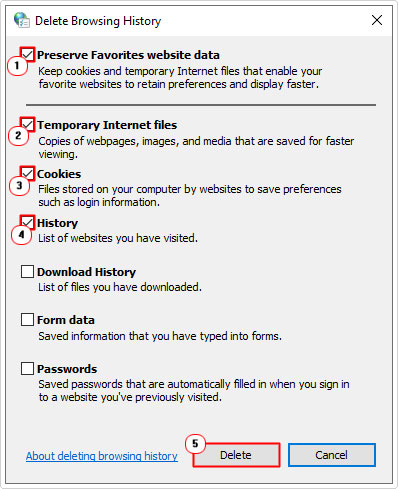
5. Now, retry Windows Backup.
Use System Restore
If error 0x800700e1 started to rear its ugly head, right after you made a specific change to your system, then it’s possible, that change is to blame. In situations like this, you can use the System Restore facility to rollback those changes.
For more information on how to use this feature, check out my post on what is a restore point.
Are you looking for a way to repair all the errors on your computer?


If the answer is Yes, then I highly recommend you check out Advanced System Repair Pro.
Which is the leading registry cleaner program online that is able to cure your system from a number of different ailments such as Windows Installer Errors, Runtime Errors, Malicious Software, Spyware, System Freezing, Active Malware, Blue Screen of Death Errors, Rundll Errors, Slow Erratic Computer Performance, ActiveX Errors and much more. Click here to check it out NOW!

