| Attention Before you read this post, I highly recommend you check out my resources page for access to the tools and services I use to not only maintain my system but also fix all my computer errors, by clicking here! |
Were you attempting to remove a file on your Windows operating system, only to receive the error message: Error 0x800710FE: This file is currently not available for use on this computer? Would you like to know what it means? Would you like to know how to get around it? If you answered yes to any of those questions, then you’ve come to the right place.
In the vast majority of cases error 0x800710fe occurs when the end user attempts to delete, either a file or a folder. This error may occur when the end user attempts to delete a file that is system-protected or when the file or folder in question belongs to a third-party security package. Research has shown that there are multiple reasons why this error occurs, with Offline File Synchronization outlined as a main culprit, amongst other things.
What Causes Error 0x800710fe?
When looking at the potential cause of error 0x800710fe on your system, we find the following:
- Two or more apps are conflicting with one another.
- The operating system has been infected with a virus.
- Your system has corrupted or missing system files.
- An issue with the Offline File Synchronization feature.
- The user does not have the necessary permissions to access the file or folder.
This is just some of the many possible causes. So what can you do to solve this issue? Continue reading, for a list of verifiable solutions.
How to Fix It
Depending on the possible cause and your level of technical ability, it may be possible for you to fix error 0x800710fe by entering the Sync Center settings and making a few necessary changes.
In other instances, the error could be the result of a CSC database glitch, in which case, it can be fixed by making certain changes to the Windows registry.
Additionally, research has shown that logical errors on your drive are capable of causing this error. In which case, it can be fixed by running the appropriate tool.
All-in-all, you should be able to fix this error by utilising the many solutions outlined below.
Run Windows Repair Tool to Fix Error 0x800710fe
It’s very important that regular maintenance be carried out on your Windows operating system which is where tools like Advanced System Repair Pro come into the equation. This, repair tool, when run, is capable of fixing a plethora of system issues, such as BSODs, registry errors and runtime errors.
So, before attempting any of the more painstaking solutions below, I’d recommend you gave this tool a try. It will scan your system in its entirety, and, with your permission, optimise and repair every infraction it finds.
You can learn more about this powerful tool, including the various features and ways it can help you, from the link below:
CLICK HERE TO CHECK OUT ADVANCED SYSTEM REPAIR PRO
 The solution(s) below are for ADVANCED level computer users. If you are a beginner to intermediate computer user, I highly recommend you use the automated tool(s) above! The solution(s) below are for ADVANCED level computer users. If you are a beginner to intermediate computer user, I highly recommend you use the automated tool(s) above! |
Format the CSC Database
The next solution you may want to try entails using the Windows Registry Editor to create a FormatDatabase key. This key will in turn, allow you to reset clusters of data that could be the cause of the error 0x800710fe permissions problem.
Many end users have reported that they were able to fix the error by following the instructions outlined below:
WARNING: The Windows registry is a very sensitive area of the operating system, and as such, any wrong modification or deletion, can render your system inoperable. So tread with caution.
1. First, boot into your system as a full administrator.
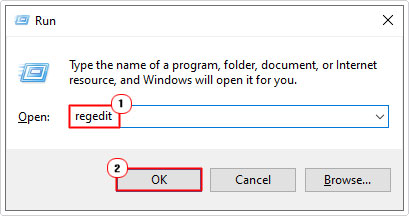
2. Then press  + R, type regedit and click on OK.
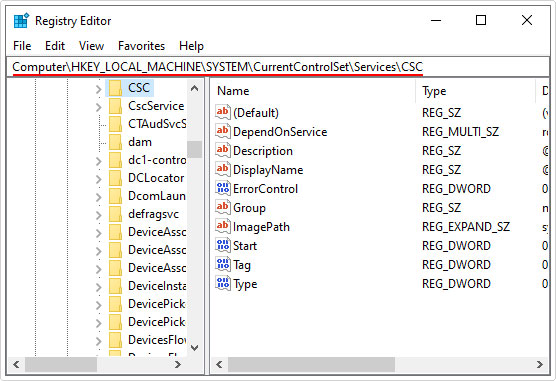
3. When Registry Editor loads up, go to the following path:
HKEY_LOCAL_MACHINE\System\CurrentControlSet\Services\CSC

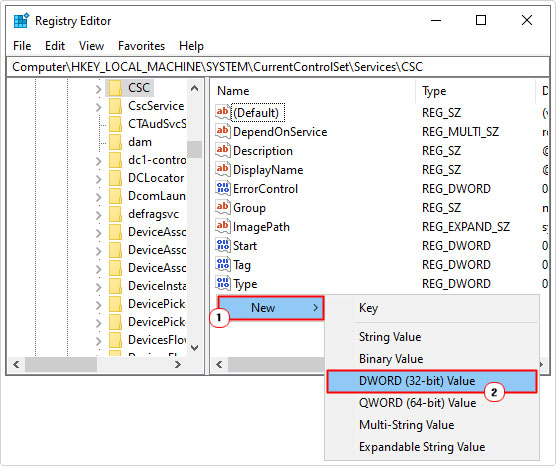
4. Once there, right-click on the right-pane then select New -> DWORD (32-bit) Value.

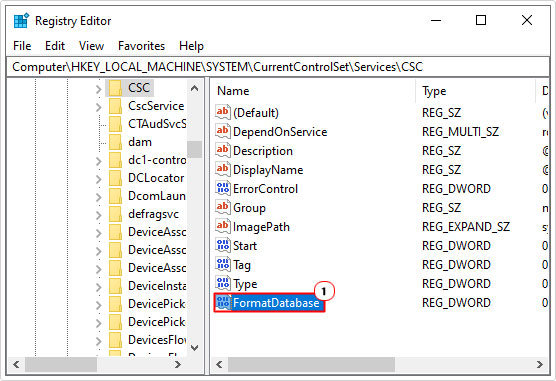
5. Now, change the name of the new DWORD to FormatDatabase, then double-click on it.

6. This will bring up an Edit DWORD (32-bit) Value applet, from here, set Base to Hexadecimal, then type 1 into the Value data box, then click on OK.
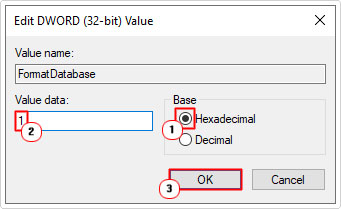

7. After you’ve finished, close the Registry Editor tool, then restart your system.
Disable Offline File Synchronization
Research has shown, that in a great deal of cases, the cause can be traced to a dependency or file linked to the Offline File Synchronization feature.
If this feature is the root cause, then you should be able to fix error 0x800710fe by accessing the Sync settings and disabling the Offline Files feature. To do that, simply following the instructions below:
Note: The instructions outlined below, should be applicable to all versions of Windows.
1. First, you will need to boot into your system as a full administrator.
2. Then press 


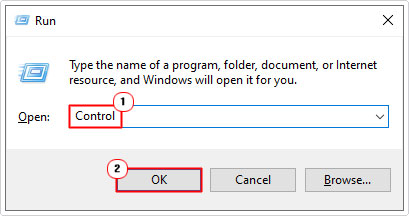

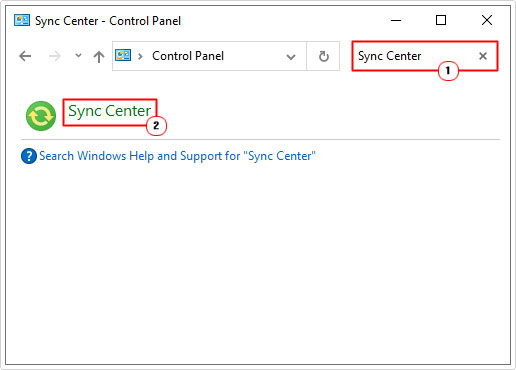
3. This will bring up the Control Panel, from here, type Sync Center into the Search Control Panel box, then click on Sync Center.

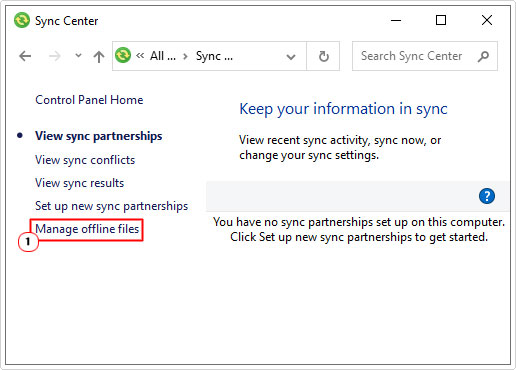
4. From Sync Center, click on Manage offline files.

5. This will bring up an Offline Files applet, from here, click on Disable offline files.
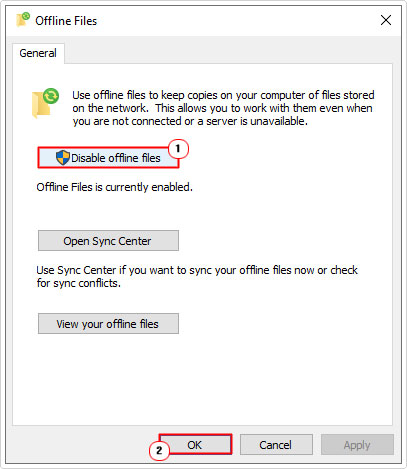

6. Now verify that error 0x800710fe has been fixed.
Disable Sync Center Using Command Prompt
Of the many culprits known for causing error 0x800710fe, the most common, has been proven to the Sync Center. Although, Offline files is disabled by default, it is possible the feature was enabled when a synched partnership was established (in an attempt to make some files or folders on your network available offline).
If error 0x800710fe is as a result of one of more of these files or folders (as part of this partnership), then you should be able to fix the error, simply by disabling Sync Center, disabling its scheduled tasks, clearing client-side cache, and preventing the feature from loading during Windows start-up.
Many end users have reported that error 0x800710fe disappeared right after they disabled this feature, allowing them to delete the file or folder that was initially causing the error message.
Anyway, you can disable Sync Center by following the instructions below:
CMD Commands
1. First, boot into your system as a full administrator.
2. Then press 


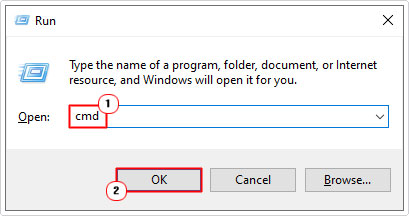

3. This will bring up Command Prompt, from here, type the following command and press Enter.
for %G in ("CSC","CscService") do sc config "%~G" start= disabledNote: It is possible to Copy and Paste the command(s) into Command Prompt, for the sake of convenience.
4. The next step is to clear the Client-Side Cache (CSC), to do that, type the additional commands below, pressing Enter after each line.
takeown /f "%windir%\CSC" /a /r
icacls "%windir%\CSC" /grant:r *S-1-5-32-544:F /t /c /q
icacls "%windir%\CSC" /grant:r *S-1-5-18:F /t /c /q
for /d %G in ("%windir%\CSC\v2.0.6\namespace\*") do rd /s /q "%~G"
5. Once you’ve successfully executed the commands above. The next step is to disable the Scheduled Tasks for Sync Center. To do that, type the commands below, pressing Enter after each line.
schtasks /change /tn "\Microsoft\Windows\Offline Files\Background Synchronization" /disable
schtasks /change /tn "\Microsoft\Windows\Offline Files\Logon Synchronization" /disable
6. The last step is to prevent Sync Center from starting during system boot up. To do that, type the commands below, pressing Enter after each line.
reg add "HKCU\Software\Classes\Local Settings\Software\Microsoft\Windows\CurrentVersion\SyncMgr" /v "StartAtLogin" /t REG_DWORD /d 0 /f
reg add "HKCU\Software\Classes\Local Settings\Software\Microsoft\Windows\CurrentVersion\SyncMgr\HandlerInstances\{750FDF10-2A26-11D1-A3EA-080036587F03}" /v "Active" /t REG_DWORD /d 0 /f
reg delete "HKCU\Software\Microsoft\Windows\CurrentVersion\SyncMgr" /f
reg delete "HKCU\Software\Classes\Local Settings\Software\Microsoft\Windows\CurrentVersion\NetCache" /f
reg delete "HKCU\Software\Classes\Local Settings\Software\Microsoft\Windows\CurrentVersion\SyncMgr\HandlerInstances\{750FDF10-2A26-11D1-A3EA-080036587F03}\SyncItems" /f
7. Once you have successfully run every command. Close Command Prompt, then restart your system.
Now you can try deleting the file or folder that was causing error 0x800710fe.
Run Chkdsk
Another possible cause for error 0x800710fe is logical disk errors. Fortunately, it is possible to repair these error types on your drive by using the built-in utility CHKDSK.
The latest iterations of CHKDSK (Disk Error Checking Utility) on both Windows 10 & 11 are more effective than previous editions.
For step-by-step instructions on how to run this tool, check out my post on fixing SiHost.Exe Unknown Hard Errors.
Are you looking for a way to repair all the errors on your computer?


If the answer is Yes, then I highly recommend you check out Advanced System Repair Pro.
Which is the leading registry cleaner program online that is able to cure your system from a number of different ailments such as Windows Installer Errors, Runtime Errors, Malicious Software, Spyware, System Freezing, Active Malware, Blue Screen of Death Errors, Rundll Errors, Slow Erratic Computer Performance, ActiveX Errors and much more. Click here to check it out NOW!


Is there a way to do this on a work computer where you are not the administrator and do not have admin rights?
There is a cmd hack which you can use, you’ll need to boot from a media creation file for your OS.