| Attention Before you read this post, I highly recommend you check out my resources page for access to the tools and services I use to not only maintain my system but also fix all my computer errors, by clicking here! |
With the advent of Windows 10, Microsoft has been working especially hard to bring much needed improvements to their operating system(s). However, despite their efforts, one cannot argue that Microsoft’s Windows is still riddled with errors. The magnitude of these issues vary, from the inability to open and run certain components, to an inability to run Windows altogether. Encountering an error while carrying out a particular task on your system, can be the most frustrating of them all; and that’s where we come to error code 0x800f081f.
I’ve covered a great many solutions to 100s of different error codes in previous posts. However, in this particular post, I will be exclusively addressing error code 0x800f081f. I’ll be tackling the root of this problem, that way, you will be able to better alleviate it.
So, to start things, error code 0x800f081f, typically indicates an inability to access .NET Framework 3.5. The operating system will indicate that it cannot run or be installed in the following fashion:
Windows couldn’t complete the requested changes. Windows couldn’t find required files to complete the requested changes. Make sure you’re connected to Internet, and try again.
What Causes Error Code 0x800F081F
There are a number of associated error codes, all of which indicate the same ailment, and typically requires the same solution(s) to address. However, I will be discussing error code 0x800F081F solely here.
The crux of the problem with error code 0x800F081F is an incompatibility with Microsoft .NET Framework 3.5. Error code 0x800F081F will typically occur while using the following components:
- Installation Wizard.
- Windows PowerShell.
- Deployment Image Servicing and Management (DISM) tool.
Error code 0x800F081F occurs, primarily on the latter versions of Windows, which includes Windows 8/8.1 & 10. But it’s also known to occur on Windows Server 2012, 2012 R2 & 2016.
When the end user attempts to access or utilise this feature, the Windows Update will attempt to acquire the .NET binaries and files required for it. If it’s unable to complete this task, the following error message will appear:
0x800F081F: Windows could not find the .NET source files for the installation to proceed
Note: Error code 0x800F081F can and typically does manifest itself in a number of different ways. All of which however, may not indicate the same cause, but most certainly indicate the same problem.
With that said, the most common causes for this error include the following:
- The accidental erasure of important system files.
- The Windows operating system improperly shutting down, resulting in the corruption of integral files.
- A virus file infiltrating and corrupting the OS.
How to Fix It
When it comes to fixing error code 0x800F081F, there are a number of approaches that you can take. Your level of computer competence, should determine the method that you ultimately choose.
With that, I’d recommend you attempted all the solutions below, in the order that they appear.
Run a Virus Scan to Fix Error Code 0x800F081F
As I previously mentioned, error code 0x800F081F is typically caused by a malicious file infiltrating your system and corrupting important system files. Usually when this does occur, you may encounter ads attempting to trick you into purchasing a rouge internet security tool to fix the error. Don’t fall for any of these ads.
Instead, I’d recommend that you ran a full scan of your system, using your internet security tool. However, if you don’t have a security tool, or you’re interested in using the very best antivirus tool to safeguard your system, then I’d recommend you gave SpyHunter a look in.
SpyHunter is a very effective and efficient tool, which I’ve used on many occasions to fix issues on my system. Anyway, you can learn more about this tool and how it can help you, from the link below:
CLICK HERE TO CHECK OUT SPYHUNTER
Repair Windows
If error code 0x800F081F is not virus related, then it’s almost certainly related to the integrity of the operating system. Antivirus scanners are unable to restore OS integrity, because they lack the necessary files to do so, and that’s where Windows repair tools, such as Reimage come into the equation.
Reimage is a Windows repair tool, capable of reinstalling all your Windows files, on the fly, without deleting or disturbing any of the tasks, files, videos or programs currently installed on the system.
It’s one of the safest and most effective ways of tackling a great many OS related issues.
You can learn more about Reimage, and how it can help you, from the link below:
CLICK HERE TO CHECK OUT REIMAGE
 The solution(s) below are for ADVANCED level computer users. If you are a beginner to intermediate computer user, I highly recommend you use the automated tool(s) above! The solution(s) below are for ADVANCED level computer users. If you are a beginner to intermediate computer user, I highly recommend you use the automated tool(s) above! |
Reinstall Microsoft .NET Framework 3.5
When it comes to manually attempting to rectify error code 0x800F081F, reinstallation of the .NET Framework 3.5 is a task that you can and should attempt before and after you carried out the methods outlined below.
Anyway, to reinstall this component, simply do the following:
1. First, ensure you’ve booted into your operating system with administrative rights.
2. Then press  + R, type Control Panel and click on OK.
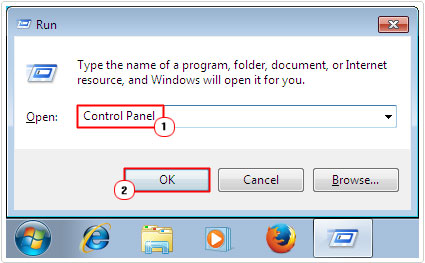
3. When Control Panel successfully loads up, type Windows Features into the Search Control Panel box and click on Turn Windows features on or off.
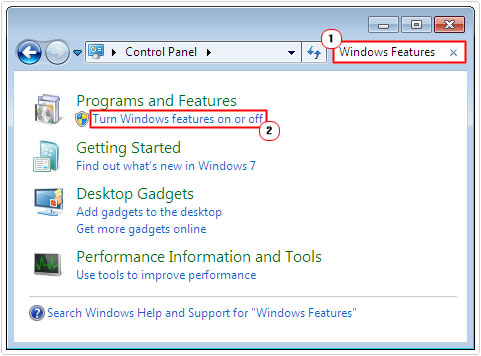

4. This will bring up Windows Features, from here, check the box next to Microsoft .NET Framework 3.5 and click on OK.
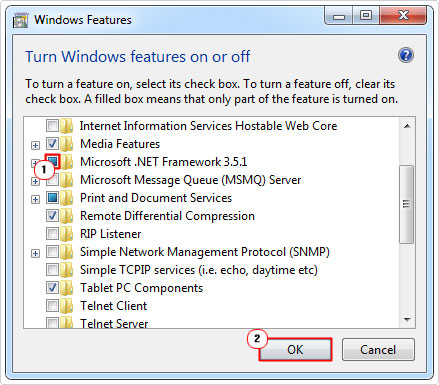

Note: If the checkbox is already checked, then you will need to repeat the process, first to uncheck it, and then to check it again. To complete the reinstallation process.
If everything installs correctly, then you can try whatever it was you were doing, prior to error code 0x800F081F, to verify whether or not the error has been resolved.
Enable Group Policy to Fix Error Code 0x800F081F
Another method that you can use to fix error code 0x800F081F is to access the group policy editor and enable the appropriate policy within it. Group policies have an overarching impact on the functionality of the operating system, so it’s very possible that this could rectify your problem.
Note: This method works on only select versions of Windows.
1. Log into your computer, with admin rights.
2. Then press 


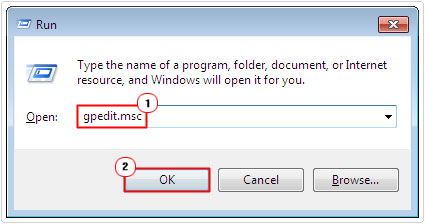

3. When Group Policy loads up, navigate to the following path:
Computer Configuration > Administrative Templates > System
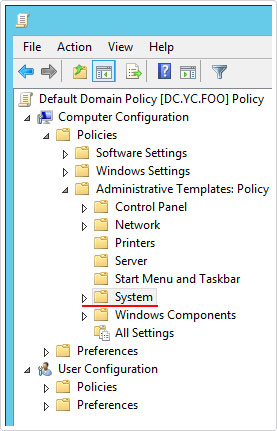

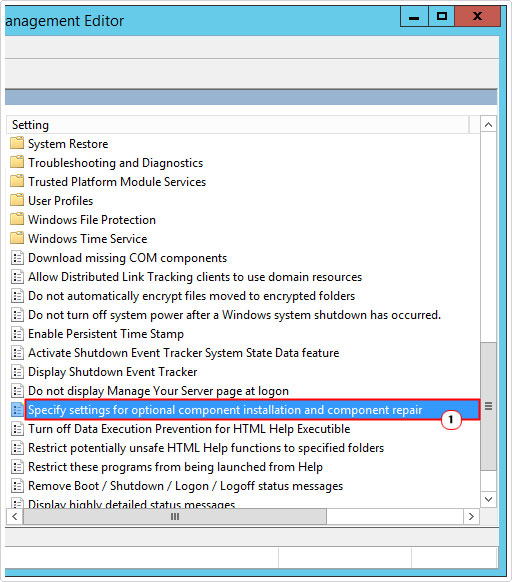
4. From here, double click on the Setting called Specify settings for optional component installation and component repair.

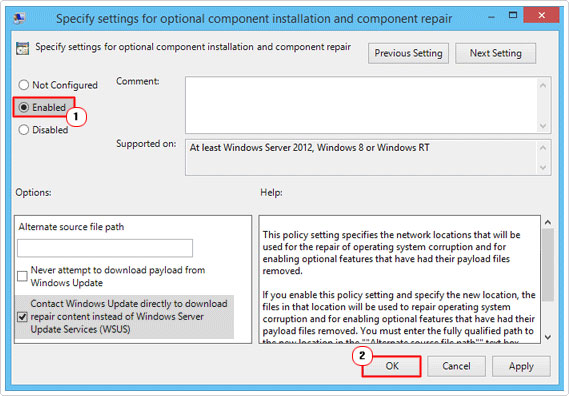
5. This will load the applet for Specify settings for optional component installation and component repair, from here, click on Enabled, then click on OK.

Enable .NET Framework via DISM Command
This method entails using the DISM command to enable the .NET Framework component.
However, before you can use this method, you will need a copy of your operating system in ISO form. If it’s Windows 10, then you should be able to acquire it using Microsoft’s Media Creation Tool.
Note: You can find it on Microsoft’s official website.
For older versions of Windows, you’ll need to use your Windows CD or the Windows Image file you were given, when you purchased the operating system.
Once you have your operating system in ISO form, only then are you ready to proceed.
The first thing you’ll need to do, is mount your ISO image to a virtual drive. This is a fairly simple, seamless process, which you can do, providing you have the appropriate software installed on your system. The two tools that I recommend are:
- PowerISO
- Daemon Tools
So, go ahead and download one of these tools, and familiarise yourself with it.
1. Once you’ve mounted the ISO to a Virtual Drive, press 


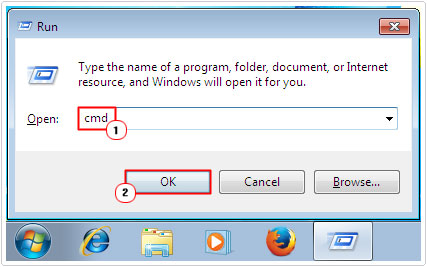

2. Once Command Prompt loads up, type the following command, followed by Enter:
dism /online /enable-feature /featurename:NetFx3 /All /Source:[Drive]:\sources\sxs /LimitAccess
Note: Replace [Drive] with the letter of the virtual drive that you’re using for your Windows ISO image file.
Are you looking for a way to repair all the errors on your computer?


If the answer is Yes, then I highly recommend you check out Advanced System Repair Pro.
Which is the leading registry cleaner program online that is able to cure your system from a number of different ailments such as Windows Installer Errors, Runtime Errors, Malicious Software, Spyware, System Freezing, Active Malware, Blue Screen of Death Errors, Rundll Errors, Slow Erratic Computer Performance, ActiveX Errors and much more. Click here to check it out NOW!

