
| Attention Before you read this post, I highly recommend you check out my resources page for access to the tools and services I use to not only maintain my system but also fix all my computer errors, by clicking here! |
Error 0x80190001 is one of a handful of errors that occurs while updating your Windows based system. Windows Updates oftentimes occur seamlessly, behind the scenes, ensuring your system has the latest security patches and features. However, there are instances when issues may occur. This particular error may occur as a result of third-party software (you installed) or an incomplete download.
Error 0x80190001 prevents the end user from updating their Windows based systems. This particular error occurs on every iteration and version of Windows, and may be the result of something as simple as a connection issue, however, more complex solutions may need to be deployed.
When your system goes through the Windows Update process, it acquires the relevant update(s) from Microsoft’s servers, however, if your system is unable to locate the relevant files, the update itself will likely fail. Error 0x80190001 is but one of many similar errors.
The particular error message associated with this issue is as follows:
Something went wrong
Please try again later
0x80190001
With that said, let’s go into greater depth on its common causes.
What Causes Windows Update Error 0x80190001
This is not a generic error, and as such, has several most common culprits for its occurrence. These are as follows:
- Windows date and time is incorrect: Before attempting an OS update, may sure you have the correct time and date setup. Many Windows updates rely on this feature to properly, download and install a new update.
- Incomplete download files: Error 0x80190001 may occur if Windows fails to download (from Microsoft’s servers) all of the appropriate files for the update.
- Software conflict: It’s possible a third-party tool, such as an internet security app is interfering with the Windows Update feature.
Additional causes may include file erasure and Windows corruption.
Now that we have a general idea of what may be causing this error, let’s get into those solutions.
How to Fix It
When attempting to update or upgrade Microsoft Windows, error 0x80190001 is probably one of the more common errors an end user may encounter. The exact cause will vary, naturally, but the solutions still remain consistent across the board.
So to start with, you should definitely considering restarting your system.
If it’s an intermittent issue, like the failure to initialize a specific service or access a certain process or file, then a system restart should get things back to good working order.
When restarting, it’s important to carry out a hard reboot. To do that, simply, hold down the power button, until the system powers off. Usually that will be for no more than 5 seconds.
After you have successfully powered the system down, wait a minute (60 seconds), then power the system back on again. When the system successfully boots up, check to see whether or not it fixed the Windows Update error.
Disconnect External Devices
If you have a series of external devices connected to your system, such as USB sticks, controllers, smartphones etc. then you may want to consider disconnecting them. It’s not uncommon for external devices to interfere with the update/upgrade process.
Just disconnect anything that doesn’t need to be connected to the system, then retry the update.
Check Internet Security Software
If you are still unable to update/upgrade Windows due to error 0x80190001, then you may want to consider looking into your antivirus software.
Although your internet security tool is designed to protect your system, overzealous tools can oftentimes block certain features, to protect your system.
To verify whether or not that is the case, you will need to disable your antivirus software, at least temporarily, so you can check.
The steps to disabling your software will vary, but typically, you’ll want double-click on its icon in the system tray (bottom-right hand corner). When its Graphical User Interface (GUI) loads up, locate Real-time Scanning, and disable it.
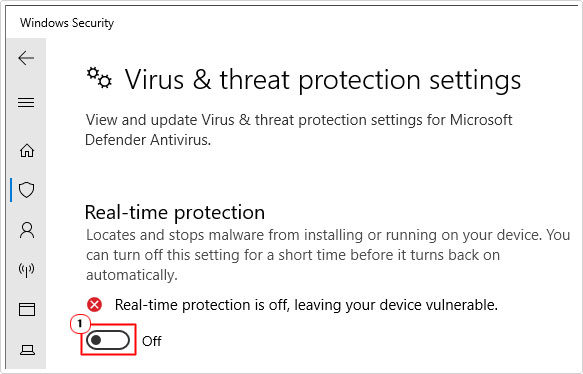
If the antivirus software is found to be the root cause of the error, then you should consider switching to an alternate solution. There are many such solutions around, but I personally recommend you give System Mechanic a try. Click the link below to learn more about this tool and how it can protect your system:
CLICK HERE TO CHECK OUT SYSTEM MECHANIC
Use Windows Repair Tool to Fix Error 0x80190001
If, after attempting the relatively simple solutions above, the error 0x80190001 continues to persist, then you may want to try this more holistic, yet, automated solution.
Through the use of this highly advanced Windows repair tool, you can expect it to fix a wide range of issues, not to mention Windows Update-related errors.
All you need to do is download, install and run it, and it will carry out a scan of your system, identifying and repairing common areas of your system.
A single scan can potentially fix DLL errors, app errors, BSOD errors, registry corruption and much more.
If by any chance, this interests you, then visit the link below:
CLICK HERE TO CHECK OUT THE ADVANCED REPAIR TOOL
 The solution(s) below are for ADVANCED level computer users. If you are a beginner to intermediate computer user, I highly recommend you use the automated tool(s) above! The solution(s) below are for ADVANCED level computer users. If you are a beginner to intermediate computer user, I highly recommend you use the automated tool(s) above! |
Disable Sync in Google Chrome
If you’re still unable to fix the update error 0x80190001, then you should try this little trick. It involves disabling Sync in your Google Chrome browser. End users have reported that they were able to fix the error by specifically disabling sync, which has been known to interfere to certain Windows apps.
The steps to doing this are as follows:
1. First, boot into Windows as a full administrator.
2. Then, load up Google Chrome by double-clicking on its Desktop Icon.
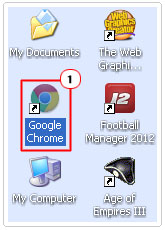
Note: You will need to select your main profile.
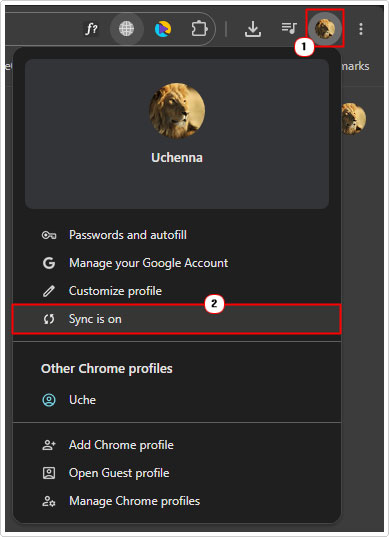
3. Now, click on your Profile Icon (in the top-right corner), then click on Sync is on.
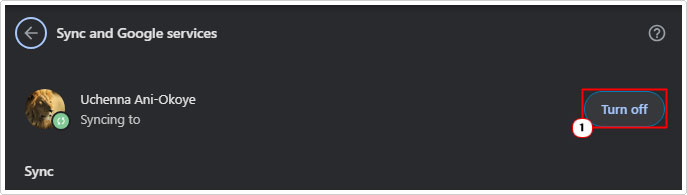
4. This will bring up the Sync and Google services page, simply click on Turn off.
Empty SoftwareDistribution Folder
Software Distribution is the temporary storage location for Windows Updates. During the update/upgrade process, files are stored in this location before they are execute and installed on your system.
However, if an update was to become corrupted, during the download phase, this could result in a failed update. Additional attempts to update Windows may fail because the OS may bypass re-downloading the file, instead choosing to execute the same corrupted update files.
Fortunately, there is a solution to this problem. You can simply, manually erase the contents of this folder.
The instructions on doing this, can be found on my post on fixing Windows Update error code 0x80070103.
Enable Windows Update Services
There are a series of services the Windows Update requires to successfully carry out an update. These are what you call dependency services. In the event that one or more of them failed to run (causing the error), you can rectify this issue by manually starting the services yourself.
The steps to doing that are as follows:
1. First, boot into Windows as an admin.
2. Then press  + R, type cmd and press CTRL + Shift + Enter.
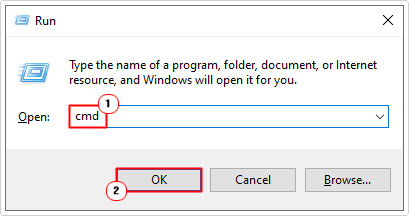
3. When Command Prompt loads up, type the following commands below, pressing Enter after each line.
SC config bits start=auto
SC config cryptsvc start=auto
SC config trustedinstaller start=auto
4. Once you have all the dependency services running, you can retry the Windows Update or Upgrade process.
Use SFC and DISM
Another possible cause of the update error 0x80190001 is the corruption of the OS. It’s possible an integral system or Windows file has been erased or corrupted.
Fortunately, Windows has two built-in tools, designed specifically for tackling this issue. The first is SFC or System File Checker. This is a repair tool, designed to scan, locate and replace missing or corrupt system files.
The second tools is DISM or Deployment Image Servicing and Management. This one is designed to restore the integrity of your Windows install, by replacing missing or corrupt Windows files.
Both tools work best in tandem. So it’s advised that you run them both.
For step-by-step instructions on how to do that, check out my post on fixing MSVCR71.dll missing errors.
Use Windows Update Assistant to Fix Update Error 0x80190001
If after attempting all of the solutions above you are still unable to fix the error 0x80190001, then you could try using the Windows Update Assistant to update or upgrade your operating system.
This, if done right, will update your OS to the latest version without erasing any of your sensitive files.
The steps are as follows:
1. Boot into Windows as an admin.
2. Now, download the Windows Update Assistant from the following Microsoft link, here: https://www.microsoft.com/software-download/windows10
Note: Click on Update now, to download the tool.
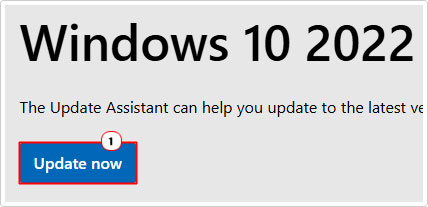
3. Double-click on the downloaded Windows Update Assistant file, and follow the onscreen instructions.
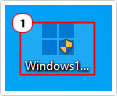
Note: This solution is specifically for Windows 10 users.
Are you looking for a way to repair all the errors on your computer?
If the answer is Yes, then I highly recommend you check out our 24/7 Live Support Service.
Which is the leading Online Support Service that is able to help you cure your system from a number of different ailments such as Windows Installer Errors, Runtime Errors, Malicious Software, Spyware, System Freezing, Active Malware, Blue Screen of Death Errors, Rundll Errors, Slow Erratic Computer Performance, ActiveX Errors and much more. Click here to check it out NOW!