| Attention Before you read this post, I highly recommend you check out my resources page for access to the tools and services I use to not only maintain my system but also fix all my computer errors, by clicking here! |
Windows Updates are an integral part of your operating system as it adds much needed functionality as well as providing a plug for loopholes and vulnerabilities, from time to time. However, the Windows Update component itself, is not infallible, as there are oftentimes when it also incurs errors. Windows update error 0x8024000b is just one of these errors. This error occurs when the Update component is unable to read the Manifest file which is required when installing an update. The current operation (at the time) is thus cancelled either by the end user or the OS. Additionally, an inability to filter the results is also known to cause this error message:
Error 0x8024000B:
Operation was cancelled.
Microsoft is constantly releasing new patches and updates for the various programs on its operating system. These updates are designed to ensure everything runs smoothly, without hiccup. These updates usually come jam-packed with bug fixes and security patches, along with stability updates as well as additional features for already existing applications (as already touched on). Despite the positives associated with these many updates, we have errors that can and do occur; as a result of this component (Windows Update). Fixing them can be quite daunting, and that brings us to this tutorial. In this post we will be going through the numerous solutions that end users have used to successfully tackle error 0x8024000b.
What Causes Windows Update Error 0x8024000b?
When we look at the potential causes of error 0x8024000b, we find that, in most cases, the error is caused primarily by one of two things, these are as follows:
- Missing Manifest Files: Error 0x8024000b will occur when the Windows Update component is unable to access or read the manifest files, required to install the update. This may be as a result of the operating system or end user cancelling the Update process midway. That is what the ‘Operation was cancelled’ alludes to.
- Corrupted Windows Registry: As is the case with most Windows Update errors. Corruption within the registry may adversely affect the Windows Update component.
In addition, after doing my due diligence, I discovered that a lot of end users encountered error 0x8024000b right after or during the installation of update KB4494351 and KB4505220, both of which update Microsoft’s SQL.
That said, this error can and does occur during the installation of any and all Windows Updates.
How to Fix It
Windows Update error 0x8024000b is a very tricky error to rectify. However, there are some simple solutions you can try. Below you will find the solutions, arranged in order of difficulty.
Before we get into the more complex methods of fixing error 0x8024000b. The first thing I’d have to suggest you gave a try was the Windows Update Troubleshooter. It’s a built-in Windows tool, that when run, will attempt to fix the error using a number of simple methods. Its effectiveness is debatable, however, that doesn’t mean you should completely rule it out, as a possible fix.
You can find step-by-step instructions on how to use the Windows Update troubleshooter from my post on fixing error 0x80004005.
Run Windows Repair Tool to Fix Error 0x8024000b
When it comes to fixing error 0x8024000b, one of the more effective, yet easier solutions to repairing it is to use an automated Windows repair tool like Advanced System Repair Pro. This tool is highly effective at fixing a plethora of issues that may occur on your system. Such as registry corruption, system instability and slow system performance.
In addition to that, it is also capable of cleaning your system of junk files, helping to free up much needed hard drive space. It comes bundle with a user friendly interface, making it easy for anyone to get to grips with.
For additional information on how this powerful tool may be able to help you, check out the link below:
CLICK HERE TO CHECK OUT ADVANCED SYSTEM REPAIR PRO
 The solution(s) below are for ADVANCED level computer users. If you are a beginner to intermediate computer user, I highly recommend you use the automated tool(s) above! The solution(s) below are for ADVANCED level computer users. If you are a beginner to intermediate computer user, I highly recommend you use the automated tool(s) above! |
Rename Spupdsc.exe
If the error continues to persist after attempting the two solutions above, then I suggest you give this fix a shot.
Error 0x8024000b is known to occur as a result of one culprit file on your system (Spupdsvc.exe). Thus, to fix this error, you may want to consider renaming the file. It’s not too difficult, just follow the instructions below:
Note: You have the option of renaming the file to whatever you want, however it’s very important that you do not delete the file, as it’s likely you may need it in the future.
1. First, boot into your system as a full administrator.
2. Next, press  + R, type cmd /c ren %systemroot%\System32\Spupdsvc.exe Spupdsvc.old and press Enter.
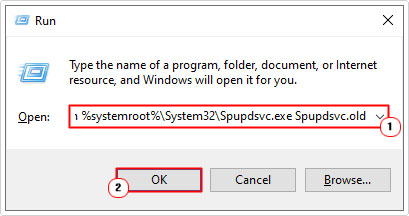
3. Once completed, restart your computer.
After the computer successfully boots up, you can now try running Windows Update.
Delete Update Cache Files
Before an update is installed on your system, it is first downloaded to a specific folder. As you regularly update your computer, this folder grows, as more and more updates are copied to it. Now, if a virus were to infiltrate this folder, it could either inhibit or adversely affect future updates.
Thus, to rectify this problem (and fix Windows Update error 0x8024000b), you’d want to erase all the content from this folder and start a fresh.
You can find instructions on how to remove the contents from this folder on my post on fixing Windows Update error 0x8024200d.
Run PowerShell Script
If error 0x8024000b continues to persists even after attempting all the methods above, you may want to try running this PowerShell script. When run it will clear the superseded updates from WSUS.
To run this script, simply follow the instructions below:
1. First, you will need to boot into your system as a full administrator.
2. From there, you’ll want to visit the Microsoft TechNet website and download the Cleanup-WSUSserver.ps1 script. Alternatively you can acquire it from here: https://www.mediafire.com/file/g3u8wq61j5nvwz6/Cleanup-WSUSserver.ps1/file
Note: Once you have successfully downloaded the script to your system, you will need to modify the Server and Port values, before it will work for you.
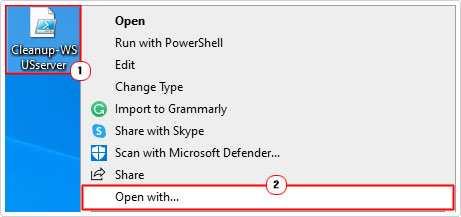
3. Next, right click on the script and select Open with -> Notepad.
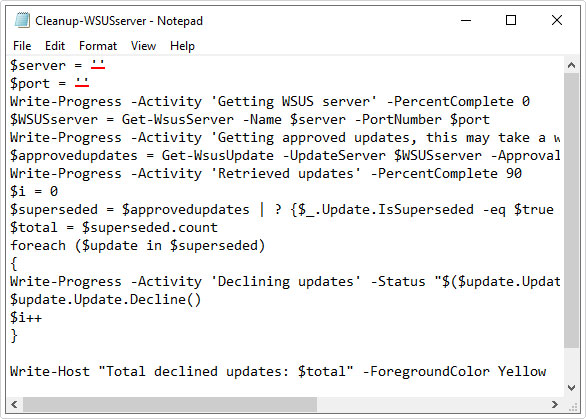
4. When the Script opens up in Notepad, fill the empty $server and $port values with your WSUS port and server values.
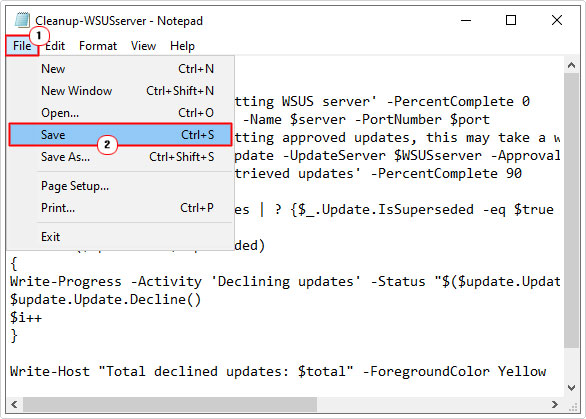
5. Once you have made the necessary changes, click on File -> Save to save changes, then close the Notepad.
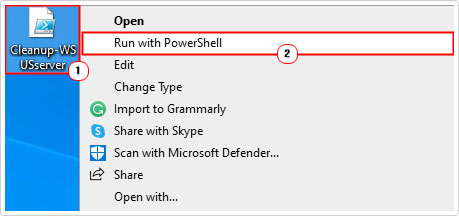
6. To finish off; simply right-click on the PowerShell Script and select Run with PowerShell.
Are you looking for a way to repair all the errors on your computer?

If the answer is Yes, then I highly recommend you check out Advanced System Repair Pro.
Which is the leading registry cleaner program online that is able to cure your system from a number of different ailments such as Windows Installer Errors, Runtime Errors, Malicious Software, Spyware, System Freezing, Active Malware, Blue Screen of Death Errors, Rundll Errors, Slow Erratic Computer Performance, ActiveX Errors and much more. Click here to check it out NOW!

