| Attention Before you read this post, I highly recommend you check out my resources page for access to the tools and services I use to not only maintain my system but also fix all my computer errors, by clicking here! |
When an end user attempts to install WSL, they may encounter WslRegisterDistribution failed with error: 0x80370102. If that’s you, then you’ve come to the right place. When it comes down to it, there are many reasons why this error occurs.
Error 0x80370102 more commonly occurs, specifically when attempting to install Linux Distro for Windows Subsystem for Linux 2 (WSL2).
This error hasn’t been around for that long, as WSL2 is relatively new or young, having only been introduced to the marketplace in the last couple of years (with the introduction of Windows build 18917). That said, this error is not exclusive to WSL2, as it’s also known to occur on Debian Distro.
When error 0x80370102 occurs, the most common symptoms, is a halting of the installation process. So it prohibits you from installing the virtual device.
That said, this error has been around for several years, and in that time, the number of viable solutions has grown. In this tutorial, we will be exploring all of them. Thus, it’s recommended you follow, precisely, the instructions laid out here to ensure the problem is resolved without hiccup.
What Causes Error 0x80370102
As I previously touched on, this error is relatively new, when compared to other errors of its type, and it’s not exclusive to Linux distros. Below you will find a list, brought together by user feedback and research. The problem you’re encountering on your system may be the result of any one of these potential causes:
- Early Build: It’s possible you’re attempting to install an early build of WSL 2. When WSL 2 was first introduced to the public, it came with a plethora of bugs, any number of which could be causing the error.
- Virtualization Disabled: Virtualization is a term used to describe the process of creating a virtual or software based, representation of something, this could be a virtual server, network, application or storage. Error 0x80370102 is known to occur when virtualization has been disabled in the BIOS.
- Windows Insider: This error is known to occur when end users attempt to install the software on an Insider Preview Build of Windows. Windows Insider build is littered with bugs and issues, which could be what’s contributing to the error.
- Hyper-V: Again, similar to virtualization, error 0x80370102 can occur when Hyper-V, (which is a piece of technology which allows for the creation of virtual environments within a Windows session) has been disabled in the BIOS.
How to Fix It
When it comes to fixing error 0x80370102, there are quite a few things that you can do. In this tutorial, I have attempted to cover every base. Each solution is ordered in terms of effectiveness and ease of execution, just to make life easier.
With that said, I suggest you continue reading for the solution to the nagging error 0x80370102.
Run Windows Repair Tool to Fix Error 0x80370102
Before attempting any of the more sophisticated solutions, you may want to try using a Windows repair tool to resolve the error. There are several of these tools available, but the one I personally recommend is Advanced System Repair Pro (ASR). ASR is an advanced system maintenance and repair tool capable of protecting your system from a plethora of common system issues.
It’s very effective at fixing registry, DLL, Windows Update and several other error types. So before you do anything else, I’d have to recommend you gave this tool a try.
You can learn more about this tool and how it can help you, from the link below:
CLICK HERE TO CHECK OUT ADVANCED SYSTEM REPAIR PRO
Check If Virtualization Is Enabled
When it comes to fixing error 0x80370102, there is an assortment of things you will need to do to get things up and running correctly. However, before you begin, you will first, need to verify whether or not virtualization has been enabled on your system. To do that, simply follow the instructions below:
1. First, you will need to boot into your computer as a full administrator.
2. Once you’ve successfully logged into your system right-click on the Taskbar and select Task Manager.
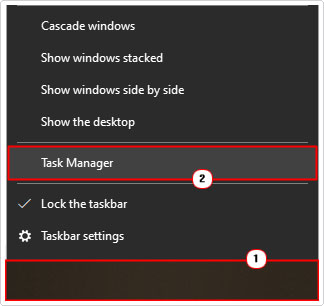
3. This will bring up a Windows Task Manager applet, from here, click on the Performance Tab, then click on CPU. Under Logical processors it will have Virtualization. Check whether it says Disabled or Enabled besides it.
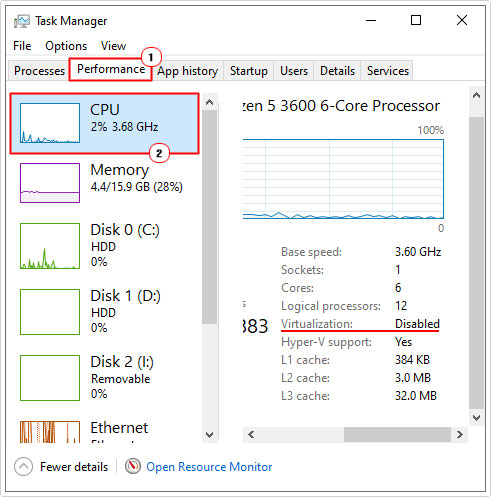
Note: Under Virtualization, you should also see Hyper-V support. You will need to verify that, that also has been enabled.
Enable Virtualization
If Virtualization has been disabled on your system, then you will need to enable it. Unfortunately, the only way to do this, is through the BIOS. The instructions on how to do this, varies from BIOS to BIOS, so it’s recommended that you consult the manual of your motherboard.
When it comes to booting into the BIOS, the process is the same, just press F2, F12 or the DEL key during the POST (Power on Self-Test). The system should notify to you which button you need to press to enter the BIOS.
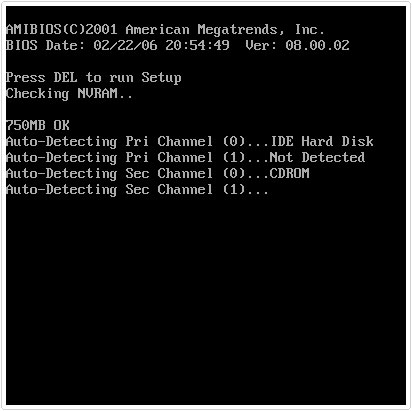
Once you’re in the BIOS, you will need to find the CPU Section. Typically the Virtualization Setting is located there.
Once you’ve enabled it, Save and Exit.
Again, it’s recommended that you consult your manual for help in this area.
Enable Nested Virtualization
Once you’ve enabled Virtualization in the BIOS, the next step is to enable nested virtualization for Virtual Machines. This can be done several ways, but for this tutorial, we will be using PowerShell.
1. First, boot into your system as a full administrator.
2. Then press  + X, and click on PowerShell (Admin).
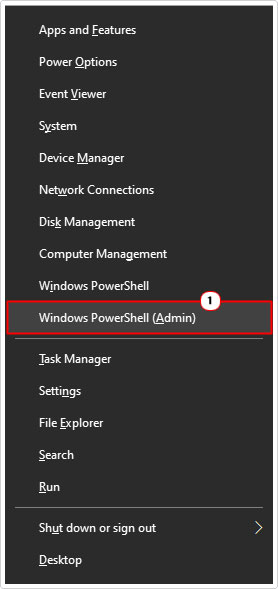

Note: Make sure PowerShell is loaded on the host machine, with the target machine turned off.
3. When PowerShell loads up, type the following command below, changing the VM processor and Name to match your own, then press Enter.
Set-VMProcessor -ExposeVirtualizationExtensions $true
4. If you have more than one networked machine, that you want to enable VM on all of them. To do that simply type the command below and press Enter. Just ensure the target machines are not on at the time.
Get-VM | ? State -eq ‘Off’ | Set-VMProcessor -ExposeVirtualizationExtensions $true
Enable Hyper-V Support
Hyper-V is a feature which enables administrators to be able to better utilise their hardware for the purpose of running multiple virtual operating systems simultaneously on the same server. If this feature is disabled, then you will get an error 0x80370102 every time you attempt to install Linux distribution through Windows. To enable this feature, simply do the following:
1. First, you will need to boot into your system as a full administrator.
2. Next, press 


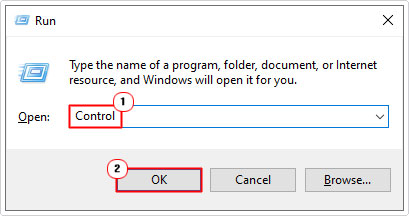

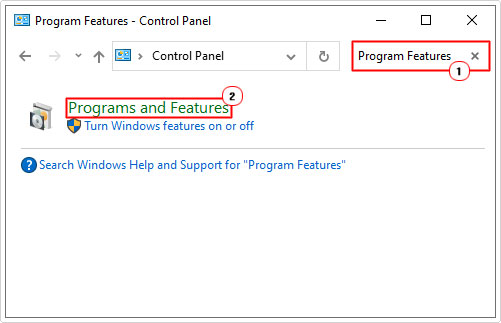
3. When Control Panel loads up, type Program Features into the Search Control Panel box, then click on Turn Windows features on or off.

4. This will bring up a Windows Features applet, from here, tick the box next to Hyper-V, and then click on OK.
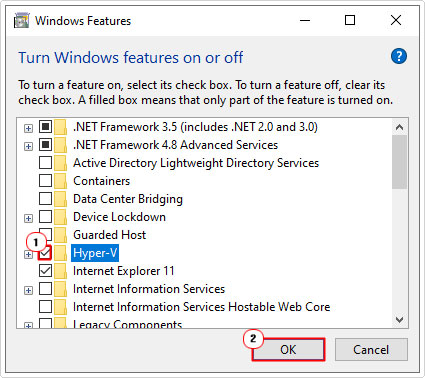

5. Lastly, restart your system, for the changes to take effect.
Disable CPUID Feature
When switching your system on, the operating system will utilise a set of CPUID instructions to determine the processor you’re running on. The CPUID feature is primarily for end users that run the latest processors on older operating systems. In this case, it’s possible the operating system may not be fully compatible with the processor installed in your system. Thus, to bypass this issue, you can simply disable the CPUID feature.
However, when it comes to disabling this feature, the process will vary, depending on the BIOS. So you will need to do some browsing around to find it.
I’ve already covered how to load up the BIOS (in section Enable Virtualization), so go from there, and try and locate the feature. Alternatively, you may be able to find the appropriate information in your motherboard manual.
Are you looking for a way to repair all the errors on your computer?


If the answer is Yes, then I highly recommend you check out Advanced System Repair Pro.
Which is the leading registry cleaner program online that is able to cure your system from a number of different ailments such as Windows Installer Errors, Runtime Errors, Malicious Software, Spyware, System Freezing, Active Malware, Blue Screen of Death Errors, Rundll Errors, Slow Erratic Computer Performance, ActiveX Errors and much more. Click here to check it out NOW!

