| Attention Before you read this post, I highly recommend you check out my resources page for access to the tools and services I use to not only maintain my system but also fix all my computer errors, by clicking here! |
When you activate your Windows operating system, you’re license is linked to your hardware specifications. The downside to this is, in the event that you decide to make major hardware changes to your system (i.e. upgrade), the OS may prompt the following error message: “Windows reported that the hardware on your device has changed. Error code: 0xC004F211” after boot up.
Given the way Microsoft’s licensing system works, this shouldn’t be all that of a surprise, as the operating system is no longer able to identify your system. Given its inability to match the hardware specifications of your original system to your newly upgraded one.
One thing that all Windows users should do, the moment they boot their system up for the first time, is link their Microsoft account to their Windows license. As this, in the vast majority of cases, is enough to alleviate this problem. However, there are nuisances involved in this process, which we will discuss later in this tutorial.
That aside, hardware changes is not the only cause of this problem. As many users have reported a possible virus infection as the root cause.
In this tutorial, I will showcase a number of solutions, all of which have proven very effective as fixing activation error code 0xc004f211.
What Causes Activation Error Code 0xc004f211?
Error code 0xc004f211 is not uncommon. Occurring after a system reboot or when attempting to activate Windows.
There are a variety of possible causes. The most common of which are outlined below:
- You have a pirated copy of Windows: If, after a Windows Update, the system detects that your version of Windows is not genuine, then you’ll need to acquire a legitimate license to fix it.
- A virus infection: It’s possible a malicious file infiltrated and corrupted key Windows files. Which have adversely effected the activation component of Windows.
- Product key is invalid: Make sure you type the product key in correctly. Just go through it a few times, just to be sure.
- System doesn’t meet required specifications: If you upgraded from an older iteration of Windows to 10/11, then there’s a strong chance, one or more of your hardware drivers could be incompatible with the new OS.
- Product Key limit has been reached: If you have a volume license, then it’s possible that it has reached its maximum allowed systems.
Now, with all of that out of the way, let’s take a look at the numerous solutions available to you.
How to Fix It
Before we get to any of the solutions, the first thing you’ll need to verify, before anything else, is the following:
- That your Windows license has been linked to your Microsoft account.
- That you have a valid product key.
- All your hardware components are compatible with your version of Windows. Driver issues will typically ensue, in the event that one or more of your hardware components are outdated.
If all of these steps check out, only then should you proceed with the solutions below.
Note: There are workarounds (outlined below) for users who have not linked their accounts to their licence.
Run Windows Activation Troubleshooter
As previously noted – there’s already a predetermined solution, orchestrated by Microsoft. Essentially, if you’ve linked your digital license to your Microsoft account, then you should be able to reactivate the operating system, after the upgrade. Microsoft’s term for this is Exception path. All you need to do is either, log into Windows. If that doesn’t work, then run the Windows Activation Troubleshooter.
Note: In the event that you did not link your account to your licence prior to your initial Windows activation, then this method will not work.
For those user who did not link their Microsoft Account to their Windows license prior to the major hardware upgrade, their only working solution would be to purchase a new license – depending on the circumstances.
Anyway, to use activation troubleshooter, simply do the following:
1. Boot into your system as a full administrator.
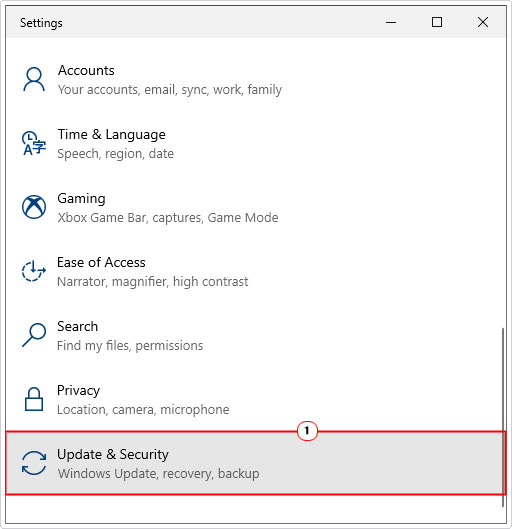
2. Then press  + I, then click on Update & Security.
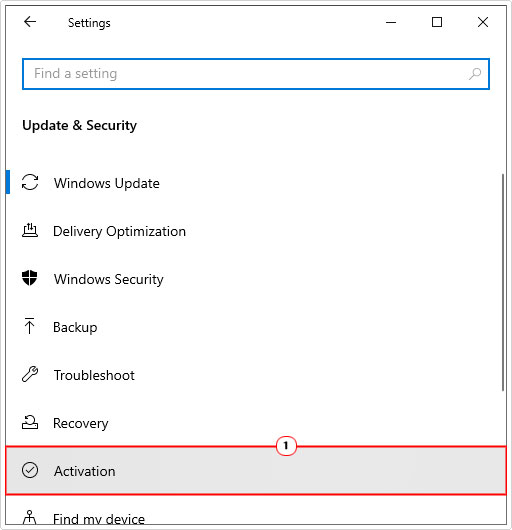
3. When Update & Security pops up, click on Activation.

4. Lastly, select Troubleshoot.
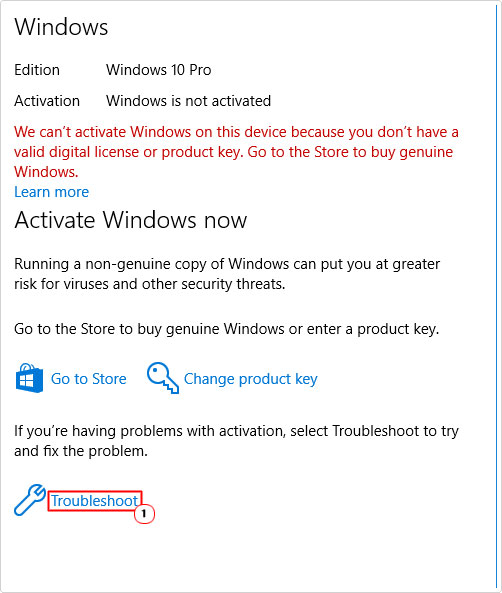

Note: The Activation Troubleshooter is only accessible if your iteration of Windows (10/11) is not activated.
Run Windows Repair Tool to Fix Activation Error Code 0xc004f211
If the above mentioned solution fails to fix error 0xc004f211, then there’s a more holistic approach I recommend you attempt – before applying the more sophisticated solutions below.
That is, to use the Windows repair tool Advanced System Repair Pro. This tool is a highly advanced, multifaceted tool, capable of detecting and fixing a plethora of issues, on your system, automatically.
You can expect it to detect and tackle application, DLL, update, game, and activation errors, in addition to data corruption and sluggish system performance.
Anyway, you can find out more about this tool, from the link below:
CLICK HERE TO CHECK OUT ADVANCED SYSTEM REPAIR PRO
  |
Use SLMGR Command
There are instances when error code 0xc004f211 has occurred, due to a glitch or conflict, right after a Windows Update. In situations like this, you can get around the problem by using the SLMGR command to activate Windows.
To do that, follow the instructions below:
1. First, boot into your system as a full administrator.
2. Next, press 


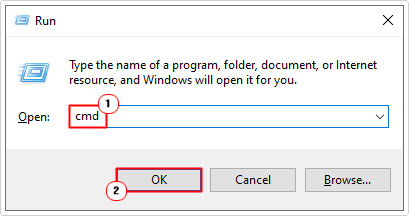

3. When Command Prompt loads up, type the following command below and press Enter.
slmgr /ipk License Key
slmgr /ato
Note: replace License Key with your 25 digit code.
4. There will be a brief time you may have to wait, before Windows verifies the authenticity of your license key.
Note: If you used a digital license to activate your operating system, then you should use the following code:
slmgr /xpr
Once that’s complete. Close Command Prompt, then restart your system. Now verify that your operating system has successfully been activated.
Report Hardware Change
It’s possible to use the Windows Activate Troubleshooter to report to Windows that you have made changes to your systems hardware, and that it has not been unknowingly tampered with in any way. To do that, follow the instructions below:
1. First, follow steps 1 – 3 of Run Windows Activation Troubleshooter.
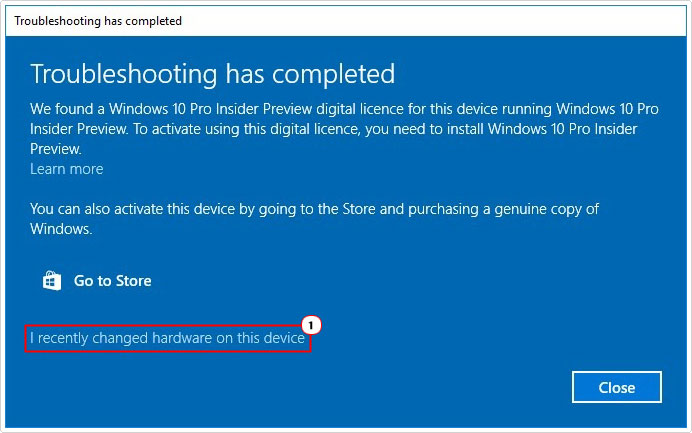
2. The troubleshooter will run automatically. After which a Troubleshooting has completed dialog box should appear. From here, click on I changed hardware on this device recently.

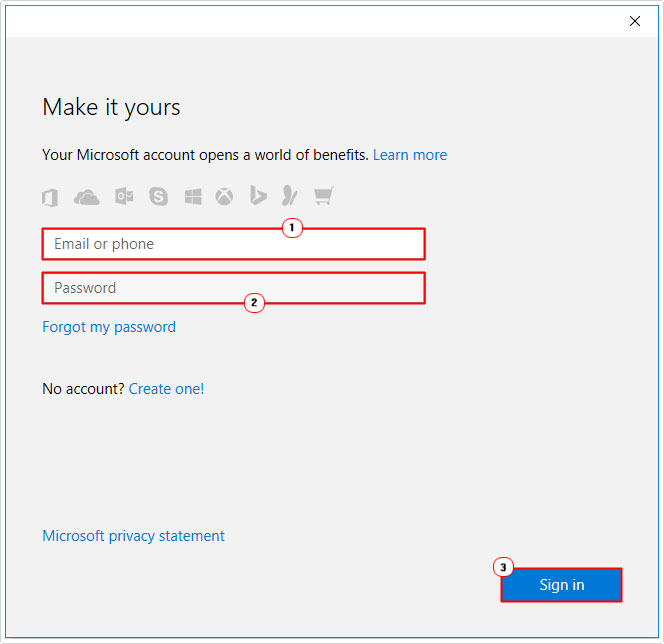
3. This will take you to the Make it yours screen. Type your Email or phone and Password into the corresponding boxes, then click on Sign in.

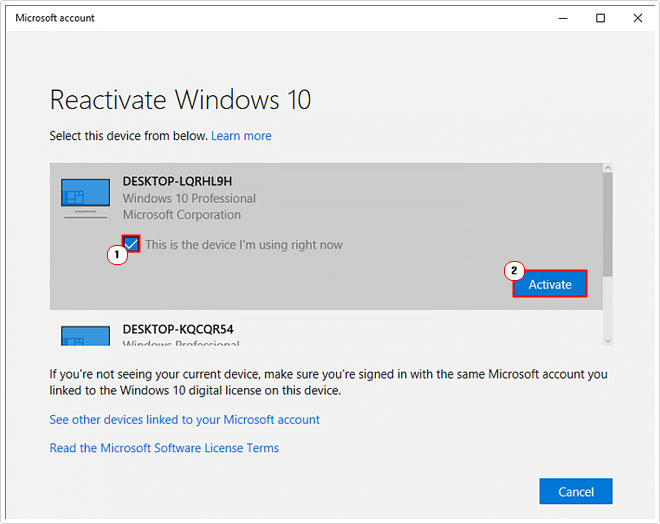
4. The next screen is Reactivate Windows 10 (or 11 depending on your version of Windows). Tick the box next to this is the device I’m using right now, then click on Activate.

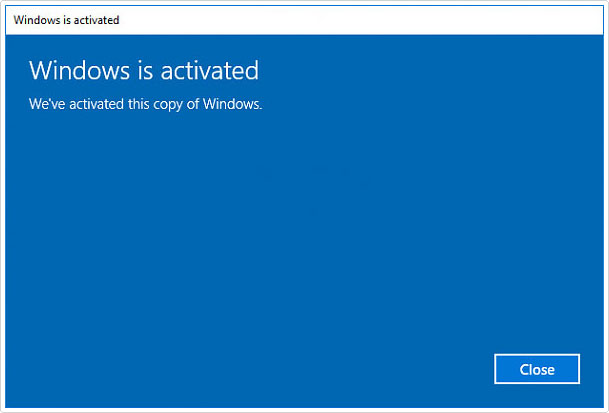
5. If done correctly, it should take you to a Windows is activated screen.

Update Windows
Another possible reason why activation error code 0xc004f211 may be rearing its ugly head, is as a result of an outdated operating system. To eliminate this, as a possible root cause, you will need to run and apply any available updates for your operating system.
To do that, follow the instructions below:
1. Boot into your system with administrative rights.
2. Then press 


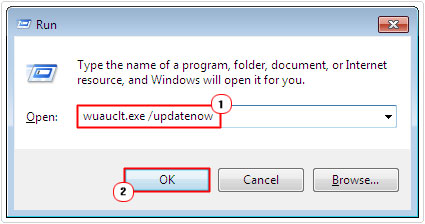

Clean Windows Install
If, after attempting all of the solutions above, you’re still receiving the activation error 0xc004f211, then you may want to consider a clean install, as a last resort.
Note: You will lose the entire contents of your hard drive. So be sure to back things up, first.
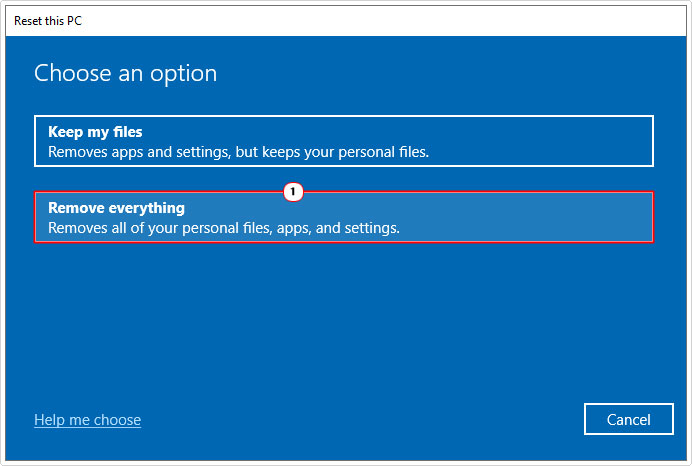
There are two ways you can go about achieving this objective. The first is to use the reset feature. Just choose Remove everything. You can find step-by-step instructions on this, from my post on fixing error 0x800703f1.

The second option is to use the media creation tool, directly from Microsoft’s website. You will need an external USB stick to complete this method. You can acquire the tool from the official link here: https://www.microsoft.com/en-gb/software-download/windows10
Are you looking for a way to repair all the errors on your computer?


If the answer is Yes, then I highly recommend you check out Advanced System Repair Pro.
Which is the leading registry cleaner program online that is able to cure your system from a number of different ailments such as Windows Installer Errors, Runtime Errors, Malicious Software, Spyware, System Freezing, Active Malware, Blue Screen of Death Errors, Rundll Errors, Slow Erratic Computer Performance, ActiveX Errors and much more. Click here to check it out NOW!

