| Attention Before you read this post, I highly recommend you check out my resources page for access to the tools and services I use to not only maintain my system but also fix all my computer errors, by clicking here! |
Error 80000000 is a Microsoft Outlook issue that occurs in several instances. The most common of which, is right after an OS upgrade (Windows 10 > 11). The simple gist of it, is an inability to connect to the exchange server.
Microsoft Outlook and Exchange are the communication backbone of any company, organisation or corporation. For this reason, the proper functionality of these services are crucial. Error 80000000 is one of many of such errors, that simply identifies the Outlook clients inability to connect to (or communicate) with the Exchange server locally – although there may not appear to be any immediate fault.
The full error message typically looks like the following:
There is a problem with the proxy server’s security certificate.
Outlook is unable to connect to the proxy server autodiscover (Error Code 80000000).
In this tutorial, we’ll discuss its general causes, along with a number of practical steps you can adopt to fix it.
What Causes Error Code 80000000?
The error code 80000000: Outlook is unable to connect issue oftentimes is the direct result of the following causes:
- Security App (on Server) is improperly configured: It’s possible the security app used on the server may be interfering with communications between outlook and exchange, thus prompting the error.
- TLS 1.0+ has been disabled: The Transport Layer Security (TLS) encryption protocol may have been disabled by a Windows Update on the local machine.
- HTTP Protocol Misconfiguration: The Exchange server is typically configured to communicate via the TCP/IP protocol. Thus, if the Outlook client software is configured over HTTP, it could prompt the error code 80000000.
- TLS Update: It’s possible a version inconsistency exists between the clients system and the Exchange server. Thus, preventing both from properly establishing communications.
- Autodiscover service is disabled: The Autodiscover service, when enabled, simplifies the deployment and configuration process.
With that out of the way, let’s take a look into the various ways you can resolve this issue.
How to Fix It
The first thing you should seek to do is determine whether a compatibility issue exists between the Exchange server and the Outlook client software.
For example, compatibility issues exist between Exchange 2010 and Microsoft 365. So if you’re using both, and experiencing an error 80000000, then compatibility may be the root cause.
In instances like this, you’d want to install a compatible version of Microsoft Outlook (like Outlook 2013).
Another thing you can do to determine whether or not the error is directly linked to the Microsoft Outlook client software, is log into the mail services via the Outlook Web Application (OWA).
Additionally, you also want to ensure no connectivity issues exist on the network, between the host machine and the server. It’s possible the Exchange server may be offline.
If the error message continues to persists, even after attempting the aforementioned steps, then I suggest you try the more sophisticated solutions below.
Run Windows Repair Tool to Fix Error Code 80000000
You can find a multitude of solutions, for any issue one may encounter on their Windows based system. Most of these solutions are typically manual. However, there are instances when the manual approach just doesn’t cut it. Which brings us to the Windows repair tool Advanced System Repair Pro.
This tool is incredibly advanced, capable of scanning and detecting a wide berth of error types, such as BSOD, Windows update, DLL and much more.
It’s also equally adept at detecting and removing malicious files from your system, as well as, optimising its performance.
All-in-all, you’re looking at an all-round maintenance and repair suite that will keep your system running fast and without issues.
You can learn more about this tool, from the link below:
CLICK HERE TO CHECK OUT ADVANCED SYSTEM REPAIR PRO
 The solution(s) below are for ADVANCED level computer users. If you are a beginner to intermediate computer user, I highly recommend you use the automated tool(s) above! The solution(s) below are for ADVANCED level computer users. If you are a beginner to intermediate computer user, I highly recommend you use the automated tool(s) above! |
Set Outlook Client to TCP/IP
Its possible error 80000000 is the result of a protocol mismatch. In which case, setting the client software up over the TCP/IP protocol, may resolve the issue.
To do that, follow the steps below:
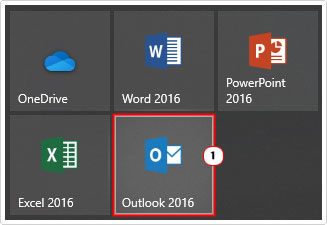
1. Boot into your system as a full administrator, then load up Microsoft Outlook.
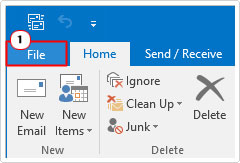
2. Now, click on File.
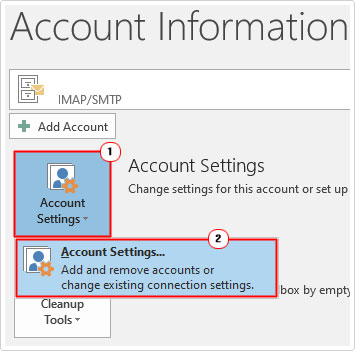
3. You should be in the File menu, from here, click on the Account Settings Icon, then click on Account Settings…
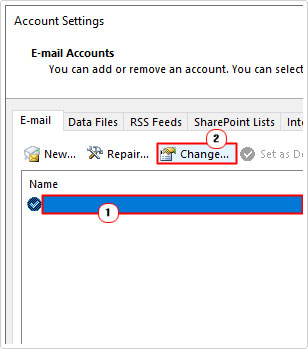
4. This will bring up the Account Settings applet, from here, on the Email Tab, double-click on your account (or click on Change).
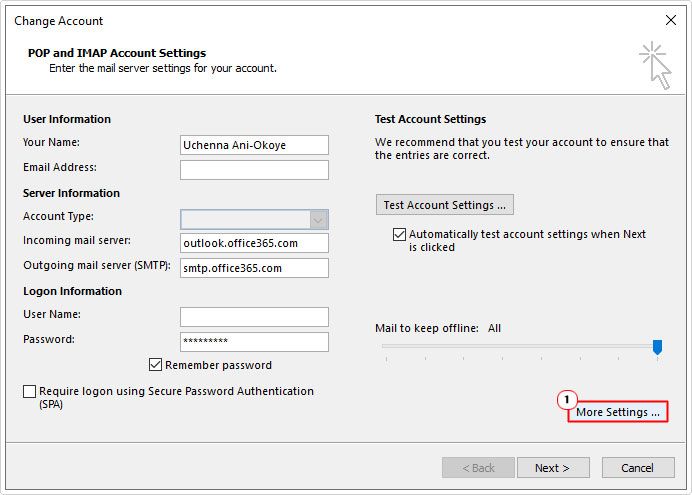
5. The Change Account applet will pop up, click on More Settings.
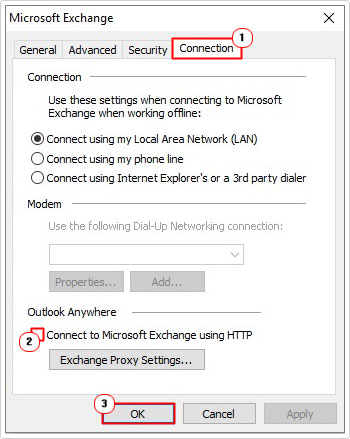
6. From the Microsoft Exchange applet, click on the Connections Tab then un-tick the box next to Connect to Microsoft Exchange using HTTP, then click on OK.
Enable Autodiscover Service
Autodiscover is a service that runs on an Exchange server, its purpose is to make the configuration of email clients, much easier.
However, before your client software (such as Outlook) can work with the autodiscover service, it must be enabled and running. To determine whether or not this service is functioning as expected, simply do the following:
Using PowerShell
Test-OutlookWebServices is a function that comes bundled with Exchange 2010 and can be used to test whether or not the Autodiscover service is running.
Its default storage location is:
C:\Program Files\Microsoft\Exchange Server\v[XX]\Scripts
Note: Where XX denotes the version.
To utilise it, simple do the following:
1. Boot into the system with the appropriate administrative rights.
2. Then press  + X, then click on Windows PowerShell (Admin).
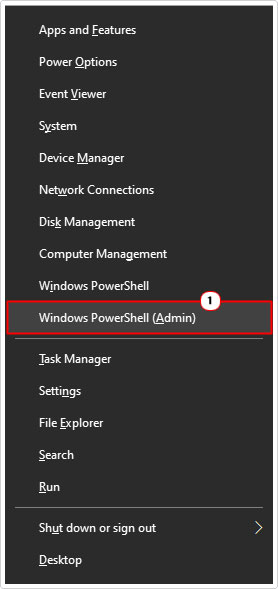

3. When Windows PowerShell loads up, type the following (below) and press Enter.
Test-OutlookWebServices -identity: user@example.com –MailboxCredential (Get-Credential)
Note: Replace user@example.com with a valid email address.
4. The result should display success if the autodiscover service is running. If not, then you have a configuration issue on your Exchange server.
Enable TLS on Client Machine
TLS (Transport Layer Security) was originally created as a successor to SSL (Secure Sockets Layer). This makes TLS a more enhanced version of SSL. Thus, if the client machine doesn’t have any of the TLS versions enabled on its system, then it can prevent the Mail client software from communicating with the Exchange server.
To get around this issue, you can simply enable TLS 1.1 & 1.2 on the client machine.
To do that, I suggest you use the registry editor.
Use Registry Editor
WARNING: The Windows Registry is a very sensitive area of the operating system. Thus, any wrong modification to the registry can render your system completely inoperable.
1. First, boot into your system as a full administrator.
2. Then press 


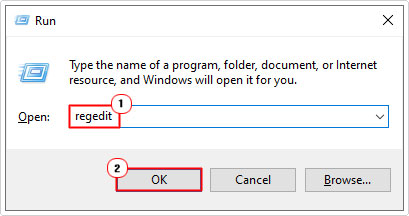

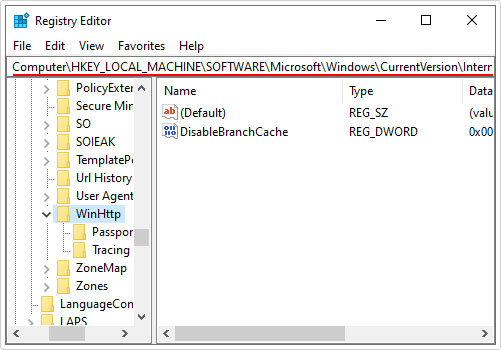
3. When the Registry Editor loads up, go to the following path:
HKEY_LOCAL_MACHINE\SOFTWARE\Microsoft\Windows\CurrentVersion\Internet Settings\WinHttp

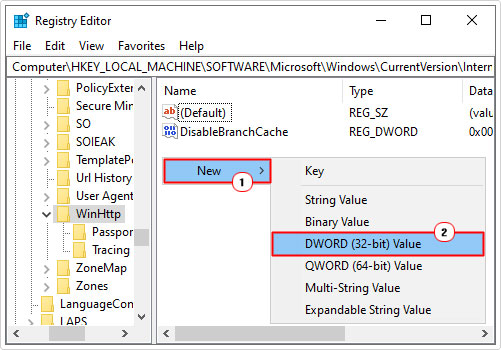
4. Now, right click in the right pane, and select New -> DWORD (32-bit) Value.

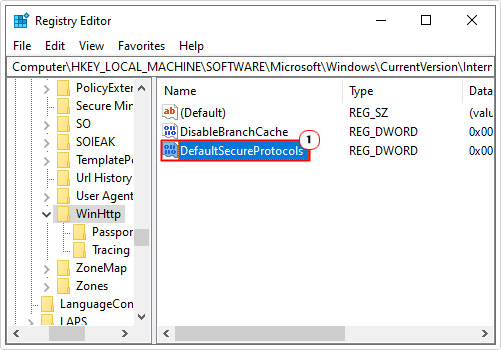
5. Next, name it DefaultSecureProtocols, then double click on it.

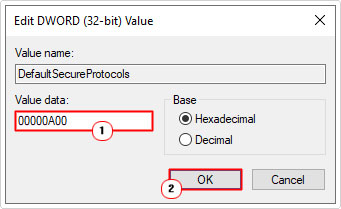
6. This will bring up the Edit DWORD (32-bit) Value box, now type 00000A00 into the Value data box and click on OK.

Note: If you’re using a Windows x64 (64-bit operating system), then you will need to navigate to the following path and repeat steps 4 – 6:
HKEY_LOCAL_MACHINE\SOFTWARE\Wow6432Node\Microsoft\Windows\CurrentVersion\Internet Settings\WinHttp
7. Lastly, close Registry Editor and restart your system.
Use Microsoft Script
If all of the above seems too complicated for you, then you can automate the entire process by running an official Microsoft script. This script will essentially, create the DefaultSecureProtocols registry subkey in the appropriate registry path(s).
To utilise this script, simply download it from here: https://download.microsoft.com/download/0/6/5/0658B1A7-6D2E-474F-BC2C-D69E5B9E9A68/MicrosoftEasyFix51044.msi
Save it to your system, then Open it.
Note: This script will also add the DefaultSecureProtocols registry subkey to the following locations:
HKEY_CURRENT_USER\Software\Microsoft\Windows\CurrentVersion\Internet Settings

HKEY_LOCAL_MACHINE\SOFTWARE\Microsoft\Windows\CurrentVersion\Internet Settings
This is to enable TLS 1.1 & 1.2 for the much outdated Internet Explorer.
Upgrade Exchange Server to Fix Error Code 80000000
It might be that your Exchange Server 2010 is just too far outdated. Support for 2010 version ended in 2020. For this reason, you should want to update your Exchange server version.
To update the server, it’s recommended that you consult the company that originally set it up.
Are you looking for a way to repair all the errors on your computer?


If the answer is Yes, then I highly recommend you check out Advanced System Repair Pro.
Which is the leading registry cleaner program online that is able to cure your system from a number of different ailments such as Windows Installer Errors, Runtime Errors, Malicious Software, Spyware, System Freezing, Active Malware, Blue Screen of Death Errors, Rundll Errors, Slow Erratic Computer Performance, ActiveX Errors and much more. Click here to check it out NOW!

