| Attention Before you read this post, I highly recommend you check out my resources page for access to the tools and services I use to not only maintain my system but also fix all my computer errors, by clicking here! |
Have you recently encountered a d3d9.dll related error? If so, then you’ve come to the right place. In this tutorial, we’ll present to you, an overview of what d3d9.dll is, and the various verifiable methods you can use to alleviate its many associated errors.
D3d9.dll is one of several DLL files that belongs to the DirectX application programming interface. DirectX has become an integral component of all Windows based systems. It’s used primarily in tasks involving multimedia, such as video and game programming.
However, as is typical, with any Windows component, it’s not without its faults. General d3d9.dll not found or missing errors, oftentimes occur when the DirectX version installed is outdated. For example, if an end user is attempting to run a video game that requires DirectX 9 on a system that has DirectX 8 installed on it.
Below is a list of some of the most common d3d9.dll error messages:
The procedure entry point ddentry10 could not be located in the dynamic link library ddraw.dll
Access violation error in DirectX file D3D9.DLL
Dplay.dll has performed an illegal operation
The application failed to start, the file d3d9.dll was not found. Reinstall the application to fix the error.
Is D3d9.dll Harmful To Your System?
d3d9.dll, for all intents and purposes, is considered a safe file. As a result, it’s unlikely to cause harm to your system. The default location of the d3d9.dll file is:
C:\Windows\System32
If you find the file anywhere else on your system, then it’s likely a virus.
Can You Remove or Stop D3d9.dll?
Non-system processes can typically be stopped, because they are not involved in the running of the system. D3d9.dll, as we have already established, belongs to DirectX. This is a program developed by Microsoft.
If do not require the DirectX application programming interface on your system, then you can remove it, by uninstalling it. That will, in turn, erase the d3d9.dll file. However, there’s no official way of removing DirectX from your system, so I’m not going to recommend you explore this avenue, and instead, leave it on your operating system.
What Causes D3d9.dll Errors?
D3d9.dll errors are not unlike the many errors you may encounter on your system through repeated use.
Below you will find a list of the most likely causes, in your case:
- The d3d9.dll file no longer exists on your system.
- D3d9.dll has been corrupted.
- A compatibility issue exists between the installed DirectX version and the video game you’re trying to play.
- The d3d9.dll is not registered by the system.
As previously mentioned, certain games require a specific version of DirectX to run. So if a game requires DirectX 8, then you’ll need at least DirectX 8 installed on your system for it to work.
How to Fix It
When it comes to fixing d3d9.dll related errors, there are many things you can do.
However, the first thing you should attempt, before anything else, is a simple system restart. Sometimes these errors can be the result of something that can readily be fixed by a simple restart. So, restart your computer, then check whether or not it has fixed the error.
If the error persists, then you should check the specifications of the game (or media program) you are trying to run, then verify you have the correct version installed on your system.
To check your DirectX version, simply do the following:
1. First, ensure you have booted into your system as a full administrator.
2. Then press  + R, type Dxdiag then click on OK.
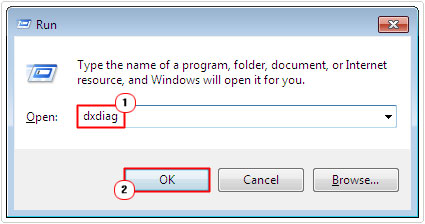
3. This will bring up the DirectX Diagnostic Tool, from here, under the System (default) Tab, check DirectX version.
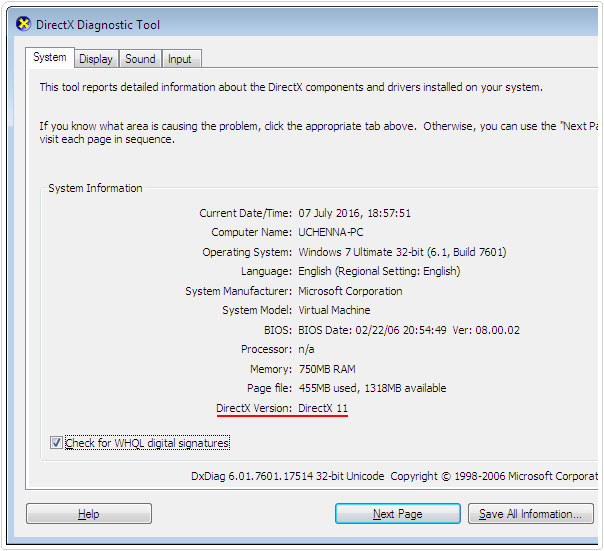

If you find that you have an outdated version installed on your system, then you can and should download the most up-to-date version from this official Microsoft link: https://www.microsoft.com/en-gb/download/details.aspx?id=35
Reinstall Recently Removed App
If the d3d9.dll error occurred right after you removed a specific application, then there is a good chance, that the removal of that application caused the d3d9.dll file to be inadvertently removed. To fix this problem you should try reinstalling the program.
To do this, simply retrace your steps. Download, run the installer and follow the onscreen instructions.
Run a Registry Scan to Fix D3d9.dll Errors
To keep your system running optimally, it’s important that you carry out regularly maintenance checks which may include registry cleans. The Windows registry can oftentimes be linked to d3d9.dll errors. Thus, in the event that, that is the case, the problem can be resolved by cleaning your registry.
To clean the registry you will need to run specialised software such as Advanced System Repair Pro. This tool, when run, will, scan, detect and repair infractions within your systems registry, amongst other things.
You can learn more about this powerful tool, from the link below:
CLICK HERE TO CHECK OUT ADVANCED SYSTEM REPAIR PRO
Update Graphics Card Drivers
Sometimes d3d9.dll errors can be the result of an outdated graphics card driver. In which case, you’re going to want to update these drivers.
To do that, you will need to visit the website of your card manufacturer.
From there, you can download the latest drivers for your specific card. Once complete, run the setup, follow the onscreen instructions, then restart your computer.
Alternatively, if this all sounds far too complicated, then you can use a driver automation tool like DriverFinder. Such a tool, when run, will essentially automate the entire process. It will detect, locate and install the appropriate drivers for the different devices attached to your system.
You can learn more about this tool from the link below:
CLICK HERE TO CHECK OUT DRIVERFINDER
Run a Malware Scan
Sometimes d3d9.dll errors can be the result of a virus infection. Malicious files, such as viruses are capable of getting onto your system and corrupting important system files, resulting in a plethora of error types.
To ensure that a virus isn’t to blame, you can, and should run a full scan of your system using your internet security solution. Alternatively, if you don’t have an antivirus program, you can use SpyHunter. Which is one of the very best antimalware tools around, simply visit the link below for more information:
CLICK HERE TO CHECK OUT SPYHUNTER
  |
Re-Register D3d9.dll
When attempting to fix d3d9.dll errors, the first thing you must ensure is that DirectX is installed and running on your system. Once you’ve established that, the next thing you should do, is re-register the d3d9.dll file. To do that, follow the instructions below:
1. First, boot into your computer as an admin.
2. Then press 


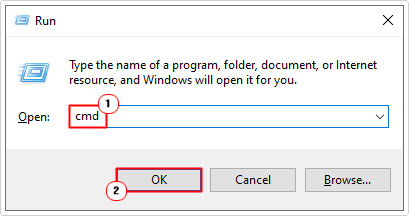

3. When Command Prompt loads up, type the following command below and press Enter.
Regsvr32 d3d9.dll
Replace D3d9.dll
If attempts to update DirectX fails to fix the d3d9.dll error, you may want to try replacing the specific file manually. To do that, follow the instructions below:
1. First, boot into your system, as a full administrator.
2. Now press 


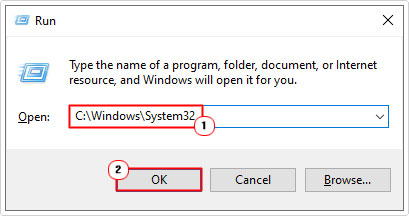

3. This will bring up the System32 folder. From here, locate and rename d3d9.dll to d3d9BACKUP.dll.
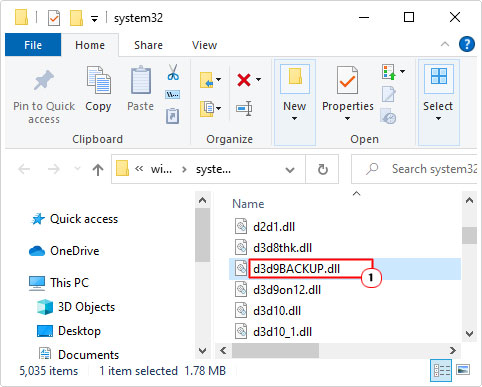

Note: By right-clicking on the file and selecting Rename.
4. Then, download the appropriate d3d9.dll from the following link(s):
32-bit d3d9.dll: https://www.mediafire.com/file/x958k9dpq8rceb3/d3d9+32.zip/file
64-bit d3d9.dll: https://www.mediafire.com/file/89qmcjuqehzfwsx/d3d9+64.zip/file
5. Once you’ve downloaded the d3d9.zip file, open it, then click on Extract To.
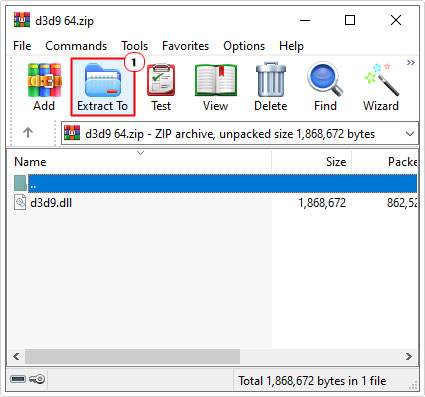

Note: In this tutorial, we will be using WinRAR.
6. This will bring up the Extraction path and options applet, from here, type C:\Windows\System32 into the Destination path box, then click on OK.
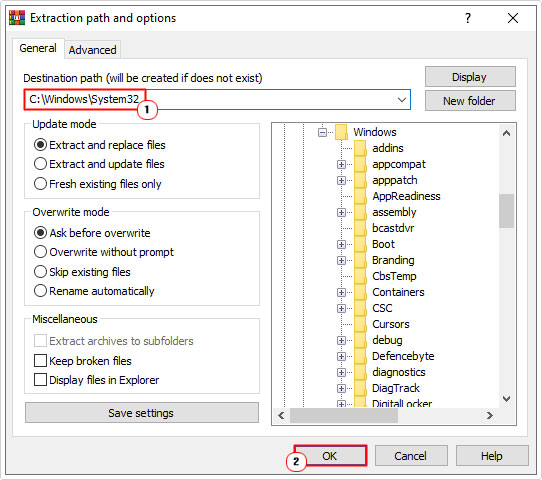

7. Lastly, re-register the d3d9.dll, by following steps 2 – 3 of Re-Register D3d9.dll.
Perform a System Restore
If all of the above solutions have failed to fix the d3d9.dll error, then as a last resort, you may want to try performing a system restore.
If done correctly, it will set your system back to an earlier state, ideally, one, prior to the error. For step by step instructions on how to run this tool, check out my post on what is a restore point.
Are you looking for a way to repair all the errors on your computer?


If the answer is Yes, then I highly recommend you check out Advanced System Repair Pro.
Which is the leading registry cleaner program online that is able to cure your system from a number of different ailments such as Windows Installer Errors, Runtime Errors, Malicious Software, Spyware, System Freezing, Active Malware, Blue Screen of Death Errors, Rundll Errors, Slow Erratic Computer Performance, ActiveX Errors and much more. Click here to check it out NOW!

