| Attention Before you read this post, I highly recommend you check out my resources page for access to the tools and services I use to not only maintain my system but also fix all my computer errors, by clicking here! |
DXGI_ERROR_DEVICE_HUNG is a DirectX related error that occurs most commonly when an end user attempts to run certain games.
Typically, the game will load, then crash, prompting the user to restart, which in turn, produces the error. If you’re experiencing similar symptoms, it is likely as a result of a malfunctioning DirectX component, or possibly a GPU-related problem.
This error occurs on all video card brands (which includes GeForce and ATI alike). DXGI_ERROR_DEVICE_HUNG is a very finicky error as it has been reported to occur when running some games, but not on other games. For example, user’s state:
“I’m having an issue with error DXGI_ERROR_DEVICE_HUNG. It only occurs when running CoD WW2, and no other game. I can play GTA V, PUBG, BF4, Need for Speed, etc. without issue.”
This error indicates that there was a possible device failure due to incompatible or corrupted commands sent by the accompanying app (drivers); as determined by Microsoft. This is a fairly significant issue that must be investigated before it can be repaired.
What Causes DXGI_ERROR_DEVICE_HUNG Errors?
DXGI_ERROR_DEVICE_HUNG is one of several common DirectX issues that can and sometimes be accompanied with popup messages such as GetDeviceRemovedReason. The general causes of this error can be a number of things, which may or may not include the following:
- An overclocked CPU or GPU.
- Missing and/or corrupted Windows registry entries.
- The improper installation of the problematic PC game.
- Issues with system RAM.
- DirectX is corrupted or outdated.
Any one or all of these issues outlined above could be contributing to the DXGI_ERROR_DEVICE_HUNG error. With this issue occurring more commonly on games such as COD WWII and Battleground. Again, this error is consistent with both NVIDIA GeForce cards and the ATI Radeon series.
How to Fix It
After taking a considerable amount of time researching. Looking through forums and other sources, I discovered a range of methods and techniques that have worked for users, and thus, could work for you. So let us begin!
DXGI_ERROR_DEVICE_HUNG is a DirectX related issue, so the first thing I recommend you do, is verify that your version of DirectX is working as it should. To do that, follow the steps below:
1. First, ensure you’ve booted into your system as a full administrator.
2. Then press  + R, type dxdiag then click on OK.
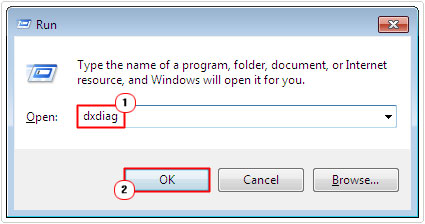
3. This will load up the DirectX Diagnostic Tool, the first thing you want to verify, is that you’re on the correct version (DirectX 12) on the Systems Tab, besides DirectX Version.


Note: For Windows 8, 10 & 11 users, the operating system would have installed the most up-to-date version of DirectX (which currently is 12), during the installation process. Additionally, Windows Update will apply any new updates, moderations or patches, to DirectX, as and when they are made available.
Once you have determined that you have the appropriate version of DirectX installed on your system, the next thing to do is determine that DirectX is working correctly.
4. To do that, click on the Display Tab, then check under Notes. If everything is working correctly, it should say: No problems found.
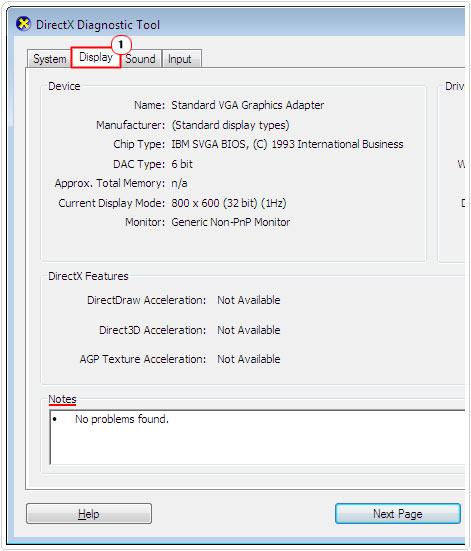

Note: Alternatively, it may list an issue, typically with a specific file belonging to the DirectX component. To fix issues of this nature, you’ll need to reinstall DirectX.
You can acquire the setup files from the following official Microsoft link: https://www.microsoft.com/en-gb/download/details.aspx?id=35
Reinstall Program
If the DXGI_ERROR_DEVICE_HUNG error continues to persist after attempting the solution above, the next thing you should try, is a simple reinstallation.
This DirectX-related error is known to occur in situations where the problematic game has not been installed correctly. In situations like this, the only way to resolve it, is to reinstall the program. A reinstallation is a fairly simple process. The first thing to bear in mind, is that the program must be removed, completely, before you can begin the reinstall.
My post on fixing CL.exe errors, will take you through the removal process.
Alternatively, you can check out my post on fixing uninstall programs, for additional help on removing file remnants, etc.
Update GPU Drivers to Fix DXGI_ERROR_DEVICE_HUNG Error
Of all the possible causes of DXGI_ERROR_DEVICE_HUNG errors, the most common is either a corrupted or outdated device driver. It’s possible the drivers were corrupted somehow. Or that they are not compatible with your operating system or DirectX version. Either way, you should be able to resolve this issue by simply updating your device drivers.
To do this, you have two options. The first, is to visit the website of your GPU manufacturer and download the drivers off there. Alternatively, you may be able to find official generic drivers from NVIDIA or ATI, assuming your card is either one of these brands.
The second option is to use a driver automation tool like DriverFinder. This tool when run, will scan, detect and download the latest drivers, for not just your GPU, but all the devices in your system.
It’s a very simple tool to use, ideal for newcomers and beginners. You can learn more about this valuable tool, from the link below:
CLICK HERE TO CHECK OUT DRIVERFINDER
  |
Remove Your Overclock
Overclocking is basically a process which entails pushing your hardware to limits it was not intended to function at, while using additional cooling systems as compensation. If done successfully, it can result in fairly significant improvements. But it must be done correctly, as it can cause irreparable damage to your system.
Some CPUs were designed specifically to be overclocked, while others were not, this means, some components respond better than others. Additionally, the method or tools you use to overclock your hardware (CPU or GPU), may determine the success and stability of the overclock.
In most cases, your CPU can be overclocked directly from the BIOS (which wasn’t always the case). So it’s simply a matter of setting it back to its default state from there. However, when it comes to your GPU device, whether it’s an AMD or NVIDIA solution, it should come with its own built-in tool, designed specifically for this purpose.
So setting it back to default is a matter of opening up the GPU applet and disabling the overclock.
Edit Registry Key
Research has shown that by disabling TDR (Timeout Detection and Recovery), it is possible to prevent the DXGI_ERROR_DEVICE_HUNG error message from appearing, when running certain problematic games.
WARNING: The Windows registry is an integral aspect of your operating system. This means, any wrong modification or entry removal, can render your system inoperable. So do tread with caution.
To edit the registry, please do the following:
1. First, boot into your system as a full administrator.
2. Then press 


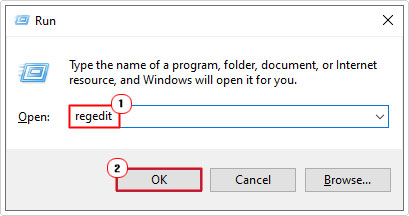

3. This will bring up Registry Editor, next, navigate to the following path:
HKEY_LOCAL_MACHINE\SYSTEM\CurrentControlSet\Control\GraphicsDrivers
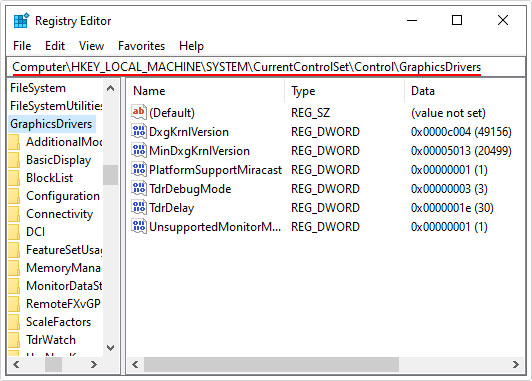

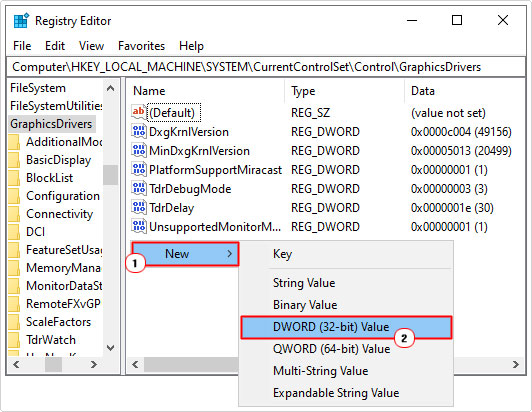
4. Next, right-click on the right pane, and select New -> DWORD (32-bit) Value or QWORD (64-bit) Value (depending on whether or not your operating system is 32-bit or 64-bit).

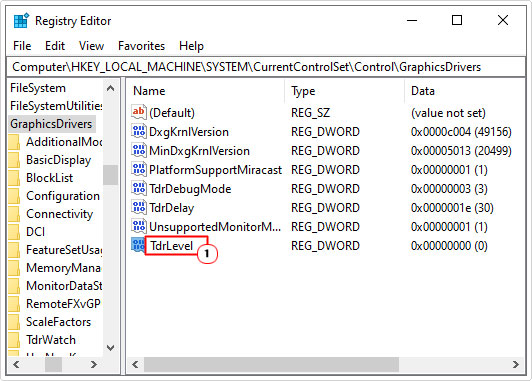
5. Now right-click on the new key and select Rename, and set its name to TdrLevel.

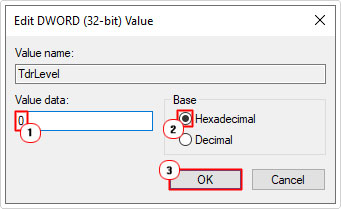
6. Next, double-click on TdrLevel and it will bring up an Edit DWORD (32-bit) Value applet, under Value data, set it to 0, make sure the Base is set to Hexadecimal, and then click on OK.

7. Lastly, close your Registry Editor, and restart your system.
Verify that the DXGI_ERROR_DEVICE_HUNG error message no longer appearing.
Update Windows Build
It’s not uncommon for an error to be fixed, almost as soon as it appears, with a Windows Update made available by Microsoft. Many of these errors, are oftentimes identified and fixed by Microsoft themselves. These fixes are then made available in proceeding update(s).
Depending on your system settings, Windows Updates should occur automatically. You should receive notifications from time to time, requesting you restart your system for a new update.
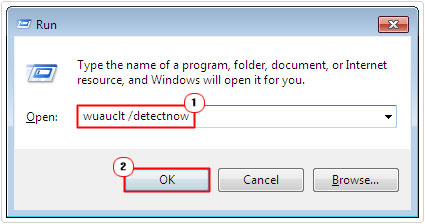
Anyway, if you’re battling with DXGI_ERROR_DEVICE_HUNG errors, it’s possible there’s a fix already made available, but has not yet been installed on your system. In situations like this, you can force Windows Update to initiate. To do that, follow the instructions below:
1. First, you will need to boot into your system as a full administrator.
2. Then Press 



Test Your RAM
It’s possible the DXGI_ERROR_DEVICE_HUNG error is as a result of faulty memory modules. To determine whether or not the RAM in your system is working as it should, you will need to test it. There are several ways to do this, but I recommend you check out my post on stress testing tools, for additional help.
Are you looking for a way to repair all the errors on your computer?


If the answer is Yes, then I highly recommend you check out Advanced System Repair Pro.
Which is the leading registry cleaner program online that is able to cure your system from a number of different ailments such as Windows Installer Errors, Runtime Errors, Malicious Software, Spyware, System Freezing, Active Malware, Blue Screen of Death Errors, Rundll Errors, Slow Erratic Computer Performance, ActiveX Errors and much more. Click here to check it out NOW!

