| Attention Before you read this post, I highly recommend you check out my resources page for access to the tools and services I use to not only maintain my system but also fix all my computer errors, by clicking here! |
While working on your system or attempting to update the operating system, you may encounter the error code 0x80070002 or 0x80070003, depending on your version of windows. The 0x80070002 or 0x80070003 errors are basically Windows update issues, so they typically occur when updating the OS, however, depending on the version of Windows the error could be due to a licensing issue. In Windows XP for example, the error code 0x80070002 is usually due to licensing and not the Windows update services.
With that said, the Windows update error is usually due to file corruption or a time/date issue, which I will show you how to fix. The error occurs during the update phase, when certain files fail to update; this creates a data mismatch issue, where certain older files are attempting to work in tandem with newer files. Removing these older corrupted files is another method of fixing this error code 0x80070002 or 0x80070003. However, in the case of Windows XP, the error is usually due to a corrupted registry; so the solutions vary widely.
Why Does Error Code 0x80070002 Occur?
- The Windows XP default security provider has been altered.
- Certain files failed to update.
- System drive letter has been changed.
- Alterations to specific software altered within the default security provider.
Symptoms of This Error
When you boot up your computer on a Windows Vista/7/8 operating system, you may receive the following error:
Error(s) found: Code 80070003 Windows Update ran into a problem.
When you boot into your Windows XP based system, you may be greeted with the following error message:
A problem is preventing Windows from accurately checking the license for this computer. Error code: 0x80070002.
There may be a number of discrepancies, depending on the severity of the error code 0x80070002 or 0x80070003 and the steps you have already taken in an attempt to fix the problem.
With that said, below I have provided you with a number of solutions, all of which have proven to be effective at tackling this particular error code 0x80070002 or 0x80070003 on all the operating systems users encounter it on.
Run a Registry Cleaner
Before attempting any other method to repair Windows Update, the first thing you should want to consider running is a full scan of your Windows registry, as there is a good chance your registry may have become corrupted.
Anyway, to do this manually would be extremely difficult, which is why I recommend the use of registry cleaner software. There are a number of these tools around, but I personally recommend Advanced System Repair Pro, and that’s primarily because it’s not just a registry cleaner, but an entire maintenance suite. Anyway, you can pick this tool up here:
CLICK HERE TO CHECK OUT ADVANCED SYSTEM REPAIR PRO
 The solution(s) below are for ADVANCED level computer users. If you are a beginner to intermediate computer user, I highly recommend you use the automated tool(s) above! The solution(s) below are for ADVANCED level computer users. If you are a beginner to intermediate computer user, I highly recommend you use the automated tool(s) above! |
Check Date and Time Settings
If you’re date and/or time is incorrect, then it can have an adverse effect on the Windows update service. Thus, it’s very important you ensure your time is correct and, most importantly, that the correct year has been specified. Anyway, to do this, simply follow the instructions below:
1. First, boot into your computer with administrative rights.
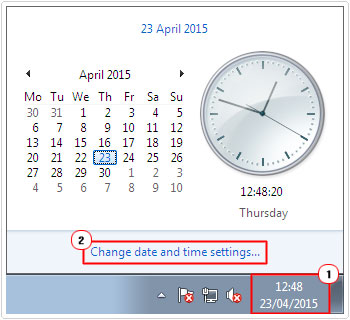
2. Once the computer has finished booting up, click on the Date and Time Icon in the bottom right hand corner, then click on Change date and time settings.
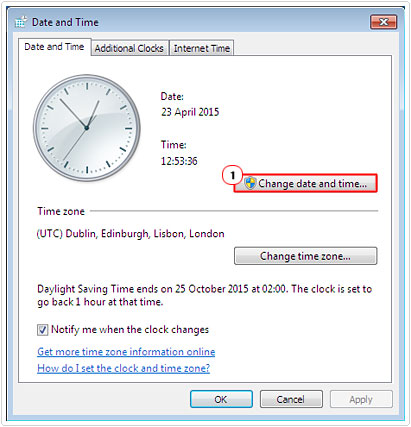
3. This will bring up the Date and Time applet, from here, click on Change date and time.
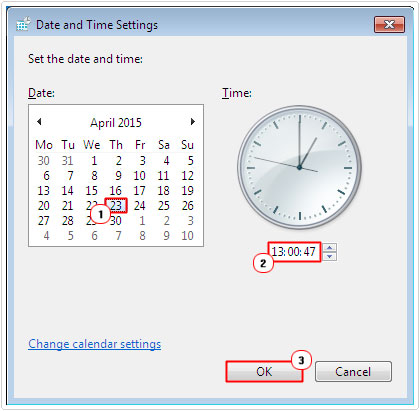
4. The Date and Time Settings applet will pop up; from here you can set the correct date and time, then click on OK, to save settings.
Remove Windows Update Files
If the error code 0x80070002 or 0x80070003 you’re receiving is due to an incomplete update process, which resulted in certain files getting corrupted, then deleting these files and trying the Windows update process against, is a solution you may want to try. Anyway, in order to do that, following the following instructions:
1. First, boot into your computer with full administrative rights.
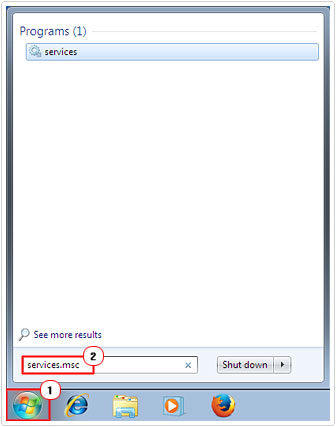
2. Then click on the Start button and type services.msc and press Enter.
3. This will bring up the Services Tools, from here, locate and right click on Windows Update, then select Stop.
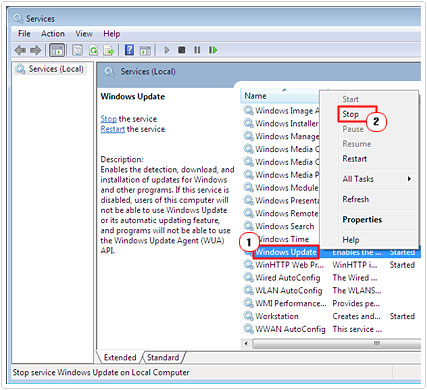
4. Once you’ve stopped the Windows Update service, right click on the Start button and select Open Windows Explorer.

5. Once Windows Explorer loads up, click on your (C:) drive, under Computer, then double click on Windows.
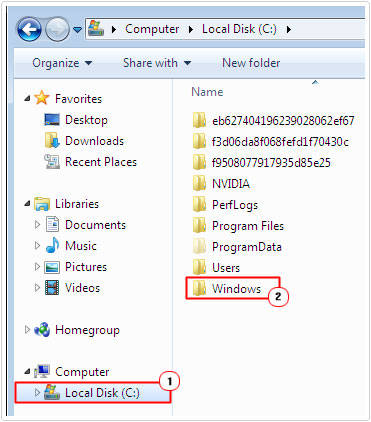
6. From the Windows folder, scroll down, then locate and rename SoftwareDistribution to OldSoftwareDistribution, by right clicking on it and selecting Rename.
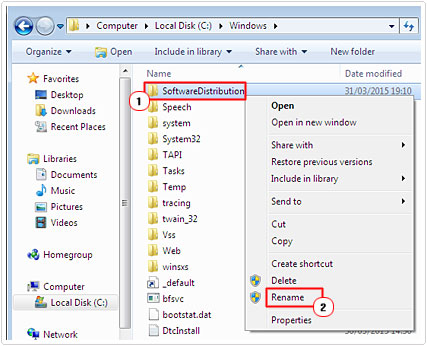
Note: If you receive any warning notification click on Yes, to proceed with attempting to rename the folder.
7. Once you’ve renamed the folder, go back to the Services tool, then right click on Windows Update and select Start.
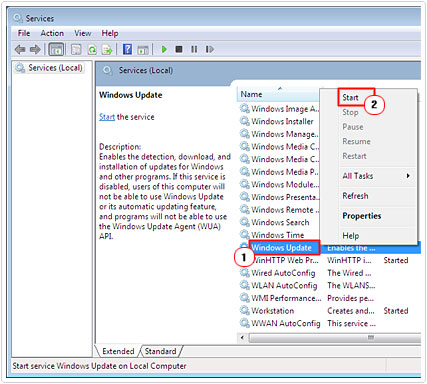
Make Primary Partition as Active
A common cause for this error code 0x80070002 or 0x80070003 on Windows 8.1 and up is when a user has the operating system installed on a partition that isn’t set to active, in other words, a secondary partition on your hard drive.
In this particular situation, there are two things that you can do, one is to completely format your hard drive and reinstall your operating system on it, which I do not recommend, and the second option is to set the partition that your main operating system is on, to active.
This will tell the system to look at that particular partition as the primary. Anyway, to do this, simply do the following:
1. First, make sure you’ve booted into your computer with administrative rights.
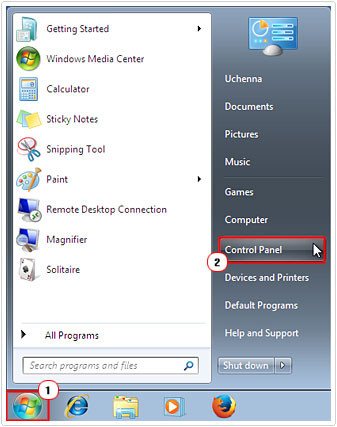
2. Then click on the Start Button, and then click on Control Panel.
3. Once Control Panel loads up, click on System and Security.
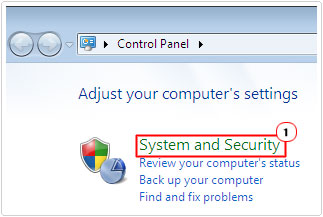
4. From the System and Security screen, click on Create and format hard disk partitions.

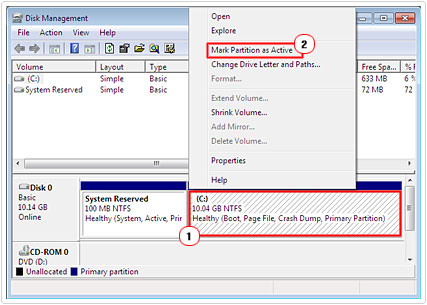
5. This will load up Disk Management, from here, right click on the partition with your operating system on it, and select Mark Partition as Active.
Use Microsoft Fix It Tool
Microsoft has their own troubleshooting fix it tool, which you can use to run through a series of possible solutions for this error code 0x80070002 or 0x80070003. So you may want to try that, if all else fails. Anyway, you can access that tool from here: https://support.microsoft.com/en-us/kb/910336
Reset Default Security Provider
In order to reset the default security provider in Windows XP, you will need to modify the registry. However, it is possible that you could further damage your system if you don’t follow the instructions correctly. Therefore, it’s very important you have at least an intermediary understanding of computers before attempting this method.
As a precautionary measure, you may want to consider backing up your registry, that way, if you make a mistake, you can easily restore it. Anyway, in order to reset the provider, follow the instructions below:
1. First, start your computer in Safe Mode.
Note: if you don’t know how to enter Safe Mode, I suggest you check out my post on removing Trojan horse viruses, for a step by step guide on how to do this.
2. Once in Safe Mode, click on Start, then Run, type regedit and click on OK.
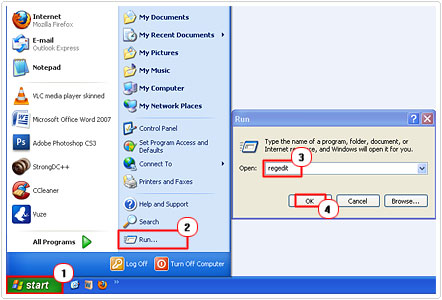
3. This will load up Registry Editor, from here, delete the following registry keys:
HKEY_USERS\.DEFAULT\Software\Microsoft\Cryptography\Providers
HKEY_USERS\S-1-5-20\Software\Microsoft\Cryptography\Providers
4. Then close the Registry Editor and restart your computer.
Disable Error Message
If you’re receiving the error code 0x80070002 or 0x80070003 despite not having any verifiable error on your computer, then you can safely dismiss it.
However, in order to prevent the error message from popping up the next time you log into your computer, you will need to delete a specific registry value in Windows, using the registry editor. To do this, simply follow the instructions below:
WARNING: Deleting or editing the wrong registry entry can damage your operating system beyond repair.
1. First, ensure you’ve booted into your computer with full administrative rights.
2. Then load up Registry Editor, by click on Start -> Run, typing regedit and click on OK.


3. Once Registry Editor loads up, navigate to the following key:
HKEY_LOCAL_MACHINE\SOFTWARE\Microsoft\Windows\CurrentVersion\Run\
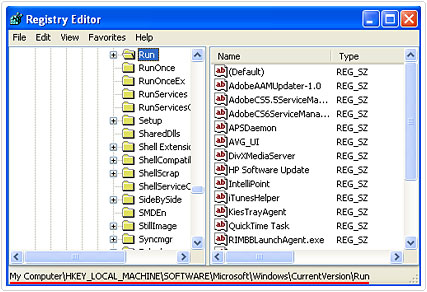

4. Once you’ve navigated to that key, simply locate the MSC key, in the right pane, and delete it, by right clicking on it and selecting Delete.
Are you looking for a way to repair all the errors on your computer?


If the answer is Yes, then I highly recommend you check out Advanced System Repair Pro.
Which is the leading registry cleaner program online that is able to cure your system from a number of different ailments such as Windows Installer Errors, Runtime Errors, Malicious Software, Spyware, System Freezing, Active Malware, Blue Screen of Death Errors, Rundll Errors, Slow Erratic Computer Performance, ActiveX Errors and much more. Click here to check it out NOW!

