| Attention Before you read this post, I highly recommend you check out my resources page for access to the tools and services I use to not only maintain my system but also fix all my computer errors, by clicking here! |
Error code 52 is a device manager problem that is caused by an issue with one’s device drivers. It occurs most commonly on Windows XP to Windows 10 based systems.
This error typically occurs when the operating system prevents the connected device from working correctly. The following error message will usually appear in the device status area of the specified device:
Windows cannot verify the digital signature for the drivers required for this device. A recent hardware or software change might have installed a file that is signed incorrectly or damaged, or that might be malicious software from an unknown source. (Code 52)
This error is known to occur on virtually every version of Windows, as previously stated, but it most commonly appears on Windows 7. There is no one culprit that we can point to, as the primary cause of this error, but many users report encountering error code 52 right after installing a particular update. So it could be a particular update or the installation process at fault.
What Causes Error Code 52
As previously mentioned, there’s no one defining cause for this error, but there are a number of circumstances that users have reported encountering this error in. These are the following:
- A program was not properly uninstalled.
- An application was improperly installed.
- The system was not shut down correctly.
- A hardware device was not properly removed.
- The system previously recovered from a virus infection.
How to Fix It
When it comes to fixing error code 52, Microsoft recommends you run the troubleshooter. But for those that have had similar driver-related errors in the past, they will know that running the troubleshooter seldom ever works. Fortunately, there are a number of workable solutions that you can deploy.
I have listed a number of solutions, and I’ve arranged them in order of effectiveness and difficulty. So I recommend you attempt them in the order that they appear.
Please continue reading for those solutions.
Update Device Drivers
Manually removing and installing the problematic driver, will in most cases, fix this error, but it can be a pretty time-consuming process that can be quite complicated, depending on your level of expertise.
This is where using an automated driver updater tool like DriverFinder comes into the equation, as it can save you a lot of frustration and time, that you would otherwise spend, doing everything yourself.
DriverFinder is an easy to use driver updater tool that can fix error code 52, as it comes with a large database of drivers, which enables it to quickly detect the specific driver your system requires, and download and install it, within a matter of seconds.
It will also make sure that all the devices installed on your system are using the most up-to-date drivers for your version of Windows, which will ensure error code 52 doesn’t rare its ugly head.
Additionally, it has a whole host of other features, that will ensure that your drivers always remain up-to-date, which is crucial, in securing your system from encountering any other driver-related issues in the future.
Anyway, you can learn more about this nifty tool, from the link below:
CLICK HERE TO CHECK OUT DRIVERFINDER
 The solution(s) below are for ADVANCED level computer users. If you are a beginner to intermediate computer user, I highly recommend you use the automated tool(s) above! The solution(s) below are for ADVANCED level computer users. If you are a beginner to intermediate computer user, I highly recommend you use the automated tool(s) above! |
Delete the USB Upper and Lower Filter Entries
There are two UpperFilters and LowerFilters registry entries that are known to cause error code 52. End users have found that deleting these values has been known to fix this problem.
WARNING: To do that, you will need to edit the registry, which can be very dangerous, as the editing of the wrong entries can render your system inoperable. So do tread with caution.
Anyway, to carry out this method, simply do the following:
1. First, boot into your computer with full administrative privileges.
2. Then, press  + R, type regedit and click on OK.
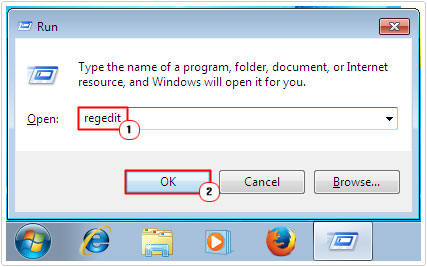
3. Once Registry Editor loads up, go to the following path:
HKEY_LOCAL_MACHINE\SYSTEM\CurrentControlSet\Control\Class\{36FC9E60-C465-11CF-8056-444553540000}
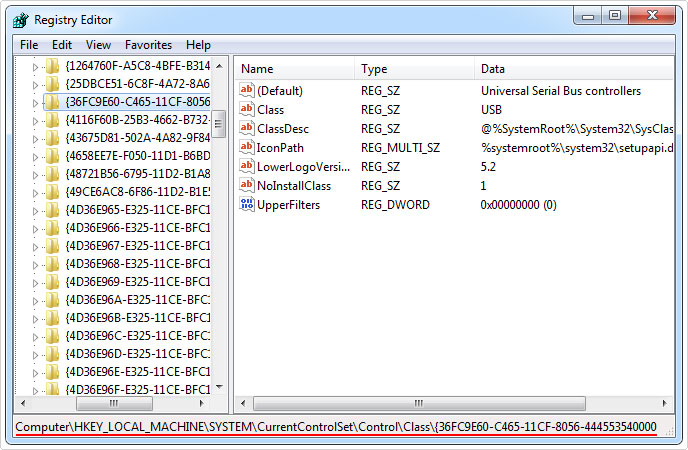

4. From there, locate and right click on the UpperFilters or LowerFilters and select Delete.
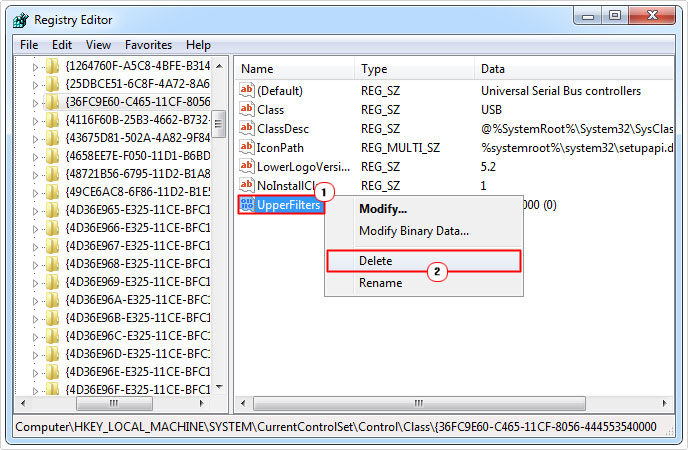

Note: If both entries exist, then you will need to repeat step 4, to remove both entries. If one exist, simply delete that.
5. Lastly, restart your computer.
Remove *USB.SYS Files
If the solution above fails to fix error code 52, then you can try removing two specific USB Windows files from your system, as a possible fix this problem.
Anyway, to do this, simply do the following:
1. First, boot into your computer with administrative rights.
2. Then press 


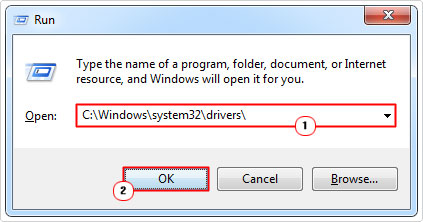

3. When the Drivers folder loads up, locate and rename usbehci.sys and usbhub.sys to usbehciold.sys and usbhubold.sys.
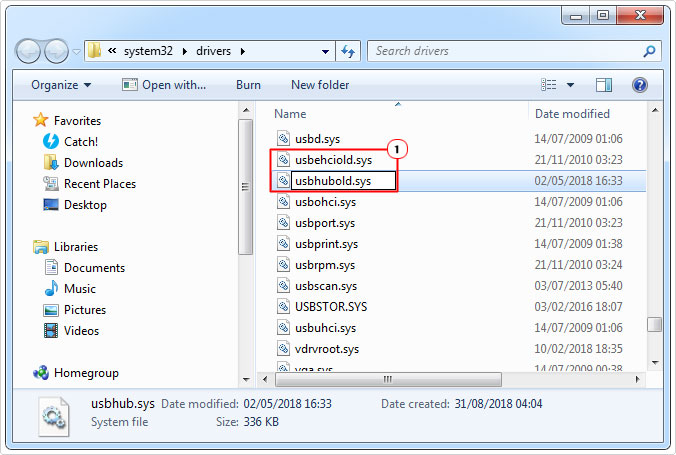

Note: If you are unable to rename the file(s), you will need to Take Ownership of them, which can be done by editing it’s file permissions.
4. Then press 


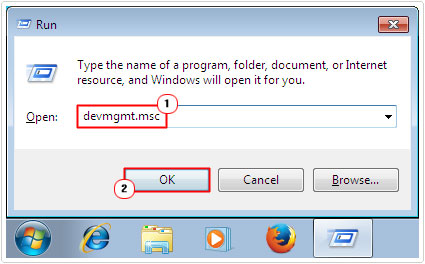

5. When Device Manager loads up, click on the + icon besides Universal Serial Bus controllers, then right click on Standard Enhanced PCI to USB Host Controller and select Uninstall.
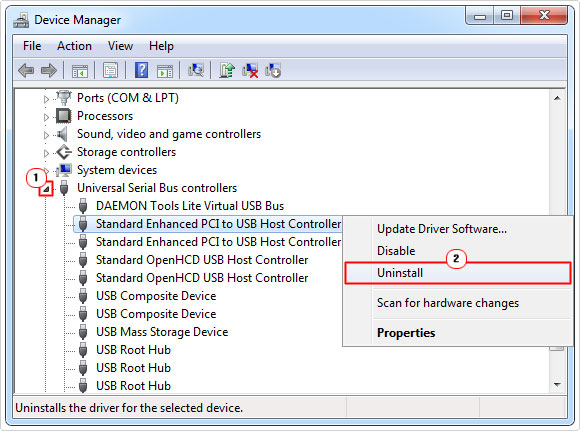

6. Lastly, restart your computer and the operating system should reinstall the USB component at boot-up.
Disable Integrity Checks
Error code 52 occurs when the operating system attempts to verify the digital signature of the specific device driver. Thus, as a viable workaround, you may want to consider disabling the verification process.
To do that, simply do the following:
1. First, boot into your computer as administrator.
2. Then press 


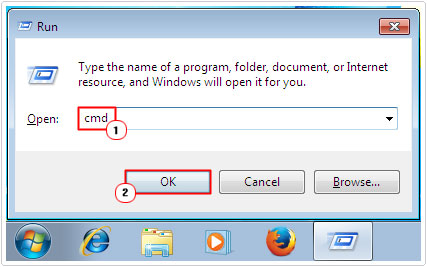

3. When Command Prompt loads up, type the following commands:
bcdedit -set loadoptions DDISABLE_INTEGRITY_CHECKS

bcdedit -set TESTSIGNING ON


4. When Promoted, click on Yes.
5. If the following command, fails to remove the error code 52, then you can try the following code, from Command Prompt (steps 1 – 3):
bcdedit /deletevalue loadoptions

bcdedit -set TESTSIGNING OFF


6. This should definitely remove the error code from the device status in Device Manager.
Use System Restore
System restore is a built in Windows tool, designed to set your system back to a previous states. In this case, you may want to try it, so you can set your system back to a state, prior to error code 52.
To use this tool, you’ll need Windows restore points saved on your system. These restore points are saved automatically when system restore has been enabled on your computer. So if it’s not enabled, then this method will not work.
That said, you can find step by step instructions on how to use this tool from my post on how to use Windows system restore.
Are you looking for a way to repair all the errors on your computer?


If the answer is Yes, then I highly recommend you check out Advanced System Repair Pro.
Which is the leading registry cleaner program online that is able to cure your system from a number of different ailments such as Windows Installer Errors, Runtime Errors, Malicious Software, Spyware, System Freezing, Active Malware, Blue Screen of Death Errors, Rundll Errors, Slow Erratic Computer Performance, ActiveX Errors and much more. Click here to check it out NOW!

