| Attention Before you read this post, I highly recommend you check out my resources page for access to the tools and services I use to not only maintain my system but also fix all my computer errors, by clicking here! |
If you’re hard drive is fairly low on free space, then you’ve probably looked at a number of files and programs that you can delete. Hiberfil.sys is likely a file you’ve looked at, and wondered what it was, and why it’s so large in size.
Essentially, hiberfil.sys is responsible for the hibernation feature of Windows. Allowing your system to restart from a hibernation state. So, what are your options? Can you delete it? Is it safe to keep on your system?
What Is Hiberfil.sys?
If your system lays dormant for considerable lengths of time throughout the day, there are a number of power saving modes that you can use, to conserve energy. Sleep state is for short breaks, like a lunch break, whereas hibernation is for much longer periods, like several hours or overnight.
Both of these modes will have your system up and operational, faster than your typical system restart, but they both work differently from one another. Sleep restores your system the fastest, this is because all your current state data is stored in system RAM, with the computer restoring to desktop, the moment you press the power button.
Hibernation is a little slower, this is because system state data is stored to the hard drive. This allows your system to conserve significantly more power, but at the expense of having to wait a little longer to restore your system.
Hiberfil.sys is the actual file that is used to store system state data for the hibernation mode. Depending on what you’re doing on the system at any given time, this file can grow or decrease in size, which can be somewhat of an issue on hard drives with limited free space.
Can You Remove Hiberfil.sys?
The main drawback of hibernation mode is the fluctuating file size of hiberfil.sys. It can, in some cases grow to incredible sizes, taking up in excess of 10+ gigabytes of space.
On a system with a ton of free hard drive space, it’s most likely you won’t even notice the hibernation file on your computer. But on a more constraint system, you’d definitely notice it.
However, before you even consider deleting hiberfil.sys, there are things you must consider.
Such as, whether or not you actually use the hibernation feature. If you regularly use hibernation, when leaving your system for lengthy periods, then it’s probably best you leave the hiberfil.sys file alone.
The operating system will simply recreate it (if you delete it), the next time you put your system into hibernation. That said, there is a workaround to this dilemma.
It is possible to delete hiberfil.sys without it reappearing, but only if you disable the hibernation feature first.
Should You Delete Hiberfil.sys?
As I previously stated, if you do not use the hibernation feature, then it’s a no-brainer, its best you delete the hiberfil.sys file. There’s no drawback to it, it won’t adversely affect your system, and you’ll get a lot of extra hard drive space.
How Do You Remove Hiberfil.sys?
Although, hiberfil.sys is technically a system file, it is possible for you to safely remove/disable it, if you’ve decided that you do not have any use for it. This is mainly because the hiberfil.sys file isn’t in any way tied to any other Windows function.
That said, in most cases, you won’t be able to simply Right-Click on it and select Delete. This is because Windows is likely using the file. So doing this may bring up a share violation error message or a message indicating that another program has the file opened.
As I’ve already stated, the only real way of removing the file is to disable hibernation mode. When done successfully, Windows will automatically remove the hiberfil.sys file. Below I have covered how to do this, on all of the latest Windows platforms.
Disable Hibernation in Windows 10
To remove hiberfil.sys from your system, you need to disable hibernation mode. To do that, in Windows 10, simply follow the instructions below:
1. First, ensure you’ve booted into your system as a full administrator.
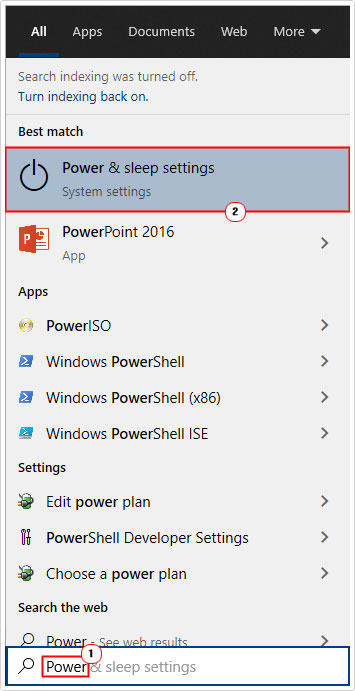
2. Now type Power into the Type here to search box, on Taskbar, and click on Power & Sleep Settings.
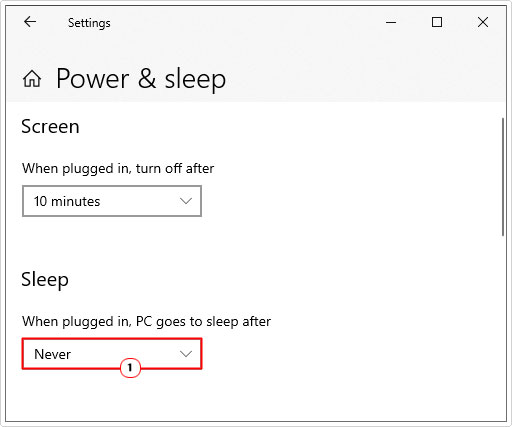
3. This will bring up the Power & Sleep options screen, from here select Never under Sleep.
Disable Hibernation Mode in Windows 10, 8, 7 & Vista
This method for disabling the hibernation feature is very general and works across the board, on Windows 10, 8, 7 and Vista. All you need to do is open up Command Prompt in Administrative mode, and type a couple of commands. Once hibernation has been disabled, Windows should automatically remove the hiberfil.sys file.
With that said, simply follow the instructions below:
1. First, boot into your system as a full administrator.
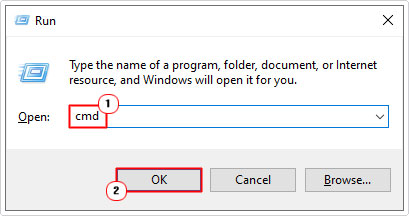
2. Then press  + R, type cmd and press CTRL + Shift + Enter.

3. When Command Prompt loads up, type the follow command and press Enter.
Powercfg -h off
Once you have successfully typed the command (above) it should automatically disable hibernation mode. This means, it will no longer be accessible through Shutdown, under the Start Menu.
The hiberfil.sys should also be removed. You can use File Explorer to verify that it has been removed from your hard drive.
Enable Hibernation Mode
If you decide that you want to re-enable hibernation mode, you can do so, by doing the following:
1. First, follow steps 1 – 2 of Disable Hibernation Mode.
2. From Command Prompt, type the command below and press Enter.
Powercfg -h on
Hibernation should now be available once again. This means the operating system will create a new hiberfil.sys file.
Disable Hibernation Mode via Registry
Another method you can use to remove hiberfil.sys from your system is to disable hibernation mode through the registry.
WARNING: The Windows registry is a very sensitive area of the system. Recommendation is that you should only attempt this method if you’re a fully experienced computer user.
To turn off hibernation mode using the Windows registry, simply do the following:
1. Boot into your computer as a full administrator.
2. Press 


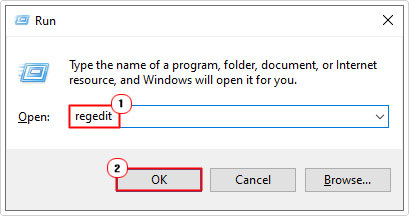

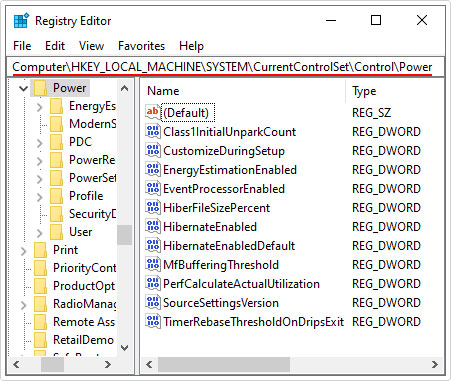
3. When Registry Editor loads up, navigate to the following path:
HKEY_LOCAL_MACHINE\SYSTEM\CurrentControlSet\Control\Power

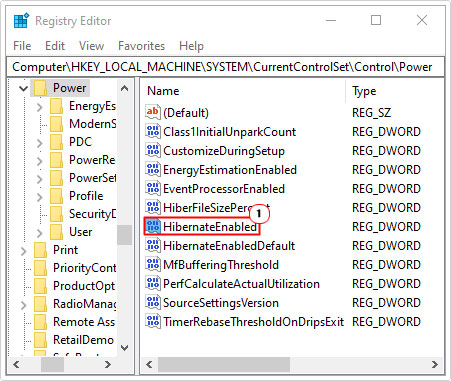
4. Now, double click on the HibernateEnabled registry entry.

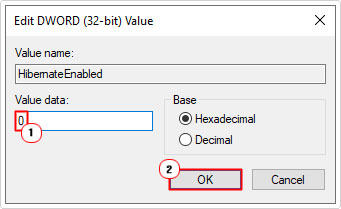
5. This will bring up an Edit DWORD (32-bit) Value dialog box, simply type 0 into the Value Data box, then click on OK.

Disable Hibernation Mode in Windows XP
If you’re system is running on the much older Windows XP platform, all is not lost. You can disable hibernation mode by doing the following:
1. First, you’ll want to boot into your system as a full administrator.
2. Then Press 


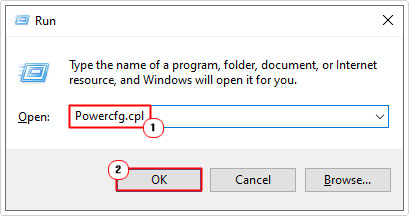

3. When the Power Options Properties applet appears, click on the Hibernate Tab, then un-tick the box next to Enable hibernation, then click on OK.
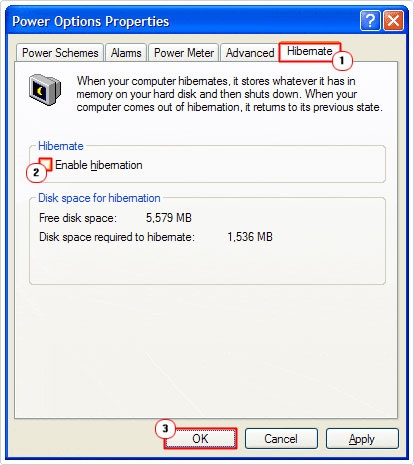

4. Lastly, restart your system, then manually remove the hiberfil.sys file from your system.
Are you looking for a way to repair all the errors on your computer?


If the answer is Yes, then I highly recommend you check out Advanced System Repair Pro.
Which is the leading registry cleaner program online that is able to cure your system from a number of different ailments such as Windows Installer Errors, Runtime Errors, Malicious Software, Spyware, System Freezing, Active Malware, Blue Screen of Death Errors, Rundll Errors, Slow Erratic Computer Performance, ActiveX Errors and much more. Click here to check it out NOW!

