| Attention Before you read this post, I highly recommend you check out my resources page for access to the tools and services I use to not only maintain my system but also fix all my computer errors, by clicking here! |
So, you would like to know how to copy your hard drive? Well, there are several methods that you can use to accomplish this task, all of which entails you copying every last segment of your hard drive, which you can then transfer to another hard drive.
Copying the contents of your hard drive is an activity that must be carried out at least once, by every computer user out there. This is because, over time, hard drives begin to deteriorate, which can result in complete failure of that drive, or in other situations, you may just want to transfer your data to a hard drive with more storage space. Whatever your motivations may be, knowing how to copy your hard drive content so that you can put it directly onto another hard drive, is something that would be beneficial to the vast majority of computer users, providing we have the knowhow.
The amount of time that you could potentially save from doing it is considerable, as it means reinstallation of your operating system would not be necessary, and everything else that comes along with it, such as setting your preferences and various third party applications. This is because all these things would be in place, after you had successfully transferred the contents of your primary hard drive to your new hard drive; so would you like to know how to copy your hard drive?
When considering how to copy your hard drive, one of the most effective and common ways of doing it is to create an image of your hard drive. The entire image creation process is fairly straightforward, as it entails you installing the appropriate software on your computer, and then following the onscreen instructions to complete the process. The best thing about this method is that you can save the data image wherever you want. That means you could save it on the same hard drive that you’re copying from, of course you’ll have to consider the amount of storage space you have available.
Hard Drive Imaging
When creating the image, all of the hard drives content will be copied minus certain files like your temporary folder and page file, which can then be saved on another medium, which could be a CD/DVD, hard drive or flash drive. In most cases, people will copy their content from one hard drive to another, although this process works with a variety of mediums (as mentioned above). The created data image will include your boot sector, file system and everything else that will ensure that you can use it to restore your content in the event that your hard drive fails.
The advantages of using hard drive imaging are as follows:
- It enables users to make incremental backups of their hard drives content. This saves hard drive space and also enables you to restore your computer to a more recent point, if and when needed. This can be most useful if a problem occurs between two backup points, as you’ll be able to restore the computer back to the point prior to the problem.
- Data can be stored remotely. The very best hard drive imaging applications out there enable users to create interim backups and drive snapshots which can be stored on a network drive, away from your system. This way, if the backup is needed and the computer that requires it is unable to access it, another computer that is connected to the same network, will be able to access the computers content and thus copy it to a new hard drive, which can then be installed in the problematic computer.
Anyway, if you would like to know exactly how to create an image of your hard drive, I suggest you check out my post on how to backup files.
When looking at how to copy your hard drive and the various methods available to you, one probably more practical option is for you to use cloning software.
Hard Drive Cloning
When looking at how to copy your hard drive, the underlying differences between imaging and cloning are that, when cloning, the entire process is done on the fly and when completed an actual bootable copy of your hard drive is created. There are also some programs out there that are able to clone your hard drive while in Windows. Whereas others may require you to restart your system, so that you’re hard drive can be copied in a DOS session.
The advantages that hard drive cloning has over imaging are as follows:
- Downtime is considerably shorter. The time it takes to copy the contents from one hard drive to another is no more than a couple of hours at worst and a few minutes at best; this is because the entire process is done on the fly. So once the process is completed, all you’ll need to do is swap your old hard drive with the new one, and your good to go.
- It’s very easy to setup. When using a cloning application like Seagate DiscWizard, you can configure the cloning settings in Windows and schedule it to run, once you restart your computer. There is no need for you to create any bootable media, change hard drives or any other time consuming activity, which is most ideal when it’s your first time trying to figure out how to copy your hard drive.
- Your data is easily accessible. In the event that you accidently delete a file or folder, you can very quickly recover the data from your old hard drive. There’s also no compression used during the cloning process, which means all the data is immediately accessible.
With that said, if you would like to know how to copy your hard drive using cloning, then I suggest you continue reading.
How to Copy Your Hard Drive Through Cloning
1. The first thing you’ll need to do, before you do any cloning is establish your Source Drive (which is the drive you want to copy your information from) and your Destination Drive (which is the drive you would like to copy your information to).
Note: Both of these drives will need to be connected to your computer before you can begin the cloning process. Assuming your Source Drive is your primary hard drive then you will need to install your Destination Drive into your computer, typically as a secondary drive. If you’re unable to install the drive into your computer, then you can use a USB adapter as an alternative. These devices are easy to find online, so you shouldn’t have any problems in that department.
Once both your source and destination drive are installed on your computer, you will need to download and install the cloning software. The software that I recommend for this process is Seagate DiscWizard, which you can download from here: http://www.seagate.com/gb/en/support/downloads/discwizard/
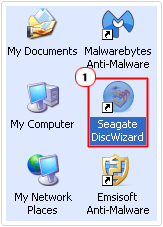
2. Once you’ve installed the program, run it by double clicking on the Seagate DiscWizard desktop icon.
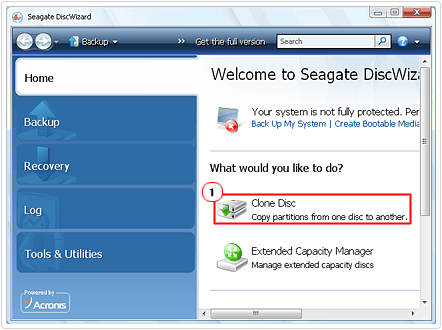
3. When the program loads up, click on Clone Disc.
4. A Clone Disc Wizard dialog box will pop up, asking you to Choose clone mode, if the storage capacity of both hard drives is the same, then select Automatic (recommended).
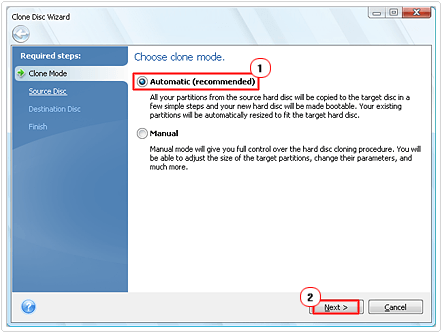
Note: Selecting Manual will allow you to set the partition size to maximum. This is especially useful if the hard drive you intend to transfer your data to is much larger than your source hard drive.
If you select Automatic under these circumstances, then the program will format your hard drive to the size of your source drive, resulting in unrecoverable storage space.
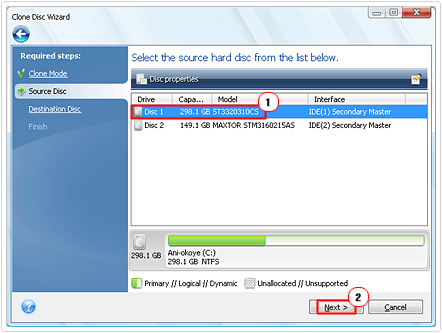
5. The next screen will ask you to Select the source hard disc from the list below, do that by clicking on the appropriate hard drive, then click on Next.
6. The following screen will ask you to Select the target hard disc from the list below; select the correct hard drive, then click on Next.
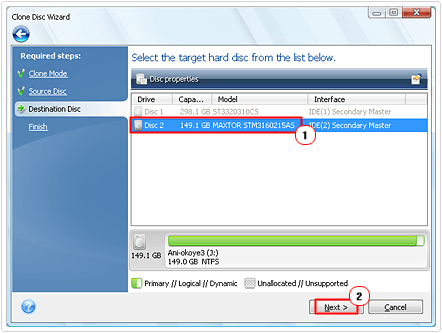
7. If there’s content on the target hard drive, a confirmation dialog box will pop up, stating that all the content on your target disc will be lost if you proceed, click on OK.
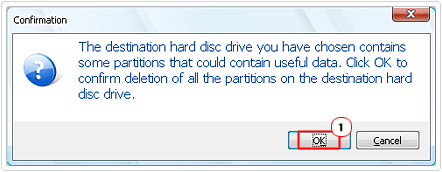
Note: Once you’ve confirmed the cloning session, your computer will restart and proceed to clone your hard drive. In the event that it does not restart, you’ll have to restart the computer manually. On average, you can expect the program to transfer around 100 gigabytes of data within an hour.
Are you looking for a way to repair all the errors on your computer?

If the answer is Yes, then I highly recommend you check out Advanced System Repair Pro.
Which is the leading registry cleaner program online that is able to cure your system from a number of different ailments such as Windows Installer Errors, Runtime Errors, Malicious Software, Spyware, System Freezing, Active Malware, Blue Screen of Death Errors, Rundll Errors, Slow Erratic Computer Performance, ActiveX Errors and much more. Click here to check it out NOW!

