| Attention Before you read this post, I highly recommend you check out my resources page for access to the tools and services I use to not only maintain my system but also fix all my computer errors, by clicking here! |
An ISO file or ISO image, depending on which term you prefer to use is an archive file typically made from an optical disc, although it can be made from files and folders on your hard drive. ISO files in most cases have the .ISO file extension, which was taken from the old ISO 9660 file system that was used for the original CD-ROM media. Despite being named after that old file system, these files use a variety of file systems to package data. In this post I’ll outline exactly how to create an ISO file using the various tools available today.
The process of creating these ISO files is fairly simple, providing you use the appropriate software to do the job. There are a variety of programs that you can use to make these files, but PowerISO, is amongst the most popular, as it enables users to be able to create images from CD/DVD and the content on their computers. You can also do a variety of other things, such as encrypt, compress and extract an ISO image.
Creating an ISO file from content on your computer is, in most cases a point and click affair. However, the exact process usually depends on the application you’re using.
Once you’ve created your image, it’s also possible for you to make alterations to it. This can be done in the form of adding or removing existing files, a process which should entail nothing more than dragging and dropping files. Of course, functions such as this are not available on every single ISO maker application, so that’s one thing you’ll need to be cognizant of.
Another thing that you should be aware of, before learning how to create an ISO file, is the fact that it’s possible to find ISO files in a number of different formats, such as the .BIN and .DAA file extension, all of which are similar in virtually every way to an .ISO file.
Advantages of Using ISO Files
Before knowing how to create an ISO file, you may first want to know the many benefits to ISO files, below are the main ones:
- When you convert the contents of a CD/DVD to an ISO file, an exact replica is made of it. This includes the header data, which means no information is lost during the conversion process.
- Using a virtual drive, ISO files can be mounted, enabling them to function as if they were real CD/DVDs.
- When you convert your files and folders to an ISO image, they are given the added advantage of being protected by any virus that may/could infect your machine.
Software for Creating ISO Files
When looking at how to create an ISO file, there are quite a few programs available online that you can use to convert your data to an ISO files. The following are amongst the most sought after:
- Roxio Easy CD Creator: This program is one function of the Roxio Creator digital media suite. Creating ISO files with it is a relatively simple process; however, you’ll need to purchase the Roxio Creator in order to access it.
- Nero – Burning ROM: This application is similar to the Roxio Creator, in that it’s a complete digital media suite. You’ll have to purchase it before you can use it to convert your CD/DVD to ISO images.
- PowerISO: This application is made available as both a freeware and paid product. The free version comes with all the features that you’ll need to create ISO files from both CD/DVD and your computer files/folders.
The first two applications will enable you to convert data to ISO format, but do not provide you with any editable functionality. PowerISO on the other hand enables the user to be able to both remove, and add files to existing ISO images. That is why for first time learners on how to create an ISO file, I recommend PowerISO, as it not only has an expansive feature set, but it’s also made available for free.
If you would like to know how to create an ISO file from a CD/DVD or files and folders on your computer, then I suggest you continue reading.
How to Create an ISO File from CD/DVD to ISO
1. First thing you’ll need to do, is log into your computer with a user profile that has administrative rights.
2. Once you’ve done that, download and install PowerISO from here: http://www.poweriso.com/download.htm
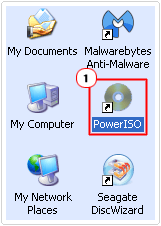
3. Once the application is installed on your computer, double click on its desktop icon to execute it.
4. The program will load up and ask you whether you want to register it (which costs money), click on Continue Unregistered to gain access to the program for free.
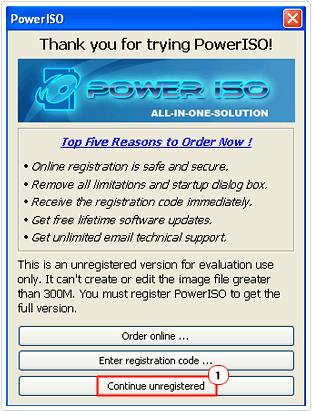
Note: The unregistered version of PowerISO has a 300MB limit on it, which means, it will not allow you to create ISO files larger than 300MB. So you want to know how to create an ISO file that exceeds the 300MB limit? Then you’re going to have to register the application.
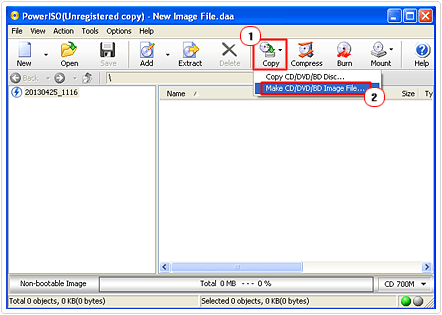
5. From here, put the CD/DVD that you would like to convert into your CD/DVD Rom Drive, and then click on the Copy button followed by Make CD/DVD/BD Image File.
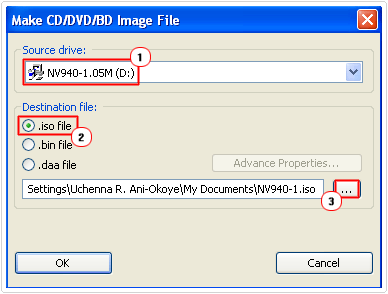
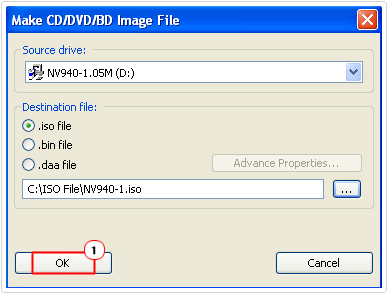
6. A Make CD/DVD/BD Image File dialog box will pop up, for Source Drive, make sure the appropriate CD/DVD Rom Drive is selected, for Destination file, make sure you click on .iso file, and then click on the … button.
7. A Save As dialog box will pop up, select where you would like to save the image, then give it a File name, then click on the Save button.
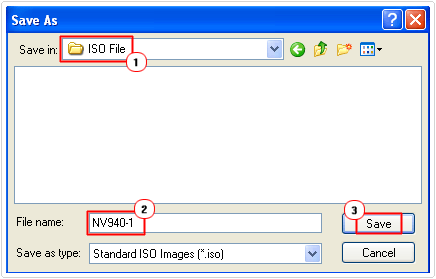
8. Once you done that, it should take you back to the Make CD/DVD/BD Image File dialog box, from here, click on OK.
To Convert Files/Folders to ISO File
1. First, follow steps 1 – 4 of “To Convert CD/DVD to ISO File”.
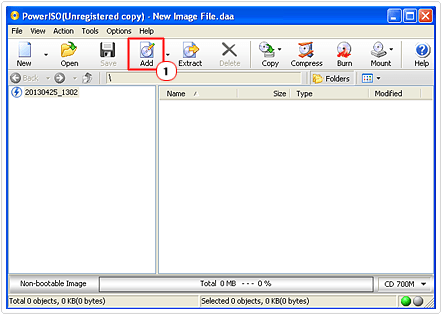
2. PowerISO will automatically create a New Image File, so all you’ll need to do is click on the Add button.
3. When you do that, an Add Files and Folders dialog box should pop up, simply navigate to the file(s)/folder(s) that you would like to add to your new image file and click on the Add button.
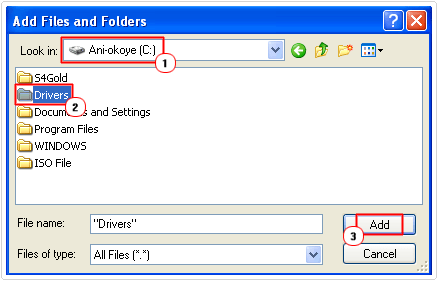
Note: You can repeat this step as many times as you like, until you have as many files and/or folders inside the image file as you like.
4. Once you’ve completed step 3, click on the Save button.
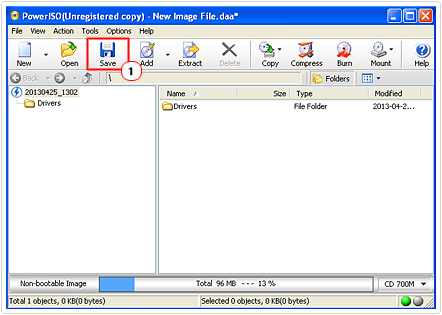
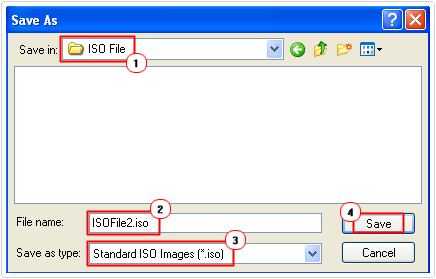
5. A Save As dialog box will pop up, first, navigate to where you would like to save the image, then put in a File name. Lastly, besides Save as type, make sure Standard ISO Images (*.iso) is selected, then click on Save.
Opening an ISO File
No point knowing how to create an ISO file if you don’t know how to open one. Well, when it comes to opening an ISO file, you have two options. The first is to use PowerISO and the second is to use a CD/DVD emulator like Daemon Tools.
Using PowerISO
1. First, follow the steps 1 – 4 of “To Convert CD/DVD to ISO File”.
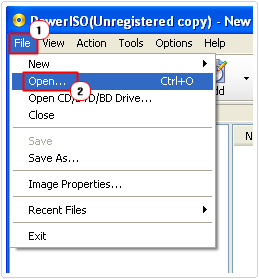
2. Once the application is up and running simply click on File -> Open.
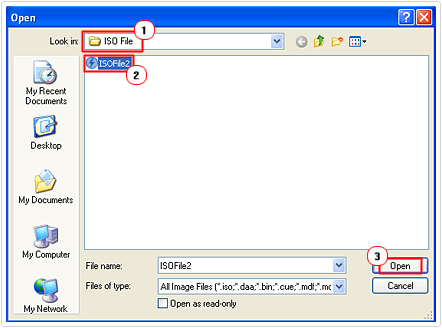
3. An Open applet will pop up, locate your ISO file, using the Look in drop down menu, then select it and click on Open.
Using Daemon Tools
1. First, ensure you’ve logged into your computer with administrative rights.
2. Then download and install Daemon Tools from here: http://www.daemon-tools.cc/eng/products/dtLite
Note: Once you’ve installed the application, you will need to restart your computer.
3. Once you’ve restarted your computer, the application should run at startup. From here, right click on the Daemon Tools icon, in the bottom right area of your desktop, then click on Virtual Devices -> Add DT Virtual Drive.
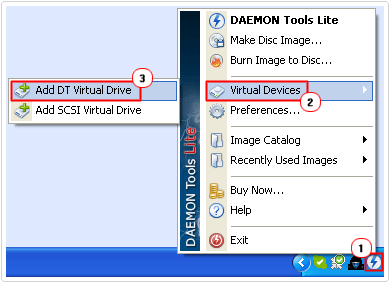
4. A small notification should appear on the screen, stating it’s creating a new virtual drive. Once it’s completed. Right click on the Daemon Tools icon again, then select Virtual Devices.
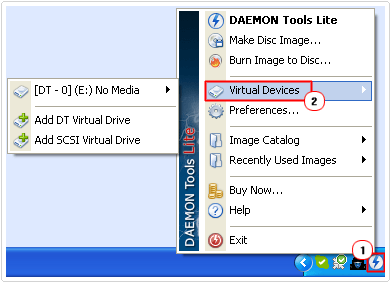
5. Then click on [DT – 0] (X:) No Media -> Mount Image.

Note: X represents the virtual drive letter.
5. A Select image file applet will pop up, using the Look in, navigate to the ISO file, then select it and click on Open.
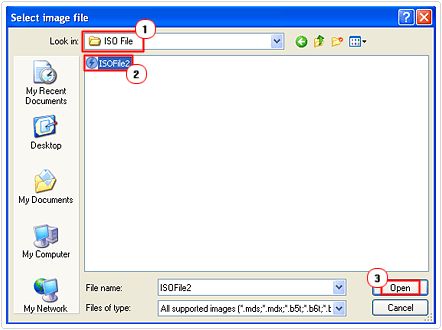
Note: This will mount the image to your virtual drive.
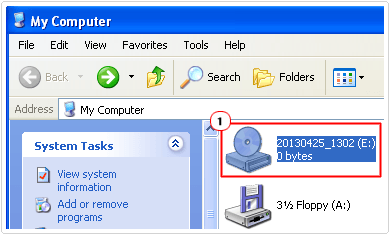
6. From here, click on Start -> My Computer. [Windows Vista/7: Computer]
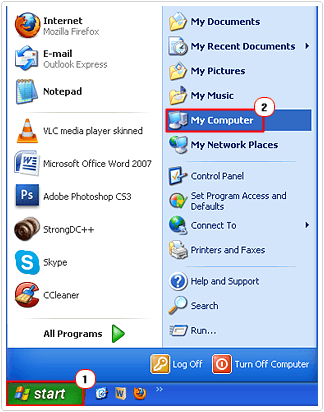
7. Once My Computer loads up, double click on the virtual drive you created, to access the contents of the ISO file.
Are you looking for a way to repair all the errors on your computer?

If the answer is Yes, then I highly recommend you check out Advanced System Repair Pro.
Which is the leading registry cleaner program online that is able to cure your system from a number of different ailments such as Windows Installer Errors, Runtime Errors, Malicious Software, Spyware, System Freezing, Active Malware, Blue Screen of Death Errors, Rundll Errors, Slow Erratic Computer Performance, ActiveX Errors and much more. Click here to check it out NOW!

