
| Attention Before you read this post, I highly recommend you check out my resources page for access to the tools and services I use to not only maintain my system but also fix all my computer errors, by clicking here! |
To put it simply, an I/O device error occurs whenever the operating system is unable to perform an input or output action, (such as sending, receiving or copying data) when attempting to access a storage device.
An I/O device error occurs on a variety of hardware Medias and devices, such as the following:
Internal/External Hard Drives
CD/DVD/Blu-ray Discs
USB Sticks and Pen Drives
SD Cards
Common Causes of I/O Device Errors
The I/O device error can manifest itself in a number of different ways with varying error messages. However, the most common error messages associated with this particular error are as follows:
The request could not be performed because of an I/O device error.
Only part of a ReadProcessMemory or WriteProcessMemory request was completed.
In addition, you also have the corresponding Windows error codes, such as the following:
- Error 6
- Error 21
- Error 103
- Error 105
- Error 131
These codes are of course, all associated with the I/O device error.
Why Does the I/O Device Error Occur?
There are so many causes for the I/O device error on Microsoft Windows based systems. However, the most common causes are the following:
- Corrupt or outdated installation driver adversely affecting a hardware component.
- Damaged or loose transmission cable in use.
- Portable media (CD, DVD, Blu-ray, USB stick or SD card) that you are trying to use is faulty or damaged.
- Hardware component is defective, faulty or damaged.
How to fix These Errors
Before you decide to throw your faulty portable media (CD/DVD) out, or choose to adopt more sophisticated methods of fixing this error, there are a number of simple steps that all users should attempt.
With that said, I recommend users attempt each method in the order that they appear, as the more complex methods should only be attempted as last resorts.
Update Hardware Drivers
If the error is related to a specific hardware component, then there is a good chance there could be a problem with the drivers installed for it. Thus, you should consider updating the drivers for that device.
To do this, you will need to visit the website of the manufacturer and download the available drivers there. Alternatively, you could use a driver updater that will automatically search the internet for the drivers, download them and install them.
If the driver updater is more appealing to you, then I recommend you download DriverFinder, from the following link:
CLICK HERE TO CHECK OUT DRIVERFINDER
Clean the Registry
It’s highly recommended that you adopt strict maintenance protocols to ensure that the I/O device error and other Windows related errors do not reoccur.
The registry is a very important component of your operating system, designed to store important Windows information, such as desktop wallpapers, recent emails, desktop icons and folders.
Because of its importance, the registry is highly susceptible to errors. As a solution, computer users regularly run registry cleaners to remove redundant entries, keys and files. Thus, it’s highly recommended that you adopt the same maintenance practices by running a registry cleaner program. Advanced System Repair Pro is the cleaner that I use and the one I recommend you use, you can find out more about it here:
CLICK HERE TO CHECK OUT ADVANCED SYSTEM REPAIR PRO
 The solution(s) below are for ADVANCED level computer users. If you are a beginner to intermediate computer user, I highly recommend you use the automated tool(s) above! The solution(s) below are for ADVANCED level computer users. If you are a beginner to intermediate computer user, I highly recommend you use the automated tool(s) above! |
Restart Your Computer
The first thing you should do, when you encounter an I/O device error is restart your computer.
Once the computer has finished rebooting, try and access the drive or portable media again.
Try a Different Computer
If the error continues to present itself, then you should try accessing the data from the portable media on another computer. This will help you determine whether the error is due to your computer or the media itself.
Note: If you’re experiencing the error on your internal hard drive, then you should bypass this method, unless you feel you have the technical knowhow and confidence to take the hard drive out of your computer and set it up on another one.
If the portable media opens on the other system, then you know there is an issue with your computer. If it does not open on the other system, then you know the problem is related to the media itself.
Alternatively, you could attempt to access data from another disc (CD/DVD) to see whether the computer is able to successfully complete the task.
Start Computer in Clean Boot State
Try using the computer in a clean boot state to determine whether or not the error is due to a driver or application conflict. Starting the computer in this mode is fairly simple, just do the following:
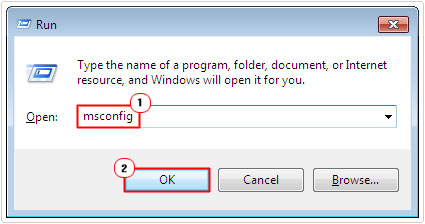
1. First, log into the computer with administrative access.
2. Then press  + R, type msconfig and click on OK.
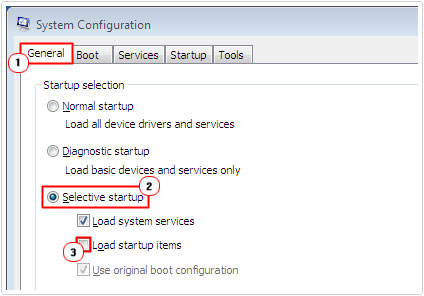
3. Once System Configuration Utility loads up, on the General Tab, click on Selective Startup, then uncheck the box next to Load Startup Items.
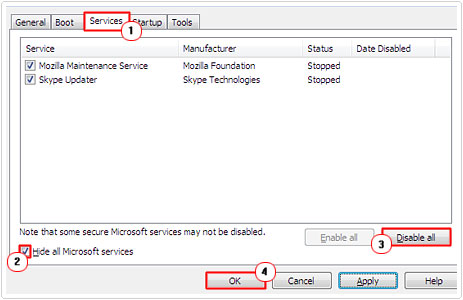
4. Then click on the Services Tab, tick the box next to Hide All Microsoft Services, then click on Disable All and OK.
5. Lastly click on Restart.
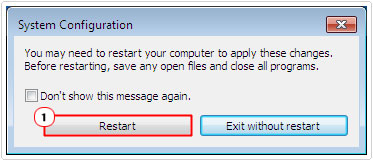
Note: If the media works without problems, then you know the problem is likely driver or software related.
Run Chkdsk
Another very effective way of fixing the error on hardware devices, such as hard drives, USB sticks and SD cards, is to run check disk. To do this, simply do the following:
Note: Make sure you have the device attached to your computer, before you begin this process.
1. First, boot into your computer with administrative rights.
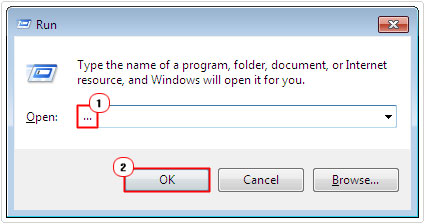
2. Then press + R, type … and click on OK.
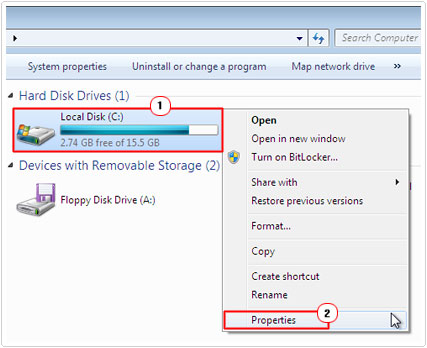
3. Once My Computer [Windows Vista/7/8/8.1/10: Computer] loads up, right click on the device and select Properties.
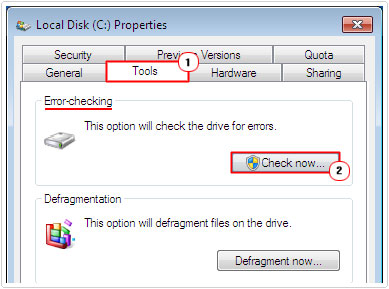
4. Then click on the Tools Tab, followed by Check Now, under Error-checking.
5. Lastly, make sure the boxes next to automatically fix file system errors and Scan for and attempt recovery of bad sectors is ticked, and click on Start.
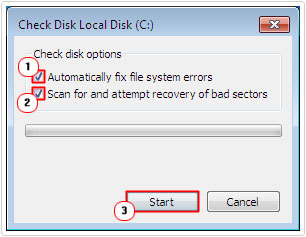
Note: If you attempt to run check disk for your primary hard drive, a notification window will appear, asking you do you want to schedule this disk check to occur the next time you restart the computer, just click on Yes, to confirm and restart your system.
Check Hardware Connections
A loose hardware connection or faulty data communication cable are two very common causes for this error. Thus, you will want to make sure of both.
If you’re using an external hard drive or some other similar device, consider replacing the cable that you use to connect the device to your computer, and see whether or not that has fixed the problem.
Additionally, you should ensure that all cable ends are correctly in their designated ports.
For internal hard drives, you will need to open up your computer, to make sure the SATA/IDE cables are securely in their slots.
You should also consider using replacement cables for your devices and checking whether or not that has fixed the problem.
Note: You will need to switch your computer off, when troubleshooting your internal hard drive. Additionally, if you don’t feel comfortable doing this, then you should consort the help of someone that does.
Verify Device Status
If all previous methods have failed, you may want to check the status of your device in Device Manager to ensure that it’s working correctly. In the event that it is not, the operating system should give you the heads-up on what exactly is wrong. Anyway, to check the status, just do the following:
1. First, boot into your computer with administrative rights.
2. Then press + R, type devmgmt.msc and click on OK.
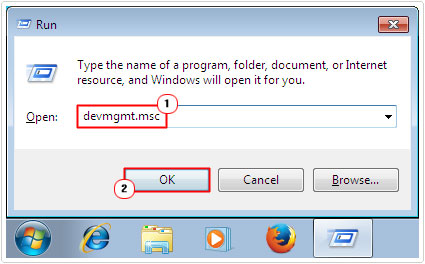
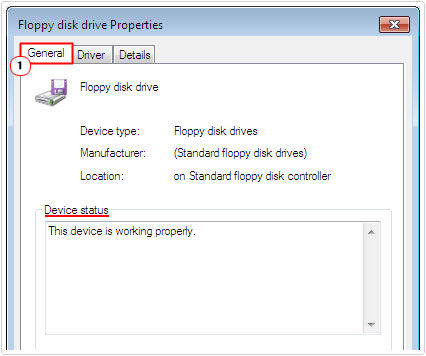
3. Once Device Manager loads up, click on the Arrow next to the device type, then double click on the Device.
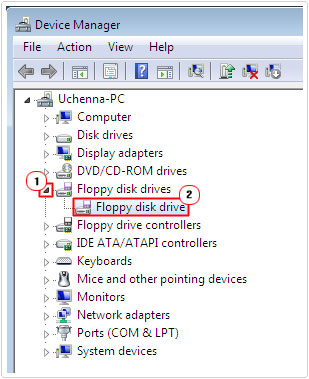
4. Lastly, On the General Tab under Device Status make sure it says the device is working properly.
Note: If there’s a Red Cross over the Device, then it means, it has been disabled, to re-enable it, simply right click on it and select Enable.
Test Hard Drives Integrity
I/O device errors are usually due to faulty hardware components. To rule this out as the possible cause, you should consider testing your hard drive to ensure that it is working as it should.
Note: This method is only applicable for people having problems with their hard drives.
The particular program that I recommend is SeaTools, developed by Seagate, but works on a plethora of hard drive brands: http://www.seagate.com/support/downloads/seatools/
Are you looking for a way to repair all the errors on your computer?

If the answer is Yes, then I highly recommend you check out Advanced System Repair Pro.
Which is the leading registry cleaner program online that is able to cure your system from a number of different ailments such as Windows Installer Errors, Runtime Errors, Malicious Software, Spyware, System Freezing, Active Malware, Blue Screen of Death Errors, Rundll Errors, Slow Erratic Computer Performance, ActiveX Errors and much more. Click here to check it out NOW!