| Attention Before you read this post, I highly recommend you check out my resources page for access to the tools and services I use to not only maintain my system but also fix all my computer errors, by clicking here! |
Did you recently fall victim to a Blue Screen of Death (BSOD) error displaying the ntkrnlmp.exe file? If so, then you’ve come to the right place. In this tutorial, we will be discussing probable causes, along with verifiable solutions that you can deploy, today, to fix this error.
Ntkrnlmp.exe is a legitimate Windows component. Its name stands for NT Kernel, Multi-Processor Version, and its main duties are to manage most of the operating systems low-level internal files, making it an integral part of your systems functionality. The component (or file) provides both executive and kernel layers of the Windows NT Kernel space, responsible for a number of Windows services, such as memory management and hardware abstraction. In short, ntkrnlmp.exe can be considered to be a critical Windows file.
The ntkrnlmp.exe Blue Screen of Death error message is typically associated with the error code CRITICAL PROCESS DIED, and is caused by a number of things.
Older Windows Platforms
As previously stated, ntkrnlmp.exe is a critical system file that belongs to the Microsoft Windows NT family of operating systems. On older platforms (Windows NT, XP, etc.) this file can be found in the following location:
C:\Windows\Driver Cache\i386
Ntkrnlmp.exe related errors, are known to occur during the installation of the Windows XP operating system. Usually the result of a conflict, that occurs when the Advanced Configuration and Power Interface (ACPI) has been enabled.
The error message should look something like the following:
Ntkrnlmp.exe Could Not Be Loaded Error Code 7
To fix this error, the end user need only disable the ACPI feature in the BIOS.
Solution
However, the steps to do this may vary. Personally, I recommend you consult the manual of your motherboard. But, if you’re still on such an old platform, in this day and age, it’s likely it’s been misplaced. In which case, you should try the following:
1. First, restart your system, then press either the Del or F2 key, during the POST (Power on Self-Test).
Note: The steps to enter the BIOS will vary, depending on the brand and version of BIOS installed on your motherboard.
2. Once inside the BIOS, you’ll want to enter the Power Management Menu.
3. From there, go to the ACPI option, then set its Value to No (or Disabled).
Note: Enabling and Disabling BIOS features can typically be done using the Page Up and Page Down keys.
4. Once complete, Save and Exit the BIOS.
There are other solutions you can deploy in addition to disabling the ACPI option within the BIOS. These are the following:
- If you’re attempting to upgrade from Windows 98 to ME, then wait for some time, to see whether or not the installation process will proceed.
- If the process remains frozen, cancel it, then remove any internet security tools on your system. Now clean boot the system, and run the setup again.
- You can also try removing any unnecessary devices attached or installed inside your system. Such as network adaptors, USB devices, VGA and Sound cards.
- As a last resort, you can try a BIOS update. You will need to find the latest iteration of your BIOS version, which can be difficult, given its age. But it’s well worth doing, if you can find it.
What Causes Ntkrnlmp.exe BSOD Errors?
On later Windows platforms, such as 7, 8, 10 (and 11), the error is known to occur in many circumstances, such as, when attempting to install an update.
The possible cause of these errors is fairly general. Which means, you must adopt a wide approach to rectifying it. That said, below are the most common reasons why you may be bogged down with it.
- The drivers for your graphics card are corrupted.
- Your system has been infected with a malicious file.
- A recently installed app is conflicting with the operating system.
- A new driver, system update or device is causing it.
How to Fix It
To follow are six effective methods that you can use to resolve this ntkrnlmp.exe error. However, given the general nature of ntkrnlmp.exe related errors, this may mean having to cycle through many of the available solutions.
With that said, I have arranged the available fixes in order of ease of execution and effectiveness. So I recommend you attempt them in the order that they appear.
Update Graphics Card Drivers to Fix Ntkrnlmp.exe Errors
If you have missing, outdated or corrupted graphics card drivers installed on your system, then it could possibly be the culprit for the ntkrnlmp.exe BSOD error.
You always want to ensure your graphics card drivers are the latest for maximum performance on your system.
To acquire the latest drivers, you can search for them manually by going to the official website of your card manufacturer. Obviously, you’ll need to know the brand and model number of your card to do this. So there’s a certain level of expertise required. If you’re confident doing this, then go ahead.
However, if you’re a relative beginner, with limited experience and technical knowledge in computing, then I recommend you use a driver automation tool, like DriverFinder.
DriverFinder is a tool designed to make updating your systems drivers easier. With it, you need only click where instructed, and it will search the internet for the latest device drivers, download them, and install them.
So, for the less knowledgeable computer user, I recommend you visit the link below, for more information on DriverFinder:
CLICK HERE TO CHECK OUT DRIVERFINDER
Run a Virus Scan
Malicious files are also known culprits for ntkrnlmp.exe related errors. It’s for this reason why you should already have internet security installed and running on your system. You should also have it configured to carry out regularly full scans, at least once per month.
However, if this is something you have not tinkered with, then you have several options that you should deploy right now.
There are a variety of security tools available in the marketplace, all with their own pros and cons. But the one I personally recommend, would have to be SpyHunter.
SpyHunter is amongst the very best antimalware tools available today. As it’s highly proficient and efficient in locating and removing a plethora of malicious file types.
You can learn more about this powerful tool, from the link below:
CLICK HERE TO CHECK OUT SPYHUNTER
 The solution(s) below are for ADVANCED level computer users. If you are a beginner to intermediate computer user, I highly recommend you use the automated tool(s) above! The solution(s) below are for ADVANCED level computer users. If you are a beginner to intermediate computer user, I highly recommend you use the automated tool(s) above! |
Use Driver Verifier Manager
If the ntkrnlmp.exe error continues to persist up to this point, then you may want to try this method. The Driver Verifier is a Windows component, used to manage all kernel-mode drivers. Its capabilities include, detecting driver faults and issues that could potentially cause corruption, while providing effective solutions that you can use.
To use this tool, simply do the following:
1. First, boot into your system as a full administrator.
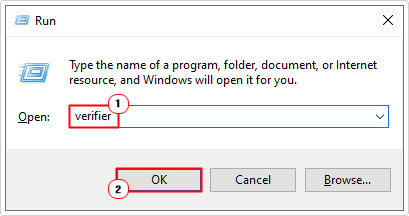
2. Then press  + R, type Verifier and click on OK.

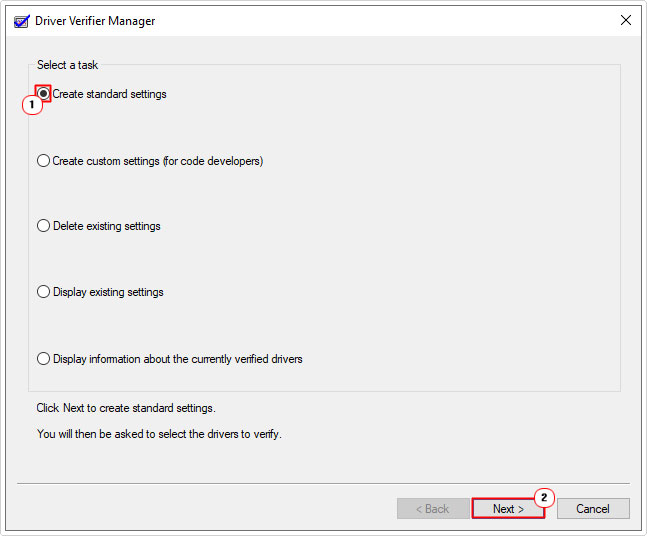
3. This will bring up the Driver Verifier Manager, from here, click on Create Standard Settings, then click on Next.

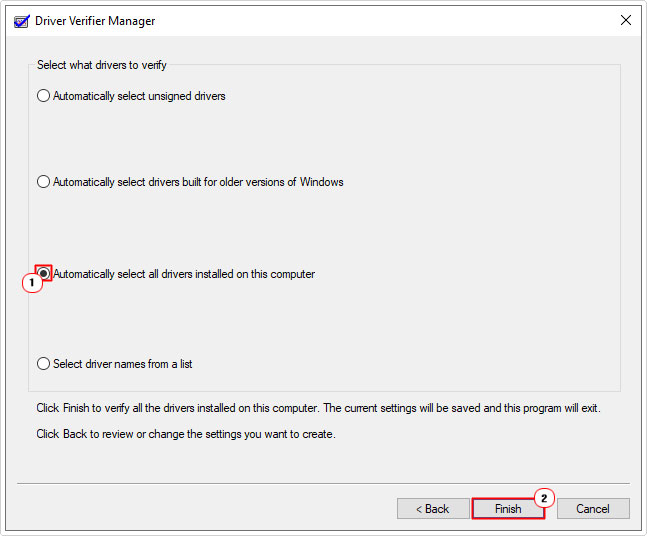
4. This will take you to the next option screen asking Select what drivers to verify. Click on Automatically select all drivers installed on this computer, then click on Finish.

5. Now, click on OK to restart your system.
When Windows successfully reboots, you should receive a report on the status of all the drivers installed on your system.
Simply follow the instructions given in the report to fix the ntkrnlmp.exe error.
Once done, you can stop the recently created Driver Verification process by doing the following:
1. First, follow the previous steps 1 – 2.
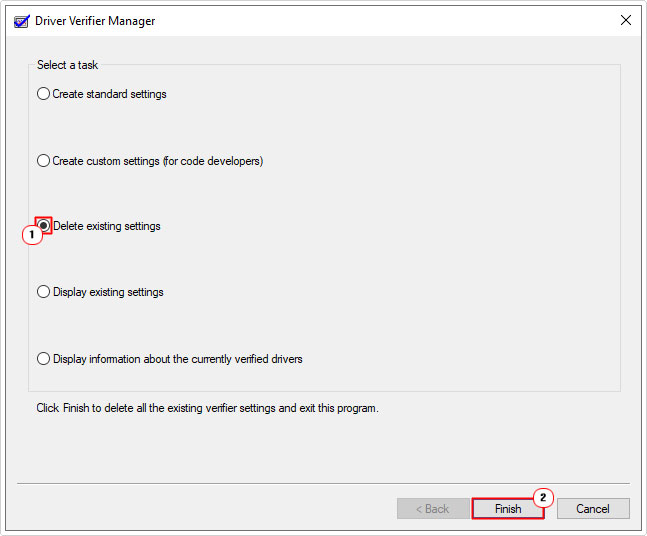
2. When Driver Verifier Manager loads up, click on Delete existing settings, then click on Finish.

3. Lastly, select yes, then restart your system.
If everything went through without hiccup, then the error should be resolved.
Repair Corrupt System Files
It’s possible the ntkrnlmp.exe blue screen of death error is as a result of missing, and/or corrupt system files. To verify whether or not this is the case, you can use System File Checker (SFC). SFC is a built-in Windows tool, designed to scan, detect and replace faulty system files on your system.
For step-by-step instructions on how to use this tool, check out my post on how to run SFC Scannow.
Use System Restore
Another effective way at repairing the ntkrnlmp.exe error on your system is to carry out a System Restore. System Restore is a built-in Windows tool, designed to restore your system back to a previous state. The idea is to set your system back, to a period, prior to the ntkrnlmp.exe error.
If system restore has been enabled on your system, then you should already have restore points saved on your system. All you need to do is select the appropriate one, then wait for the process to complete.
You can find full instructions on how to use this tool, from my post on what is a restore point.
Disable System Overclock to Fix Ntkrnlmp.exe Error
An effective overclock can result in increased system performance. However, sometimes this can lead to system instability.
If the ntkrnlmp.exe BSOD error is the result of CPU overclocking. Then you can rectify the problem by either, decreasing your overclock or removing it altogether.
If you overlocked the system by yourself, then you should already have some understand of how to tweak or remove an overclock.
Otherwise, I’d recommend you consult the manual of your motherboard.
Are you looking for a way to repair all the errors on your computer?

If the answer is Yes, then I highly recommend you check out Advanced System Repair Pro.
Which is the leading registry cleaner program online that is able to cure your system from a number of different ailments such as Windows Installer Errors, Runtime Errors, Malicious Software, Spyware, System Freezing, Active Malware, Blue Screen of Death Errors, Rundll Errors, Slow Erratic Computer Performance, ActiveX Errors and much more. Click here to check it out NOW!

