
| Attention Before you read this post, I highly recommend you check out my resources page for access to the tools and services I use to not only maintain my system but also fix all my computer errors, by clicking here! |
Have you encountered the NVIDIA Installer cannot continue error message more times than you can count, while attempting to either update or install new NVIDIA drivers? It can occur for a variety of reasons, with incompatibility being amongst the most common culprit. So what can you do about it? Continue reading to find out.
If you have a NVIDIA gaming PC, then you cannot go wrong with the NVIDIA GeForce Experience – if you want the full experience. It provides the end user with an array of features, which are all designed to enhance your overall gaming experience. It also makes the driver installation process a breeze. However, as with most tools, it’s not without flaws, which can occur and cause a great deal of aggro.
In the vast majority of cases, users report encountering the NVIDIA Installer cannot continue error notification while attempting to install drivers for their NVIDIA graphics card. No matter how many attempts they make, they are always greeted with the same error message.
There are a number of reasons why this may be happening, and it does happen on an assortment of NVIDIA GeForce Experience versions.
For those of you here, it’s probably fair to assume you have no idea what’s causing this problem. So, to follow, will be a rundown of the most common causes of this error.
What Causes NVIDIA Installer Cannot Continue Errors?
“NVIDIA Installer cannot continue” is a fairly common error message. But why does it occur? Below are the most common and most likely reasons you are bogged down with this problem:
- The Windows registry has been corrupted.
- A NVIDIA process running in the background is inhibiting the installation process.
- Your graphics card has been disabled.
- The software is incorrectly identifying your graphics card.
So, what can you do to fix it? Below you will find a wide range of solutions, all proven to be successful at tackling this problem.
How to Fix It
When it comes to tackling this problem, you’re going to want to start small. So, to begin with, I recommend you consider disabling your antivirus software.
At least temporarily, as it is possible that it is the tool that is blocking the NVIDIA GeForce Experience from completing the installation.
The process of disabling your virus scanner will naturally vary, depending on the brand and version. But generally, you’ll want to open up the GUI (Graphical User Interface) of your virus scanner and disable Real-Time Scanning there.
Once you have successfully disabled it, you should now try running the NVIDIA installation again.
If that fails to fix the problem, then consider re-downloading the NVIDIA GeForce Experience software.
This should be simple enough, just go to the NVIDIA website and download the software for your graphics card from there. Make sure you know the Make and Model of you device.
If the error persists, only then do I recommend the additional solutions below:
Run Windows Repair Tool to Fix NVIDIA Installer Cannot Continue Errors
Is your computer running much slower than usual? Are you constantly coming face to face with fresh error messages? Would you like a way of fixing it without using any manual methods? Yes, then you cannot go wrong with a Windows repair tool.
The tool I have in mind is a advanced repair solution, which was developed by PC professionals to detect and fix a variety of errors and issues on your computer.
The only thing you need to do is download and install it, then run a full scan and it will detect and fix whatever it finds on your system.
Errors such as DLL, registry, BSOD, game, runtime, virus infections, and much more, can be detected and fixed by this tool.
If this interests you, then I suggest you visit the link below:
CLICK HERE TO CHECK OUT THE ADVANCED REPAIR TOOL
 The solution(s) below are for ADVANCED level computer users. If you are a beginner to intermediate computer user, I highly recommend you use the automated tool(s) above! The solution(s) below are for ADVANCED level computer users. If you are a beginner to intermediate computer user, I highly recommend you use the automated tool(s) above! |
Close Background NVIDIA Processes
When attempting to install new drivers, in this case, new NVIDIA drivers, to prevent a “NVIDIA Installer cannot continue” error, it may be a good idea to close any potentially conflicting processes in the background. To do that, follow the steps below:
1. First, boot into your system as a full administrator.
2. Now, right-click on the Taskbar and select Task Manager.
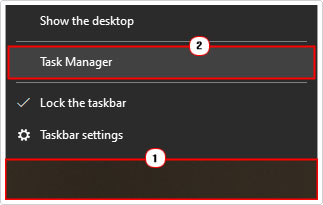
3. This will bring up the Windows Task Manager. On the default Processes Tab, locate and right-click on ALL NVIDIA process (individually), then select End Task.

4. Now you can retry the NVIDIA installation.
Check Card Detected
If you’re graphics card is not properly listed under Display Adapters in Device Manager, then that’s a strong indication that the operating system has not properly identified your card.
It could also show up under Other Devices with a Yellow exclamation mark beside it. Either way, follow the steps below:
1. Boot into your system as an admin.
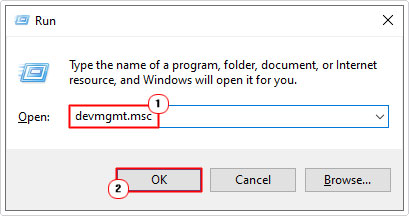
2. Then press  + R, type devmgmt.msc and click on OK.
3. This will bring up Device Manager, now click on > next to Display adapters, then right-click on your Graphics Card and select Properties.

Note: You should find your graphics card under Display adapters or Other Devices.
4. When the Graphics Card Properties applet pops up, click on the Details Tab, then select Hardware IDs from the Property dropdown menu. Now, jot down the VEN and DEV code. In this example, the VEN is 10DE and the DEV is 1C03.

5. Now, go to the following website to find out what both the VEN and DEV codes translate to: https://pci-ids.ucw.cz/
6. Next, press + R, type C:\Program Files and click on OK.

7. When the Program Files folder loads up, locate and rename NVIDIA Corporation to NVIDIA Corporation.old.

8. Once you’ve established what NVIDIA card you have installed on your system, you can now go to the official NVIDIA website and download and install the correct drivers from there.
Use Device Manager to Install Drivers
If you’re still unable to get around the NVIDIA Installer cannot continue error message, then you may want to try installing the drivers for your card via the Device Manager tool. To do that, follow the steps below:
1. Boot into your system as an admin.
2. Then go to the Official NVIDIA website and download the NVIDIA Studio Drivers for your card.
3. Using 7-zip, right-click on the NVIDIA Studio Driver and select 7-Zip -> Extract files.

4. This will bring up an Extract applet, from here, click on OK.

Note: It will extract the files to the same location of the NVIDIA Studio Driver file.
5. Now press + R, type devmgmt.msc and click on OK.
6. When Device Manager loads up, click on the > besides Display adapters, then right-click on your NVIDIA card under Display adapters and select Update driver.

7. A Update Drivers applet will appear. Click on Browse my computer for drivers.

8. This will take you to the Browse for drivers on your computer screen. Make sure the box next to Include subfolders is ticked, then click on Browse.

9. Select the extracted folder and click on OK.

10. Follow the onscreen instructions to complete the update.
Incompatibility Fix
If you continue to see the NVIDIA Installer cannot continue error notification despite installing the correct drivers for your NVIDIA card, then you could try a force-installation.
WARNING: If the drivers are in fact a mismatch, then it will result in system instability. So attempt this method at your own risk.
1. First, follow steps 1 – 3 of Check Card Detected.
2. From the Graphics Card Properties applet, click on the Details Tab, then select Hardware IDs from the Property dropdown menu. Now, right-click on the first line in the Value box and select Copy.

3. Follow steps 2 – 4 of Use Device Manager to Install Drivers.
4. Now, go to the Extracted files and open the Display.Driver folder. Next, locate and right-click on nvacsi.inf and select Open with.

5. A How do you want to open this file applet will pop up, select Notepad and on OK.

6. Scroll down to you get to the NVIDIA_Devices.NTamd64 section. Now replace the first line of PCI\VEN_10DE&DEV text with the text you copied from your Graphics Card Properties applet.

7. Lastly, click on File -> Save.

Note: Make sure there are no other sections labelled NVIDIA_Devices.NTamd64, if so, repeat step 5.
7. Lastly, go to the main driver folder (of the extracted files) and double-click on Setup to begin the installation process.

Are you looking for a way to repair all the errors on your computer?

If the answer is Yes, then I highly recommend you check out Advanced System Repair Pro.
Which is the leading registry cleaner program online that is able to cure your system from a number of different ailments such as Windows Installer Errors, Runtime Errors, Malicious Software, Spyware, System Freezing, Active Malware, Blue Screen of Death Errors, Rundll Errors, Slow Erratic Computer Performance, ActiveX Errors and much more. Click here to check it out NOW!