| Attention Before you read this post, I highly recommend you check out my resources page for access to the tools and services I use to not only maintain my system but also fix all my computer errors, by clicking here! |
Would you like to know what Runtime Broker (runtimebroker.exe) is, and why it’s causing problems while running in the background of your system?
If you’ve ever spent any amount of time looking through the various processes running on your system in Windows Task Manager, then it’s likely you would have stumbled upon this process, maybe once or twice. So what is it? Is it safe? Is it a malicious file? Well, first things first, the runtimebroker.exe process, is totally safe, and is a system based process, created by Microsoft.
Runtimebroker.exe is a specific process, with a specific function. When your operating system first boots up, it does not load this process. For reasons I will explain later in this post.
First introduced with Windows 8, it was kept on, for the later Windows 10.
Runtimebroker.exe is a legitimate Windows process, one that has a reputation for causing issues for many Windows users. High CPU usage is amongst one of the more commonly associated problems.
Runtimebroker.exe is active at different points during a single Windows session. Such activity can be monitored using Windows Task Manager, or Process Explorer, which is a more advanced version of the initial program.
This process is directly linked to the Universal Windows App (which is essentially Windows Store, and programs installed from it. As well as side-loaded applications).
RuntimeBroker.exe Overview
When you load up Windows Task Manager in Windows 10, you should be able to monitor the runtimebroker.exe process under Processes.
Windows Task Manager (in Windows 10), separates processes into background processes and applications. This means, the runtimebroker.exe can be found under either, depending on the circumstances it was loaded up under. If you switch to the Details Tab, it should give you a much clearer idea of what’s going on.
This process (runtimebroker.exe) is linked to Universal Windows Apps, which means, it only becomes active when one of those associated applications are running.
The sole responsibility of the runtimebroker.exe process, is to ensure that all required permissions, by the application have been declared, and to notify the end user, in the event that a problem has been found.
So it acts as a security layer, between the application, and your hardware device.
What Causes High CPU Usage?
Not so long, after the release of the OEM version of Windows 8 and 10, end users began reporting issues of memory leaks, linked to the runtimebroker.exe process.
The end result of this memory leak, was a huge toll placed upon the resources of the system. As it (runtimebroker.exe) consumed an excessive amount of system memory.
Apps most commonly associated with this issue, are those that use the Live Tile update function, called “TileUpdater.GetScheduledTileNotifications”. When the tile update process is initiated, the operating system makes the request, but the allocated memory, for the request is never released.
Note: Every time an update request is made, a small amount of memory is allocated for the process. However, this issue would very easily snowball, as the system is inundated with update requests, causing it to consume an excessive amount of system memory.
At the time, the only way around this problem, was simply to avoid apps, in Windows Store, that used the Live Tile update function. In hopes that, the app developer would fix the problem. However today, there are verifiable solutions you can adopt.
How to Fix It
If your computer is running slower than usual, the first thing you’ll want to do is open up Windows Task Manager. This can be done by right-clicking on your Taskbar and selecting Task Manager.
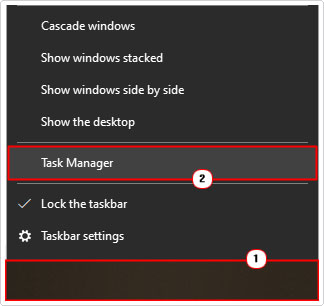
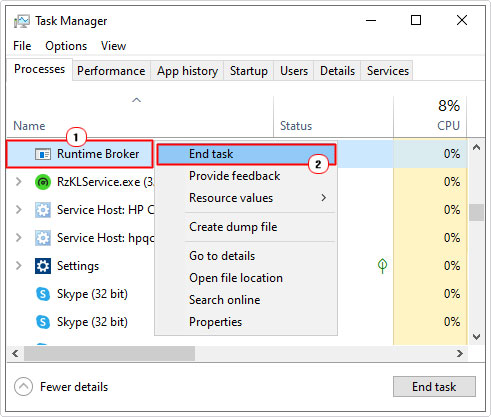
The quickest and simplest way of resolving any problems with the runtimebroker.exe process, is simply to stop it. From Windows Task Manager, click on the Processes Tab, then right-click on Runtime Broker, and select End Task. This will force the process to close, which in turn, will initiate a system reboot.
However, the problem is likely to reoccur, after some time. Maybe a day later, or maybe right after the initial reboot. The runtimebroker.exe high CPU usage issue will remain, continuously draining system performance.
Fortunately, there are several things that you can do, all of which I have outlined below, in order of effectiveness and difficulty.
Run Windows Repair Tool to Fix Runtimebroker.exe
Runtimebroker.exe issues are typically the result of an infraction within the operating system itself. This is primarily because runtimebroker.exe is a Windows-based process. Thus, the first solution, I’d recommend you adopted, would be to run a full scan of your system using Advanced System Repair Pro.
Advanced System Repair Pro, is a Windows repair tool, capable of replacing all missing and/or corrupted Windows files. Essentially, reinstalling Windows on the fly, without any of the inherent risks associated with the process (such as loss of personal data and programs).
With that said, you can find out more about this powerful tool, from the link below:
CLICK HERE TO CHECK OUT ADVANCED SYSTEM REPAIR PRO
 The solution(s) below are for ADVANCED level computer users. If you are a beginner to intermediate computer user, I highly recommend you use the automated tool(s) above! The solution(s) below are for ADVANCED level computer users. If you are a beginner to intermediate computer user, I highly recommend you use the automated tool(s) above! |
Disable RuntimeBroker.exe
Although runtimebroker.exe is a Windows process, it is possible for Windows to run, just fine, without this process. This means, you can disable the process altogether, as a means of circumventing this problem.
Note: If you disable runtimebroker.exe you will be unable to use Windows Store.
To disable this process, simply follow the instructions below:
1. First, boot into your computer as an administrator.
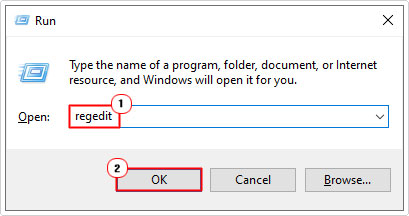
2. Then press  + R, type regedit and click on OK.

3. When Registry Editor loads up, navigate to the path below:
HKEY_LOCAL_MACHINE\SYSTEM\CurrentControlSet\Services\TimeBrokerSvc
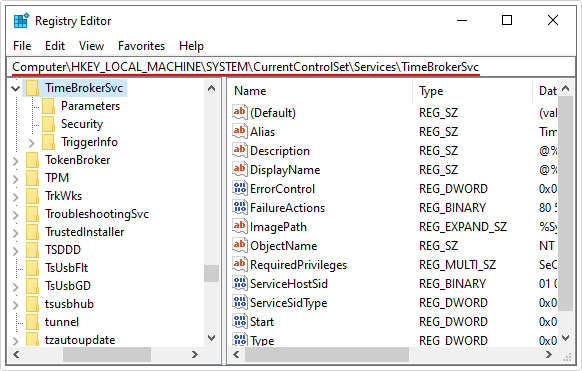

4. Once there, double-click on Start.
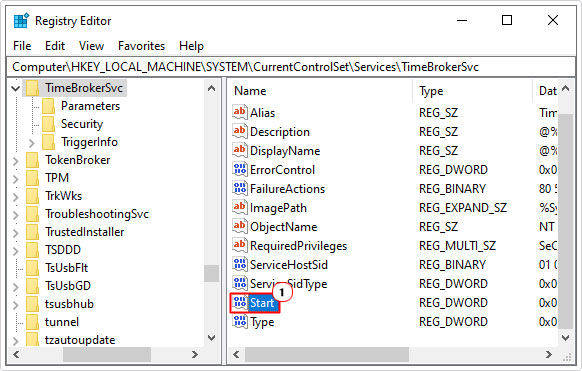

5. This will bring up an Edit DWORD (32-bit) Value applet, from here, change the Value data from 3 to 4, and then click on OK.
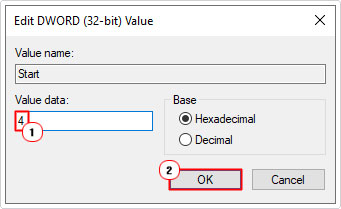

Note: 4 disables the process. 3 sets the process to manual, while 2 sets it to automatic. Setting the runtimebroker.exe process to disable, which is 4, will permanently stop the process.
Reset Windows Update
Issues with runtimebroker.exe are also commonly associated with the Windows Update feature. This may be the case in your situation. Thus, as a solution, you may want to consider resetting all the associated Windows Update processes on your system.
To do this, there are several options you can take. But ultimately, the Windows Update reset script is the easiest and quickest to implement. For step-by-step instructions on how to setup and run this script, visit my post on fixing error 0x80070020.
Remove or Update Culprit App
If you’re able to identify the exact program that is causing the runtimebroker.exe program to consume an excess amount of memory or CPU resources, you can do the following:
- When it’s a nonessential program, then you should uninstall it.
- If the program is essential, then you should try updating it. If you’re unable to find an update for the program, then you should try reinstalling it.
Disable Get Tips, Tricks and Suggestions
Any feature or app within Windows 10 that utilises the Universal Windows Application, leads to the execution of the runtime broker process.
It’s for this reason why you will observe the process allocating required resources, whether it be memory, CPU or hard drive, in order to start a specified program.
However, end users have discovered, titbit for fixing associated issues with this process. It entails, disabling the Windows feature responsible for displaying tips and suggestions for Windows users.
To disable this feature, simply do the following:
1. First, ensure you’ve booted into your computer as an administrator.
2. Then press 


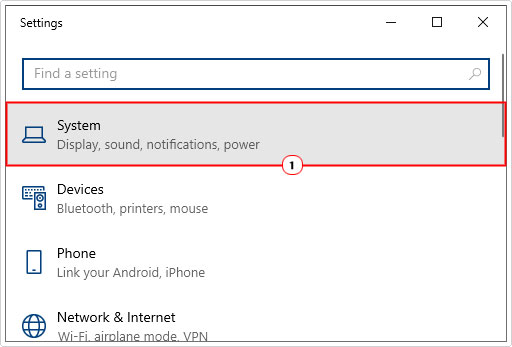

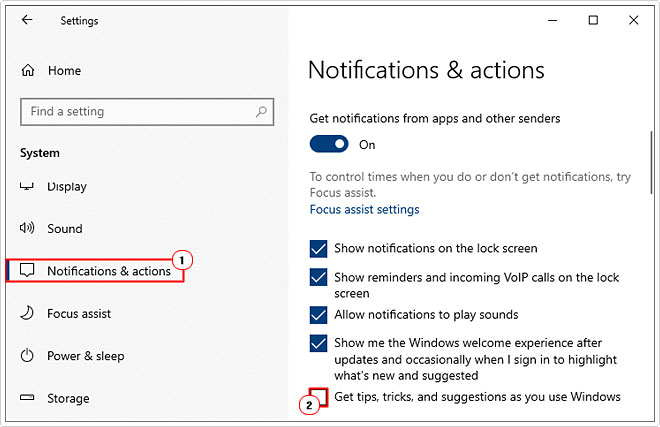
3. From System Settings, click on Notifications & Actions, then un-tick the box next to Get tips, tricks, and suggestions as you use Windows.

Are you looking for a way to repair all the errors on your computer?


If the answer is Yes, then I highly recommend you check out Advanced System Repair Pro.
Which is the leading registry cleaner program online that is able to cure your system from a number of different ailments such as Windows Installer Errors, Runtime Errors, Malicious Software, Spyware, System Freezing, Active Malware, Blue Screen of Death Errors, Rundll Errors, Slow Erratic Computer Performance, ActiveX Errors and much more. Click here to check it out NOW!

