| Attention Before you read this post, I highly recommend you check out my resources page for access to the tools and services I use to not only maintain my system but also fix all my computer errors, by clicking here! |
“The L2TP connection attempt failed” is an error notification that appears when a VPN fails to establish the appropriate security protocols, oftentimes the result of mismatched security settings (between server and client machines). This error is caused by an assortment of things, with recent Windows update(s) sitting head and shoulders above the rest.
The L2TP (Layer 2 Tunnelling Protocol) is used primarily for protecting and encrypting data sent and received via a VPN (Virtual Private Network) or any network, for that matter. VPNs are used for concealing a user’s connection, essentially allowing him or her to remain anonymous while surfing the web. This is typically done for a wide range of reasons.
However, there are those situations when a user may attempt to establish a VPN connection, but are instead greeted with the following full error message:
The L2TP connection attempt failed because the security layer encountered a processing error initial negotiations with the remote computer.
So, what can you to do fix this problem? Fortunately, a number of things. But before we get to those solutions, let’s take a deeper look at its common causes.
What Causes the L2TP Connection Attempt Failed Error?
I carried out what I believed to be sufficient research on its various causes. In my studies, I discovered some causes appeared more often than others. The most common of these encounters are listed below:
- Incorrect PPP Settings: The VPN connection will fail to establish if your systems PPP settings are wrongly configured. Before a VPN connection can be made a LCP protocol must be enabled and properly setup.
- Disabled Protocols: Another common occurrence for the l2tp connection attempt failure is the disabling of the CHAP v2 protocol. Most VPN services and apps require that this protocol be enabled and working before any connections can be established.
Other known causes for this error include, an incorrectly configured VPN app, issues on the network blocking access to priority ports etc…
Now that you have a general understanding of the potential root causes of this error, let’s get to the solutions.
How to Fix It
VPNs are very much a necessity today, as it allows users to not only surf the web anonymously, but also send and receive data more securely. Another common usage of VPNs is to establish a connection with a Remote Desktop. However, such is the nature of technology, it is not infallible, and so errors such as “the L2TP connection attempt failed” are bound to happen.
The good news is that there are a number of things you can do about it. So let’s get to those solutions.
Use Windows Repair Tool to Fix the L2TP Connection Attempt Failed
If your system is running much slower than it once did, while displaying various issues and errors, such as the aforementioned error, then you need a Windows repair tool. The tool I have in mind is called Advanced System Repair Pro and it can, when run, scan, detect and fix a wide range of Windows errors.
The types of things you can expect it to fix include, malware infections, BSOD errors, file corruption, runtime errors and much more.
This tool is also equally adept at speeding up your system, making it an all-round maintenance and repair suite.
Anyway, if that interests you in anyway, then visit the link below:
CLICK HERE TO CHECK OUT ADVANCED SYSTEM REPAIR PRO
 The solution(s) below are for ADVANCED level computer users. If you are a beginner to intermediate computer user, I highly recommend you use the automated tool(s) above! The solution(s) below are for ADVANCED level computer users. If you are a beginner to intermediate computer user, I highly recommend you use the automated tool(s) above! |
Enable MS-CHAP v2
As previously noted, the disabling of Microsoft CHAP v2 protocol is known to cause the L2TP connection attempt failed error.
Microsoft CHAP v2 is an important protocol as its main duty is to update the login process for the VPN. It properly secures the connection by ensuring the identity of both server and client machine are as they should be. This ensures a smooth and consistent web connection.
So, what can you do? Enable Microsoft CHAP v2. How do you do it? Well, follow the onscreen instructions for further help.
1. First, boot into your system as a full administrator.
2. Then press  + R, type ncpa.cpl and click on OK.

3. When Network Connections loads up, right-click on your VPN Connection and select Properties.

4. This will bring up the VPN Properties applet, from here, click on the Security Tab, then check the box for Allow these protocols, then tick the box for Microsoft CHAP Version 2 (MS-CHAP v2) and click on OK.

5. You can now try establishing a connection with the VPN connection.
Use Local IP Address
Another method you can use to fix the L2TP connection attempt failed error entails configuring the connection to use your local IP instead of its Public IP.
To do that, follow the steps below:
1. Follow steps 1 – 3 of Enable MS-CHAP v2.
2. This will bring up the VPN Properties applet, from here, click on the Security Tab, and select Layer 2 Tunnelling Protocol with IPsec (L2TP/IPsec) under Type of VPN, then click on Advanced settings.

3. On the Advanced Properties applet, check the box for Use pre-shared key for authentication, and click on OK.

Use Windows Registry
Another method you can use to fix the failing VPN connection entails entering the Windows registry and creating a specific registry value.
WARNING: The Windows registry is a very sensitive area of the operating system, as a result, any wrong modification to it can render your system inoperable.
To create the registry value, please follow the steps below:
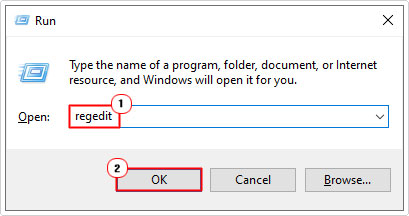
1. Boot into your system as an admin, then press  + R, type regedit and click on OK.

2. When Registry Editor loads up, navigate to the following path:
HKEY_LOCAL_MACHINE\SYSTEM\CurrentControlSet\Services\PolicyAgent

3. From the PolicyAgent registry key, right-click on the right pane and select New -> DWORD (32-bit) Value.

4. Then name it AssumeUDPEncapsulationContextOnSendRule.

5. Double-click on AssumeUDPEncapsulationContextOnSendRule to open the Edit DWORD (32-bit) Value box, now type 2 into the Value data box and click on OK.

Enable LCP Extensions
This next method of fixing the VPN connection involves changing the settings for the Link Control Protocol (LCP). The purpose of this protocol is to add additional layers of security between your system and the VPN server.
Enhancements include things such as improved network setup options and error detection, for a more reliable VPN experience.
Thus, as a possible solution, you may want to consider enabling these specific features. To do that, follow the steps below:
1. Follow steps 1 – 3 of Enable MS-CHAP v2.
2. From the VPN Connections applet, click on the Options Tab, then click on PPP Settings.

3. When the PPP Settings applet loads up, tick the box next to Enable LCP extensions, and then click on OK.

4. Close the VPN Properties applet, then try establishing a VPN connection again.
Restart IPSec Services to Fix the L2TP Connection Attempt Failed
Before a secure VPN connection can be established a series of IPSec services must be enabled and running. To ensure that is the case on your system, please do the following:
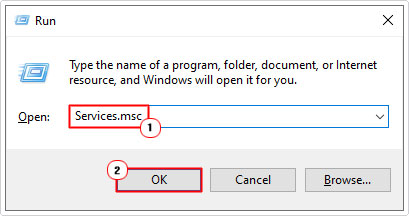
1. Boot into your system as an admin, then press  + R, type Services.msc and click on OK.

2. When Services loads up, locate and right-click on IPSec Policy Agent and select Restart.

3. Next, double-click on IPSec Policy Agent.

4. This will bring up the IPSec Policy Agent Properties applet, from here, set the Startup type to Automatic, and then click on OK.

5. Repeat steps 2 – 4 for IKE and AuthIP IPsec Keying Modules.
6. Close Services, then check whether or not it has fixed the L2TP connection attempt failed error.
Are you looking for a way to repair all the errors on your computer?

If the answer is Yes, then I highly recommend you check out Advanced System Repair Pro.
Which is the leading registry cleaner program online that is able to cure your system from a number of different ailments such as Windows Installer Errors, Runtime Errors, Malicious Software, Spyware, System Freezing, Active Malware, Blue Screen of Death Errors, Rundll Errors, Slow Erratic Computer Performance, ActiveX Errors and much more. Click here to check it out NOW!

