

| Attention Before you read this post, I highly recommend you check out my resources page for access to the tools and services I use to not only maintain my system but also fix all my computer errors, by clicking here! |
Did you recently encounter a Time synchronization failed error while attempting to sync your OS time with a time server? The full error message may include “Please check network connectivity and retry” but rarely is this issue solved with a simple network check. So, what can you do to fix it? Continue reading to find out.
The time synchronization failed error will appear when the operating system is unable to sync its time with the time server’s time. This ultimately results in an inaccurate time displayed in the Windows taskbar. The broader ramifications of this are discrepancies in the timestamp of files, such as emails and reminders triggering at the wrong time (or not at all).
On the surface, this could quite simply be the result of a connectivity problem. A stable and consistent connection to the internet is crucial in ensuring the operating system is able to communicate with Microsoft’s (time) servers as and when it needs to.
With that said, what are the biggest contributing factors to this error? Let’s take a deeper dive, below.
What Causes Time Synchronization Failed Errors?
In many instances, the time synchronization failed error may be the result of a dropped connection. However, most of the time, it’s the result of one of the following:
- Security tool blocking the service: It’s possible you have a firewall tool blocking the OS from connecting to Microsoft’s time server.
- There is an issue with Windows Time Service: The responsibility of the W32Time service is to ensure the time (in Windows) is always synced up with the time on the time server. If this service fails however, this can no longer happen.
- A malicious file has infiltrated the system: Malicious files, such as malware and viruses are capable of infiltrating and damaging vital Windows components and services (W32Time).
- User has selected the wrong time zone: The OS must have the correct time and time zone selected for the synchronisation to properly take effect.
Now that we have a general idea of the causes of time synchronization failed errors, let’s take a look at the numerous ways you can fix it.
How to Fix It
As I always say, you want to start with the simplest solution, then work your way up. So, first things first, consider restarting your system.
A system restart will free up all available resources and fix conflicts, glitches and issues that may have occurred as a result of it.
Another solution you can try, entails switching your internet connection to another network. This method is only viable if you have more than one way of accessing the internet. So, for example, if you have a mobile phone, you could set it up as a hotspot and connect to the internet through it.
If that fails to fix it, then consider the following solutions below:
Disable Security Tool
You’re internet security tool is an integral part of your web experience. As it will protect your system from virus infections, hack attempts and much more. However, there are instances when such tools can be overzealous, in these situations, they can block, otherwise perfectly harmless components and services from accessing the web.
Thus, to determine whether or not this is the case, in your situation, it’s recommended that you disable your tool – at least temporarily. Then examine.
You should be able to do this, through its GUI (Graphical User Interface), which you can access from its icon in the Taskbar.
Run Windows Repair Tool to Fix Time Synchronization Failed Errors
If your system isn’t functioning as well as it did when you first purchased it, then it’s probably time you scanned your system with a Windows repair tool like Advanced System Repair Pro.
This tool will not only make your system faster, but also resolve a number of common issues on it. Such as DLL errors, game errors, registry errors, runtime errors, BSOD errors and much more.
It also has a built-in virus scanner, which means it will locate and remove malicious threats from your system.
All-in-all, this is the tool to fix the time synchronization failed issue, so I recommend you give it a try.
For more information, please visit the link below:
CLICK HERE TO CHECK OUT ADVANCED SYSTEM REPAIR PRO
 The solution(s) below are for ADVANCED level computer users. If you are a beginner to intermediate computer user, I highly recommend you use the automated tool(s) above! The solution(s) below are for ADVANCED level computer users. If you are a beginner to intermediate computer user, I highly recommend you use the automated tool(s) above! |
Restart Windows Time Service
The time synchronization failed error may have occurred because the Windows Time Service crashed. Thus, as a possible solution, you could try restarting the service.
To do that, follow the steps below:
1. First, boot into your system as a full administrator.
2. Then press  + R, type Services.msc and click on OK.
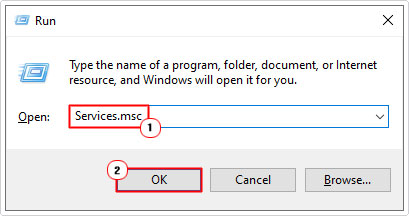
3. When Services loads up, scroll down, then right-click on Windows Time and select Restart.

4. If Windows Time has been disabled, then double-click on it. This will bring up the Windows Time Properties applet, from here, set Startup type to Automatic, and then click on Start. Lastly, click on OK.

Restart Windows Time via CMD
Another, possibly more thorough method of restarting the Windows Time service involves running a series of DOS commands.
The whole process is relatively simple, just do the following:
1. Boot into your system as a full administrator.
2. Then press + R, type cmd and press CTRL + Shift + Enter.
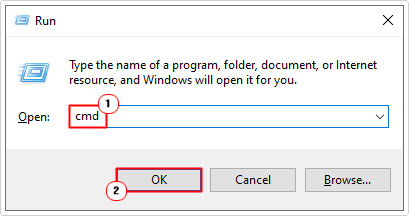
3. When Command Prompt loads up, type the commands below, pressing Enter after each line:
w32tm /debug /disable
w32tm /unregister
w32tm /register
Net start w32time
4. If the Windows Time Service was started successfully, it should notified you, with a message. Now, close Command Prompt, and retry the synchronization process.
Use Different Time Server(s)
The main Time Server provided by Microsoft Windows is incredibly popular, for that reason, it can at times experience downtime, resulting in issues such as time synchronization failed errors.
As a workaround, you could consider using a different, equally as dependable, but less strained time server.
To do that, follow the steps below:
1. First, boot into your system as a full administrator.
2. Then press + R, type Control and click on OK.
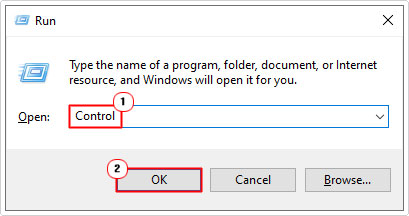
3. When Control Panel loads up, type Clock into the Search Control Panel box, then click on Date and Time.

4. This will bring up the Date and Time applet, now click on the Internet Time Tab, and then click on Change settings.

5. A smaller Internet Time Settings applet should appear, simply choose a different Server from the dropdown menu, and then click on OK.

Add Additional Time Servers
If the available time servers are not to your liking, it’s possible to add your own. Simply follow the steps below:
WARNING: The registry is a highly sensitive area of the operating system. Thus, any wrong modification can render your system inoperable.
1. Boot into your system as an admin.
2. Then press + R, type regedit and click on OK.
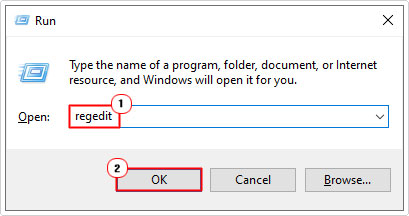
3. When Registry Editor loads up, go to the following path:
HKEY_LOCAL_MACHINE\SOFTWARE\Microsoft\Windows\CurrentVersion\DateTime\Servers

4. Next, right-click in the right pane and select New -> String Value.

5. Name the new String Value the next proceeding number then double-click on it. This will bring up the Edit String box, from here, type Time Servers URL into the Value data box and click on OK.

Note: For example, if you have 5 string values in the Servers registry key, then the next string value would be named 6.
Enable Automatic Set Time to Fix Time Synchronization Failed
Enabling this feature will ensure the operating system is always showing the correct time, as it will automatically adjust the time where applicable. This way you can ensure consistency across all OS activities.
To enable this feature, simply do the following:
1. Boot into Windows as an admin.
2. Then press + R, type taskschd.msc and click on OK.
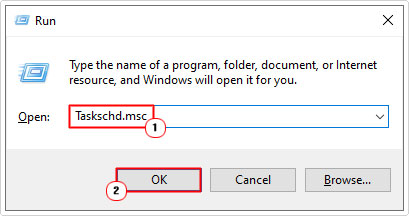
3. When Task Scheduler loads up, navigate to:
Task Scheduler Library > Microsoft > Windows > Time Synchronization

4. Now, in the middle box, right-click on SynchonizeTime and click on Enable.

5. Lastly, close Task Scheduler, then restart your system.
When Windows finishes booting up, you can now verify whether or not it has fixed the time synchronization failed error.
Are you looking for a way to repair all the errors on your computer?

If the answer is Yes, then I highly recommend you check out Advanced System Repair Pro.
Which is the leading registry cleaner program online that is able to cure your system from a number of different ailments such as Windows Installer Errors, Runtime Errors, Malicious Software, Spyware, System Freezing, Active Malware, Blue Screen of Death Errors, Rundll Errors, Slow Erratic Computer Performance, ActiveX Errors and much more. Click here to check it out NOW!