| Attention Before you read this post, I highly recommend you check out my resources page for access to the tools and services I use to not only maintain my system but also fix all my computer errors, by clicking here! |
When having conversations with friends of mine, one thing I found was that they tended to be rather annoyed by having so much unwanted applications on their system, which only helps to consume hard drive space which could otherwise be put to better use. When attempting to remove these programs, they would be faced with a number of uninstall problems. As someone who literally lives on their computer, I know how it feels to have to use a system that is slowly deteriorating in front of your eyes. So when you’ve attempted to remove an application using all of the conventional methods (i.e. Add or Remove Programs, Application Uninstaller), what is there left for you to do? Uninstalling a program is usually a very simple procedure, which shouldn’t take you anymore than a couple of minutes; however, it’s fairly common for errors to occur during this process.
The uninstallation process of an application is very similar to the way it is installed. Each application comes with an installer/uninstaller that is unique to it, it’s this component that is responsible for both installing and uninstalling the program from your computer. The installer/uninstaller component of the application is created by the developer to interact with specific Microsoft services in order to successfully add or remove the program. The method in which this component works varies because of the amount of files and the type of resources that an application requires during the installation and uninstallation phase.
Causes Of Uninstall Problems
There are quite a few reasons why an application on your computer fails to successfully remove itself from your computer. These installer/uninstaller programs rely on certain resources in order to function, and thus may fail if these resources are not functioning properly or are not present on your system. The Microsoft Windows Installer (MSI) service is used by many software developers as part of the uninstaller component of their applications. However if the MSI service fails to work, then it can prohibit you from installing and uninstalling programs from your system. The reasons why the MSI service may cease to work, vary somewhat, it could be due to a missing essential resource or conflicts within the Windows registry. If you’re currently experiencing Windows Installer errors, then you should check out my post on how to successfully remedy these errors.
Although MSI errors are the main culprit for uninstall problems, there are other reasons why it may fail.
- The applications uninstaller has become corrupted.
- The applications uninstaller is missing files.
- The MSI service has been disabled.
- The MSI service is missing vital resources required for it to run.
The vast majority of uninstall problems faced by users are due to a corrupt Windows registry and/or Windows Installer service. In other cases, the issue may be due to the applications uninstaller. There are some uninstallers that leave behind folders and program files after the process, which may be due to share file violation issues. These remaining files and folders must then be removed by the user.
Are you currently battling with uninstall problems? Have you recently initiated an uninstall process on an application only for it to not work, for some odd reason? In order for you to completely remove this application/program from your system, there are a number of steps that must be taken. Following, are the exact steps that you should take to manually remove an application from your computer.
Use Express Uninstaller
Express Uninstaller is an uninstallation tool that is capable of removing any corrupted application that Windows add/remove applet cannot. It does this by deploying a number of techniques, such as, running the applications InstallShield, scanning the system hard drive for remnants of the application, and also scanning the registry and removing all related entries, effectively eliminating your uninstall problems.
It carries out all of the methods that I have outlined below, but without the required level of expertise, as it’s all done with the single click of a button. This makes Express Uninstaller the recommended option. You can grab a hold of this excellent tool from the following link:
CLICK HERE TO CHECK OUT EXPRESS UNINSTALLER
 The solution(s) below are for ADVANCED level computer users. If you are a beginner to intermediate computer user, I highly recommend you use the automated tool(s) above! The solution(s) below are for ADVANCED level computer users. If you are a beginner to intermediate computer user, I highly recommend you use the automated tool(s) above! |
Manually Removing an Application
One thing that you should keep in mind is that there are some applications that require their own uninstall tools in order to remove them. An example of this would be Adobe Flash Player. In order for you to remove this program from your system, you will have to download an uninstaller tool from Adobe’s website. However, this is just an exception, as most uninstall problems you’re having with an application can be solved by following the instructions below.
Show Hidden Files
The first thing you’ll want to do is make hidden files visible, to do this, do the following.
1. First, ensure you’ve logged into your computer with administrative rights.
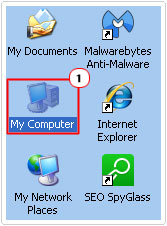
2. Then double click on My Computer on your desktop. [Windows Vista/7: Computer]
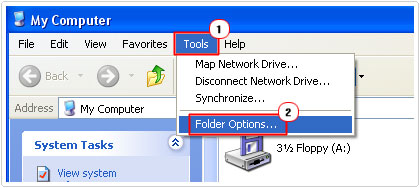
3. Once My Computer loads up, click on Tools -> Folder Options. [Windows Vista/7: Organize -> Folder and search options]
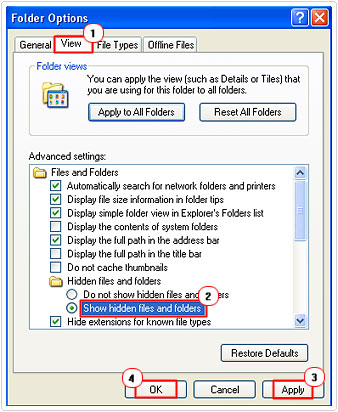
4. This will bring up a Folder Options applet, click on the View Tab, then click on Show hidden files and folders, then Apply and OK.
Run Uninstaller
The next step you should take is to run the applications uninstaller in order to verify whether the error is due to the Windows Installer or the applications uninstaller. This can be done by doing the following.
1. First, ensure you’re logged into your computer with administrative rights.
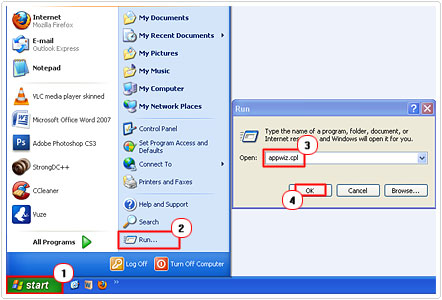
2. Then click on Start -> Run [Windows Vista/7: Press  + R], type appwiz.cpl and click on OK.

3. This will load up Add or Remove Programs [Windows Vista/7: Uninstall or change a program], from here, scroll down to the program and click on Remove. [Windows Vista/7: Uninstall]
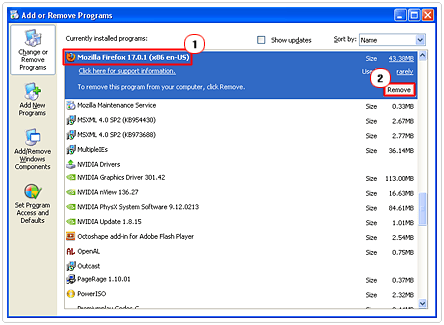

If you receive an error message stating:
“The Windows Installer Service could not be accessed”
Then it means your uninstall problems are due to the MSI service, you should therefore read my guide on how to repair Windows Installer errors.
Any other error message indicates it’s a problem with the actual programs uninstaller component. Therefore continue reading for information on how to manually remove the program/application.
Note: You should take extra precautions when manually removing an application from your computer. The steps outlined in this tutorial involve editing your registry. Incorrectly editing the Windows registry can result in your system being rendered inoperable.
Stop Running Processes
Before you attempt to remove the program, you’ll want to ensure that the program is not/no longer running in the background. To do this, do the following.
1. First, click on Ctrl+Alt+Delete to load up Windows Task Manager.
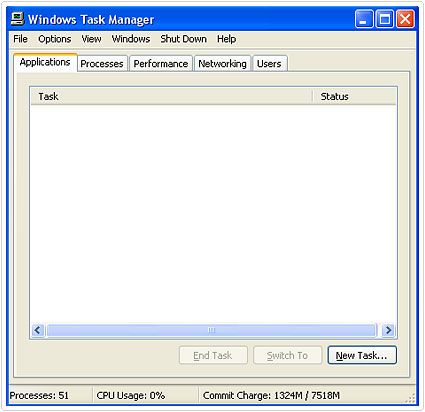

2. Once the applet loads up, click on the Processes Tab.
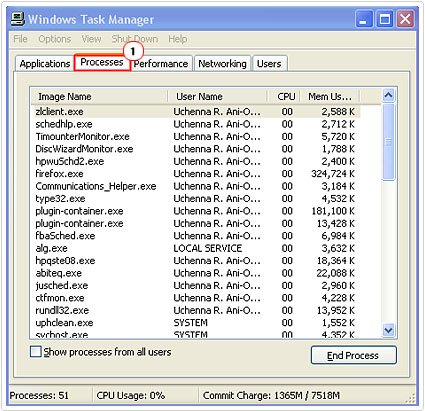

3. Then search through the processes (under Image Name) till you find one related to application you intend to remove. Then click on it and click on End Process, followed by Yes, to the warning dialog box.
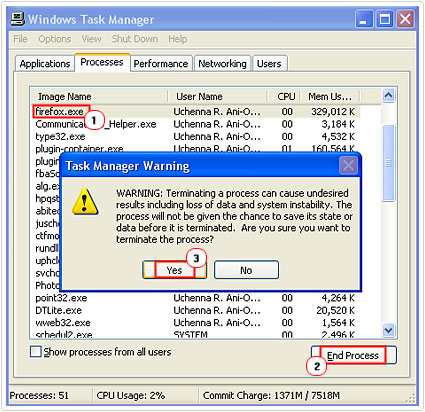

Alternatively, you could boot the system into safe mode. To do this, you can check my post on removing Trojan horse viruses.
Delete the Program Shortcut
The next step is to remove all shortcuts for the application on your computer. To do this, do the following.
1. First, click on Start -> All Programs.
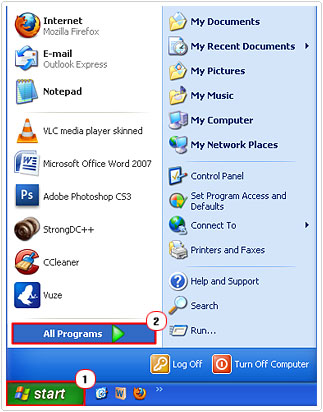

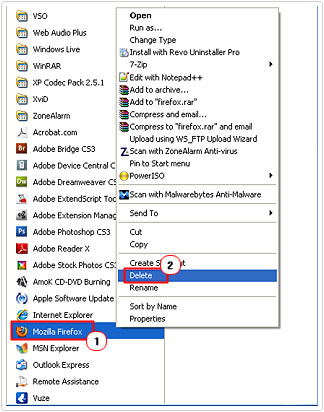
2. Locate the application shortcut then right click on it and select Delete.

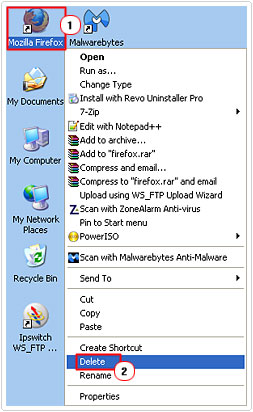
3. Then navigate to your desktop and find the application shortcut (if it exists) and right click on it and select Delete.

Delete the Program Files
Now you’ll want to remove the files for the application, this can be done, by doing the following.
1. First, right click on the Start button and select Explore.
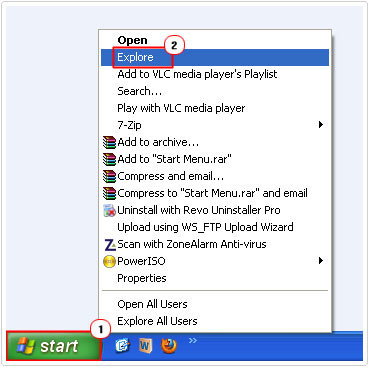

2. On the left pane, click on the + besides your primary drive (which should be C:\), then click on the Program Files or Program Files (x86) folder.
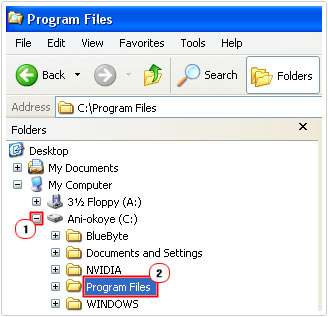

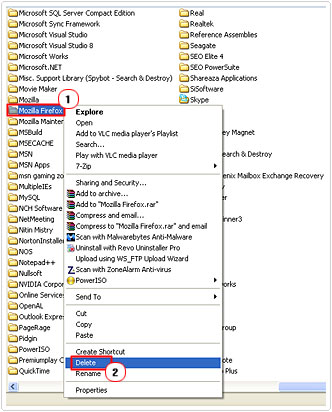
3. On the right pane you will be able to find the folder for the application you want to delete. Simply right click on it and select Delete.

Delete Application Data
The Application Data folder is where options settings for your applications are stored, so you’ll want to remove the data contained here, as you won’t need it anymore. Anyway, begin by doing the following.
1. First, click on Start -> Run [Windows Vista/7: Press 


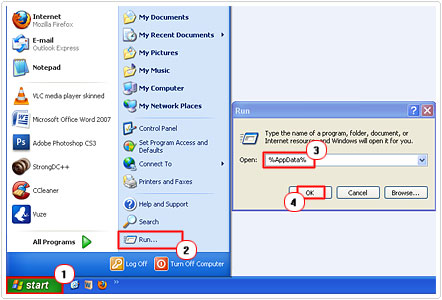

2. This will bring up the Application Data folder. From here navigate to the folder belonging to the application and right click on it and select Delete.
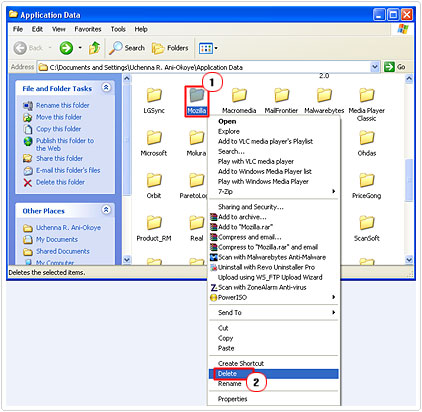

Note: Make sure the folder that you delete only contains data for the application you are uninstalling.
Delete All Registry Entries
During the installation phase, the installer will make entries within your registry which are used for a number of tasks. As part of the uninstallation process, you’ll want to remove these entries. This can be done by accessing the registry and removing all entries belonging to the application in questions; to do this, simply following the instructions on my post on fixing registry errors.
After you have carried out all the steps above, be sure to restart your system.
Following all the steps that I have outlined above should result in the successful removal of an application on your computer, a process you can carry out again and again to rectify any possible future uninstall problems.
Run a Registry Scan
Using a tool that can automatically scan your registry for traces of the recently uninstalled application is a viable alternative to manually doing it. With the manual option, as shown above, comes the risk of rendering your system in operable if you accidently delete the wrong registry key.
This is where Advanced System Repair Pro comes into play; as it is a multifaceted registry cleaner tool, that is more than capable of cleaning your registry, which would effectively complete the last step of manual uninstall problems process. Anyway, you can find out more about this program from here:
CLICK HERE TO CHECK OUT ADVANCED SYSTEM REPAIR PRO
Are you looking for a way to repair all the errors on your computer?


If the answer is Yes, then I highly recommend you check out Advanced System Repair Pro.
Which is the leading registry cleaner program online that is able to cure your system from a number of different ailments such as Windows Installer Errors, Runtime Errors, Malicious Software, Spyware, System Freezing, Active Malware, Blue Screen of Death Errors, Rundll Errors, Slow Erratic Computer Performance, ActiveX Errors and much more. Click here to check it out NOW!

