
| Attention Before you read this post, I highly recommend you check out my resources page for access to the tools and services I use to not only maintain my system but also fix all my computer errors, by clicking here! |
Is it fair for me to assume that you recently encountered the “VAC was unable to verify your game session” error message while attempting to join an online session in Steam? This is a rather common issue that prevents users from joining specifically matchmaking games, such as Counter-Strike: Global Offensive (CS:GO). Fortunately, there are ways to tackle it.
CS:GO or Counter-Strike: Global Offensive is a very popular multiplayer FPS (first person shooter) developed by Valve (the owners of Steam) and Hidden Path Entertainment. Due to its popularity, errors can and do often occur (while playing it). The “VAC was unable to verify your game session” error message is just one of a long list of notable issues.
So, what exactly is VAC and why is it causing an error in Steam?
VAC stands for Valve Anti-Cheat System, its primary objective is to detect anomalies within the game installation files. Essentially, ensuring the game hasn’t been altered so as to allow the player to have an unfair advantage when playing against others.
VAC is a laudable system, however, it is not infallible. As there have been many instances when it has prevented the end user from joining an online game session, due to misreporting on the tampering of game files. This is what’s known as a false positive, and it does happen more often than you think.
What Causes “VAC Was Unable to Verify Your Game Session” Errors?
In short, the “VAC Was Unable to Verify Your Game Session” error message while appear as a result of the following:
- Technical fault with the game.
- Two or more apps conflicting with one another.
- Internet connectivity problems.
In the vast majority of cases, this is a result of a fault with the VAC Valve Anti-Cheat System, failing to properly verify the game installation files of the participating users. The failure may be triggered by one of the following:
- The corruption of the games installation files.
- A third-party app interfering with the game files.
So, what can you do to fix it? Continue reading to find out.
How to Fix It
There are a wide assortment of methods you can use to fix this error. So for the sake of ease, we will start with the less sophistication solutions.
It’s for that reason why I recommend that you attempt all the working solutions in the order that they appear.
Anyway, so to begin with, the first thing you want to ensure is that you’re account hasn’t been VAC-Banned.
One of the more common reasons end users may encounter the “VAC Was Unable to Verify Your Game Session” error notification is because their account received a VAC ban. So, before trying anything else. You’ll want to confirm whether or not that is the case.
To do that, follow the steps below:
1. First, boot into your system as a full administrator.
2. Then load up Steam.

3. Next, click on the Steam Icon then select Settings.
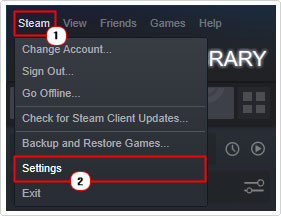
4. This should bring up the Steam Settings applet. On Accounts (Default), check besides VAC Status.

Note: If there is no ban on your account it should read: “No VAC Bans on account”. However, if it says your account has been banned. Then you should visit the VAC List site: https://vaclist.net/
Once on this site, you will need your SteamID, which you can acquire by doing the following:
1. Open Steam, then click on your Username (top-right hand corner) and select View my profile.

Note: Your SteamID will be in your Steam community URL (after profiles):
https://steamcommunity.com/profiles/0000000000000000
2. Now, type this number into the SteamID, URL, or Vanity Name box and click on Search.

Note: This will take you to a page where you will be able to establish when the ban occurred.
If your account was recently banned. Then Valve may be still investigating the incident. In which case, it’s possible the ban may be removed automatically over time.
However, if the ban has been there for a while, then you will have to create a brand new account, if you want to continue your online gaming sessions – as there is no process of appeal.
The next thing you should try is a simple system reboot.
It’s possible you have a third-party tool, such as a Virus scanner or disk defragmenter accessing the game files at the same time VAC is trying to verify those files. In instances like this, a system reboot should help.
So, close all apps, then restart your system.
Once the system has successfully rebooted, you can try Steam again.
Run Windows Repair Tool to Fix “VAC Was Unable to Verify Your Game Session” Errors
If the solutions above failed to fix the “VAC Was Unable to Verify Your Game Session” error, then you may want to try using a Windows repair tool next.
The tool I have in mind is a advanced repair solution and is capable of fixing a plethora of problems on your computer within a single scan.
Expect it to fix registry errors, file corruption and loss as well as virus/malware infections.
It’s also equally adept at fixing fatal system errors, like BSOD, runtime and DLL.
Additionally, it will optimise the performance of your system, making it run like the first day you purchased it.
If any of that interests you, then I suggest you visit the link below:
CLICK HERE TO CHECK OUT THE ADVANCED REPAIR TOOL
 The solution(s) below are for ADVANCED level computer users. If you are a beginner to intermediate computer user, I highly recommend you use the automated tool(s) above! The solution(s) below are for ADVANCED level computer users. If you are a beginner to intermediate computer user, I highly recommend you use the automated tool(s) above! |
Restart Steam Client
It’s possible a glitch in the Steam app has led to the “VAC Was Unable to Verify Your Game Session” error message. An easy way of resolving this is to simply re-login into your account, and if the error persists, then restart the app.
To do that, follow the steps below:
1. Boot into your system as a full administrator, then load up Steam.
2. Next, click on your Username (top-right hand corner) and select Sign out of account.

3. A Sign out confirmation box should appear, simply click on Confirm to complete the process.

4. Once you’ve signed out, the Steam Login box should appear, simply input your login details and click on Sign in.

You can now try entering a game session, to see whether or not this has fixed the problem. However, if the error persists, then you should try restarting Steam.
To do that, follow the steps below:
1. From Steam Client, click on the Steam Icon, then click on Exit.

2. Now, open Steam Client again, then click on Steam Icon -> Go Offline.

3. Next, follow step 1 again.
4. Open up Steam Client, then click on Steam Icon -> Go Online.

5. Now you can try launching the problematic game, to see whether or not this has fixed it.
Run Steam as Admin
It’s possible the “VAC Was Unable to Verify Your Game Session” error is due to Steams inability to access the games installation files. The result of invalid file permissions.
To grant the Steam full access to the files on your system, you could try running it as an administrator. This is a relatively simple process. Just do the following:
1. Boot into your system as an admin. Then right-click on the Steam shortcut and select Run as administrator.

Run Game as Administrator
Similar to the first issue, it’s possible a permissions issue on the side of the game is the culprit of this error. To eliminate this as a possibility, you must grant full administrative rights to the game in question.
To do that, follow the steps below:
1. Boot into Windows as an administrator.
2. Then press  + R, type … and click on OK.
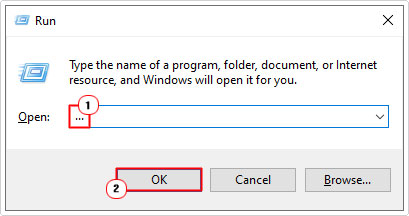
3. When File Explorer loads up, type the following into the Directory box and press Enter:
C:\Program Files (x86)\Steam\steamapps\common
4. Now, double-click on the folder of the game.

5. In the Game Folder, locate the .exe file, then click on it and select Properties.

6. This will bring up the Game Properties applet, from here, click on the Compatibility Tab, and then tick the box for Run this program as an administrator and click on OK.

Now you can try running the game through Steam to see whether or not this solved the problem.
Change Steam Username (& Avatar)
As innocuous as this may seem, many end users have been able to successfully fix this error, simply by changing their steam name and avatar. However, this has to be done, specifically, when the game is active.
1. So, boot into Windows as an admin, then load up Steam and start the game.
2. When the game is running, press Alt + Tab, to go back to desktop, then click on your Username and select View my profile.
3. Now, click on Edit Profile.

4. In the Profile Name box (On the General option), enter a new name.

5. Now scroll down and click on Save.

6. Next, click on Avatar.

7. Then click on a new Avatar.

8. Lastly, scroll down and click on Save.

Note: Alternatively, you can click on Upload your avatar.

This will bring up an Open applet, select your Avatar file, and then click on Open. Click on the Save button, when you’re happy.

Verify File Integrity
The “VAC Was Unable to Verify Your Game Session” error can occur when the files for the game in question are either missing or corrupted. In situations like this, the game files can be restored by using Steams file integrity feature.
For step-by-step instructions on how to access and use this feature, check out my post on fixing Steam_api64.dll is missing.
Repair Steam to Fix “VAC Was Unable to Verify Your Game Session” Errors
It’s possible the Steam Client software itself has been corrupted. In instances like this, you can repair it by doing the following:
1. Boot into Windows as an admin.
2. Then press + R, type cmd and press CTRL + Shift + Enter.
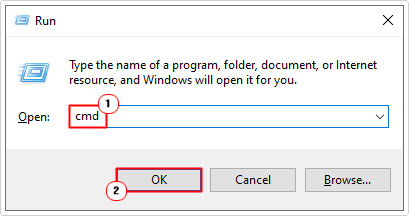
3. When Command Prompt loads up, type the command below and press Enter.
“C:\Program Files (x86)\Steam\bin\SteamService.exe” /repair
Note: Wait for the process to complete.
3. Now open Steam to verify whether or not the error has been fixed.
Are you looking for a way to repair all the errors on your computer?

If the answer is Yes, then I highly recommend you check out Advanced System Repair Pro.
Which is the leading registry cleaner program online that is able to cure your system from a number of different ailments such as Windows Installer Errors, Runtime Errors, Malicious Software, Spyware, System Freezing, Active Malware, Blue Screen of Death Errors, Rundll Errors, Slow Erratic Computer Performance, ActiveX Errors and much more. Click here to check it out NOW!