| Attention Before you read this post, I highly recommend you check out my resources page for access to the tools and services I use to not only maintain my system but also fix all my computer errors, by clicking here! |
DLL errors are not uncommon, with wpcap.dll errors, being but one of many of its kind. Applications run based on commands and lines of code, but there’s a lot more that goes into it. DLL files are integral, not just to the operating system, but the functionality of many programs you may want to use on your computer.
The wpcap.dll file is a vital part of the WinPcap tool, developed by CACE Technologies. The purpose of this tool is to enable link-layer access on your Windows based computer. There are a wide number of applications on your computer that use it, including maintenance suites and computer games.
In this tutorial, you will find several viable solutions for rectifying its many associated errors.
What Causes Wpcap.dll Errors?
When issues occur with the wpcap.dll file, usually it is caused by one of the many likely culprits below:
- The wpcap.dll file has been corrupted or erased.
- Related Windows settings have been altered.
- The system has been infected with a malicious file.
- Windows registry has been corrupted.
Error Messages
When wpcap.dll errors occur, the end user will usually encounter an error message. However, these error messages may vary, depending on the situation and circumstances. The most common wpcap.dll error messages, however, tend to be the following:
The file wpcap.dll not found.
Wpcap.dll file is missing.
This application failed to start because wpcap.dll was not found. Reinstalling the application may fix the error.
These error messages may occur while installing or running a specific application. They may also appear while starting or shutting down your operating system.
When rectifying any issue, taking note of when the error occurs, is probably the most important aspect of the troubleshooting process.
Wpcap.dll errors occur on a wide variety of programs, and operating system. Such as Windows 2000, XP, Vista, 7, and 8.
How to Fix It
The solution you adopt, will depend greatly on when and how the error occurs.
If the wpcap.dll error occurs due to issues with the WinPcap tool, then that should be a simple fix. Just reinstall the program, and the error should be resolved. In most cases, the WinPcap utility tool will come with the application that actually uses it.
So the first thing you’ll want to do, is uninstall the program(s) that the error occurred in.
When reinstalling any program, uninstallation is the most vital aspect. This is because you want every trace of the program removed, so that, issues, errors, corruptions are not inherited, when you install the program again.
The easiest and simplest way to remove a program, is to use the built-in add or remove programs utility, provided by the operating system. You can find step-by-step instructions on how to use it, from my post on repairing zlib1.dll errors.
However, if the error persists, then you may want to try downloading the WinPcap tool manually. You can do that, by visiting the official website (WinpCap.org).
If both of the solutions above fail, only then do I recommend you attempt the solutions below.
Run a Registry Scan to Fix Wpcap.dll Errors
One of the most significant causes of wpcap.dll errors, is corruption within the Windows registry. If you don’t know what the registry is, well, it’s basically a very large database, which is used to store important information. Like settings data for both your hardware components and applications.
However, despite the obvious importance of the registry, it is highly susceptible to data corruption. A result of its continued use, by the operating system. When data within this area of the operating system gets corrupted, the only way to fix it is by using a specialised registry repair tool, such as Advanced System Repair Pro.
Advanced System Repair Pro will scan, detect and repair a wide plethora of problems in your system, and in doing so, rectify the issue causing the wpcap.dll error.
You can learn more about this tool, and how it will help you, from the following link:
CLICK HERE TO CHECK OUT ADVANCED SYSTEM REPAIR PRO
Run a Virus Scan
Another probable cause for the wpcap.dll error is a virus. Viruses can be scanned for and removed by using an antivirus tool. However, there’s no way to know, whether or not an actual virus is to blame, without first running a virus scan. So I recommend you go ahead and do that. Run a full scan of your system, with whatever internet security solution you have installed on it.
That said, if you don’t have an antivirus tool, for whatever reason, maybe your subscription run out or you’ve never paid system security much attention. Then I suggest you give my post on the best antivirus solutions, a look.
 The solution(s) below are for ADVANCED level computer users. If you are a beginner to intermediate computer user, I highly recommend you use the automated tool(s) above! The solution(s) below are for ADVANCED level computer users. If you are a beginner to intermediate computer user, I highly recommend you use the automated tool(s) above! |
Replace the Wpcap.dll File
Another solution you can adopt, which has proven highly effective at fixing wpcap.dll related errors; is the replacement of the file itself. To do that, follow the instructions outlined below:
1. First, you will need to boot into your operating system as an administrator.
2. Then download the correct Wpcap.dll file from one of the following links:
Wpcap.dll for 32-bit Windows: http://www.mediafire.com/file/68vxwe4j9rsbxud/wpcap+32.zip/file
Wpcap.dll for 64-bit Windows: http://www.mediafire.com/file/yz0cchxy7onm14a/wpcap+64.zip/file
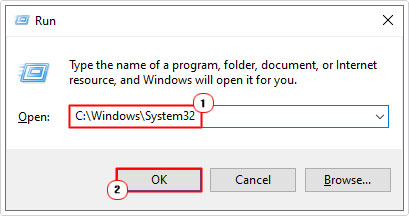
3. Once you’ve done that, press  + R, type C:\Windows\System32 and click on OK.
4. This will bring up the System32 folder, from here, locate and rename the wpcap.dll file to wpcapBACKUP.dll.
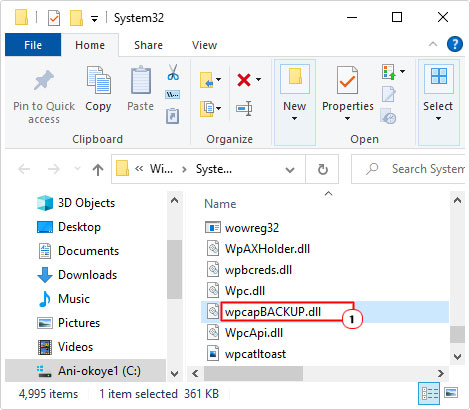

Note: To rename a file, simply right-click on the file and select rename, from the dropdown menu.
5. Next, open the Wpcap.zip file, and click on Extract To.
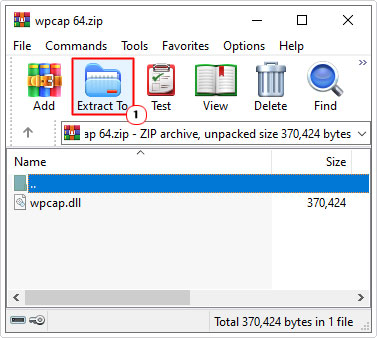

Note: This step may vary if you’re using a different utility tool. WinRAR is being used for this tutorial.
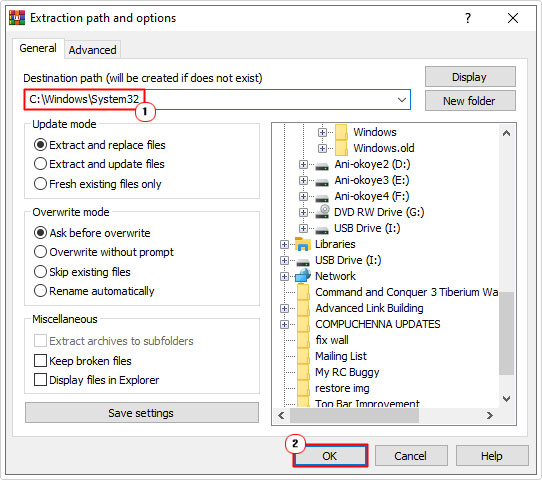
6. When the Extraction path and options applet appears, type C:\Windows\System32 into the Destination path box, then click on OK.

7. Next step is to press 


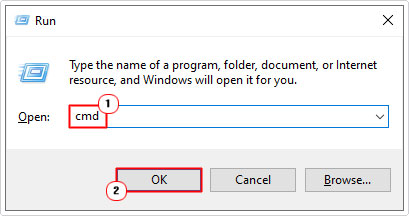

8. When Command Prompt loads up, type the code below and press Enter.
regsvr32 Wcap.dll
Update Windows
Another potential cause for the wpcap.dll error on your system, is an outdated Windows. Certain files on your computer may be too old for the wpcap.dll to interact with. In which case, you should be able to rectify the problem by updating your operating system.
However, this can be quite tricky, depending on the version of Windows you have. If you have Windows 8, then you should be able to run the following command, outlined on my post on repairing Msvcrt.dll errors.
For all earlier versions of Windows, I’d suggest you downloaded the latest service pack for it, and installed that. Since Microsoft no longer hosts these downloads, you will need to acquire it from a third-party source.
Use System Restore
If you suspect that the wpcap.dll error on your computer was due to a configuration change, i.e. alteration of a Window setting. Then you can undo this change by using System Restore.
System Restore works by setting your systems back to a previous state. These states are created automatically, during crucial moments in your day-to-day system usage. So the availability of a restore point may depend on several factors outside of your control.
That said, you can learn more about this tool, and how to use it from my post on using Windows system restore.
Run a Repair Installation
Definitely the most drastic step you may want to take. But it is possible to run a restoration, without losing any of your Windows files or programs in the process. However, I only recommend you attempt this, in the event that all else fails.
That said, check out Reimage, from the link below; a restoration tool that is designed to make this process a whole lot easier:
CLICK HERE TO CHECK OUT REIMAGE
Are you looking for a way to repair all the errors on your computer?


If the answer is Yes, then I highly recommend you check out Advanced System Repair Pro.
Which is the leading registry cleaner program online that is able to cure your system from a number of different ailments such as Windows Installer Errors, Runtime Errors, Malicious Software, Spyware, System Freezing, Active Malware, Blue Screen of Death Errors, Rundll Errors, Slow Erratic Computer Performance, ActiveX Errors and much more. Click here to check it out NOW!

